Learning frequency separation Photoshop skin retouching transformed how I approach portrait editing. After years of struggling with unnatural results and the dreaded plastic look, this technique finally gave me the control I needed. In this guide, I’ll walk you through every step of the process, from understanding what frequency separation actually does to troubleshooting common mistakes that trip up most beginners.
Whether you’re a portrait photographer looking to elevate your retouching game or a hobbyist wanting professional-looking results, this technique belongs in your Photoshop toolkit. I’ve spent countless hours refining my workflow, and I’ll share the exact settings, tools, and approaches that deliver natural-looking skin every time.
What is Frequency Separation in Photoshop?
Frequency separation is a retouching technique that splits your image into two separate layers: one containing high-frequency information (texture, pores, fine details) and another containing low-frequency information (color, tone, shadows). This separation lets you retouch each aspect independently without affecting the other.
Think of it this way: when you look at skin, you’re seeing two things at once. You see the texture—the tiny bumps, pores, and fine lines that give skin its character. You also see the underlying color and tone—the redness, shadows, and overall skin shade. Basic retouching tools affect both simultaneously, which is why blurring a blemish often creates an unnatural smooth patch.
By separating these two types of information onto different layers, frequency separation gives you surgical precision. You can smooth out uneven skin tones on the low-frequency layer while preserving every pore on the high-frequency layer. The result is retouching that looks like better skin, not fake skin.
High Frequency vs Low Frequency: What’s the Difference?
The high-frequency layer captures all the detail information in your image. This includes skin texture, individual hairs, pores, and any small imperfections. When you work on this layer, you’re affecting texture without changing color or tone. This is where you’ll remove blemishes and clean up skin texture issues.
The low-frequency layer contains the color and tone information. Here you’ll find skin color variations, shadows under the eyes, redness around the nose, and overall tonal gradations. Editing this layer affects smoothness and color without touching texture. This is where you’ll even out skin tones and reduce shadows.
The magic happens when you combine them. Your high-frequency layer sits on top, set to Linear Light blend mode, displaying all the texture. Below it, your low-frequency layer provides the color foundation. Changes to either layer stay separate, giving you complete control.
How to Set Up Frequency Separation in Photoshop
Setting up frequency separation requires following specific steps in the right order. I’ll guide you through each step with the exact settings you need. Don’t worry if this seems complex at first—after doing it a few times, the process becomes second nature.
Step 1: Prepare Your Image
Open your portrait in Photoshop. Before starting, check your image bit depth by going to Image > Mode. You’ll see either 8 Bits/Channel or 16 Bits/Channel. Note this because your Apply Image settings will differ based on bit depth. For most JPEG images, you’ll be working in 8-bit mode.
Make sure your image is on its own layer, not locked as a Background layer. If you see a padlock icon on your layer, right-click it and select “Layer from Background.” This gives you the flexibility needed for frequency separation.
Step 2: Create Two Duplicate Layers
Duplicate your image layer twice. You can do this by pressing Ctrl+J (Windows) or Cmd+J (Mac) twice, or by dragging your layer to the New Layer icon at the bottom of the Layers panel twice. You should now have three identical layers.
Rename your layers for clarity. Name the bottom duplicate “Low” and the top duplicate “High.” Your original image layer should be at the very bottom—you can turn off its visibility since we’ll work with our duplicates. Clear naming prevents confusion during retouching.
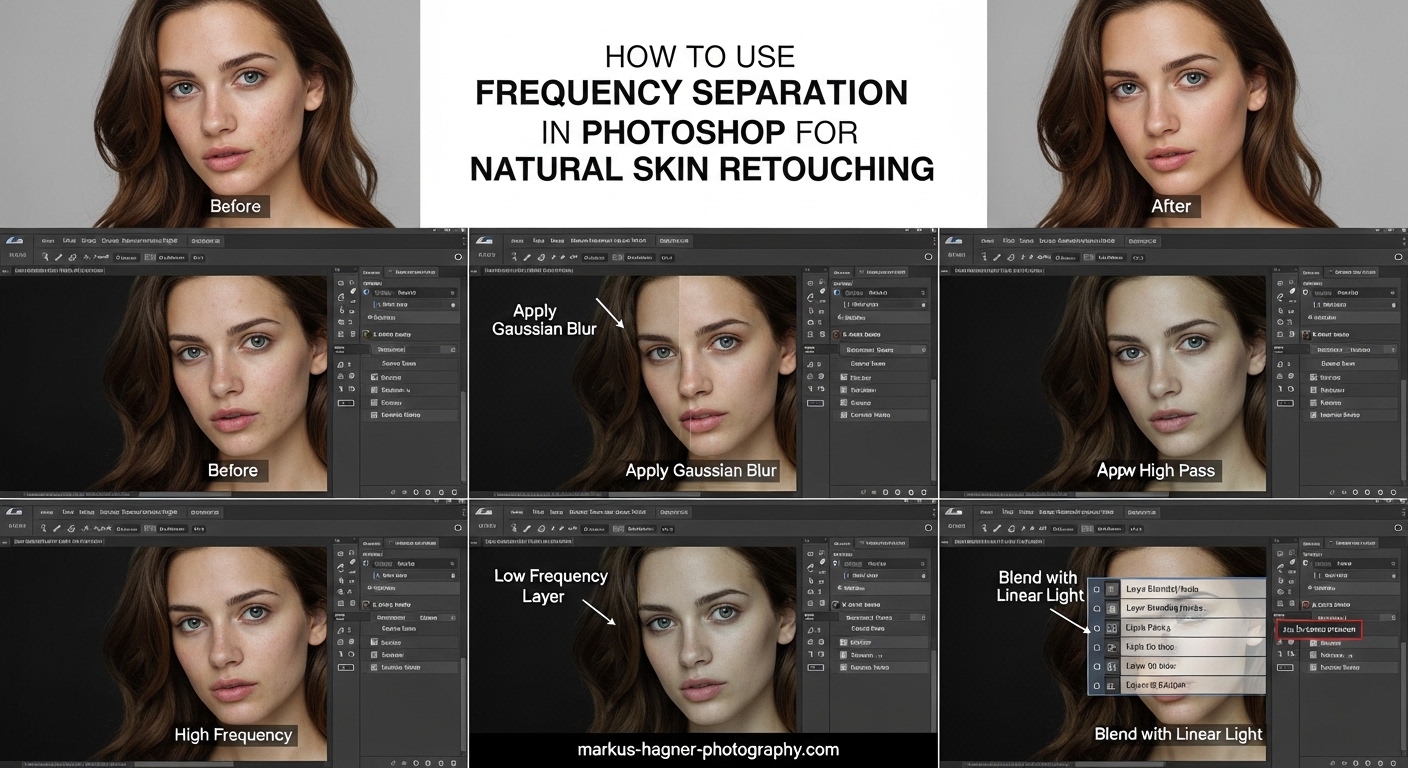
Step 3: Apply Gaussian Blur to the Low Layer
Select your Low layer and go to Filter > Blur > Gaussian Blur. This is where many people get stuck because the right radius depends on your image. The goal is to blur just enough that fine texture details disappear while major tonal areas remain visible.
For most portraits, a radius between 5 and 25 pixels works well. Here’s my approach: start with a low value like 5, then slowly increase it while watching your image. Stop increasing when you can no longer see individual pores but can still see the general facial features. For a typical headshot, 8-12 pixels often works. For larger files, you might need 15-25 pixels.
The exact number isn’t critical—what matters is that texture is gone but the overall look of the face remains. Click OK when you’ve found the right amount.
Step 4: Prepare the High Layer with Apply Image
Now comes the technical part where bit depth really matters. Select your High layer, then go to Image > Apply Image. This dialog box has several critical settings that must be exact.
For 8-bit images, set Layer to “Low” (your blurred layer), Channel to RGB, Blending to “Subtract,” Scale to 2, and Offset to 128. The Preview checkbox lets you see results in real-time. When these settings are correct, your High layer will look grey and flat—that’s normal and exactly what we want.
Click OK. Your High layer now contains only the texture information extracted from the original image.
8-bit vs 16-bit Apply Image Settings
The Apply Image settings change based on your image bit depth. Using wrong settings is one of the most common mistakes I see.
For 8-bit images: Blending = Subtract, Scale = 2, Offset = 128
For 16-bit images: Blending = Subtract, Scale = 2, Offset = 32768
The difference in Offset values accounts for the larger color range in 16-bit images. If your result looks wrong—too dark, too bright, or heavily posterized—double-check these settings. Many tutorials only mention 8-bit settings, leaving 16-bit users confused when their results look incorrect.
Step 5: Set the Blend Mode to Linear Light
With your High layer still selected, change its blend mode from Normal to Linear Light. You’ll find the blend mode dropdown at the top of the Layers panel. This step is crucial—without Linear Light mode, the layers won’t combine correctly.
When you switch to Linear Light, something magical happens: your image should look exactly like the original again. If it doesn’t match the original, something went wrong in the previous steps. The most common culprits are wrong Apply Image settings or applying Gaussian Blur to the wrong layer.
At this point, you have a working frequency separation setup. Your Low layer holds color and tone information. Your High layer holds texture information. Both combine to recreate your original image, but now you can edit each independently.
How to Use Frequency Separation for Skin Retouching
With your frequency separation set up, the real work begins. This is where you’ll actually improve the skin while maintaining natural texture. I’ll cover techniques for both the low and high frequency layers, plus the tools that work best for each.
Low Frequency Retouching: Color and Tone
Select your Low layer. Remember, this layer contains only color and tone information—all the texture is on the High layer above. This means any changes here affect smoothness and color without touching pores or fine details.
The most effective tool for low frequency work is the Mixer Brush tool. Find it nested under the Brush tool in your toolbar. Set it to “Moist” preset, with Load at around 20-30% and Mix at 90-100%. This setting picks up color and spreads it smoothly without creating harsh edges.
Paint over uneven areas like redness around the nose, shadows under the eyes, or blotchy skin tones. The brush samples the color and spreads it, effectively smoothing out transitions. Work with a soft brush slightly larger than the area you’re correcting.
For larger areas, another approach works well: make a loose selection with the Lasso tool around the problem area, apply a small Gaussian Blur (2-4 pixels), then deselect. This technique smooths color variations within your selection without affecting the overall look.
Always work gently. The goal is reducing distractions, not creating perfectly uniform skin. I typically work at 50-70% brush opacity, building up changes gradually rather than making dramatic shifts in a single stroke.
High Frequency Retouching: Texture Work
Select your High layer. This layer contains all the texture detail—pores, fine lines, and surface imperfections. Here you’ll clean up blemishes and problem areas while preserving the overall skin character.
The Healing Brush tool is your primary weapon for high frequency work. Select it from the toolbar (it looks like a bandage) or press J. In the options bar, set Sample to “Current & Below”—this ensures you’re sampling from both texture layers combined.
For blemish removal, Option-click (Mac) or Alt-click (Windows) on clean skin near the problem area to sample texture. Then paint over the blemish. The tool replaces the problem texture with your sampled texture, blending the edges seamlessly.
The Clone Stamp tool offers more control for certain situations. Unlike the Healing Brush, it doesn’t blend—what you sample is exactly what you get. Use it when you need precise texture replacement without any automatic blending. Keep opacity at 100% for texture work.
A critical tip: zoom in to at least 100% when doing high frequency retouching. You need to see individual pixels to make clean corrections. Working at lower zoom levels leads to sloppy results that become obvious when viewed at full size.
Combining Techniques for Natural Results
Professional retouching rarely relies on just one technique. After your frequency separation work, I recommend adding dodge and burn on a separate layer for subtle contouring. This adds dimension back to the face without touching your FS layers.
Work back and forth between layers as needed. If you smooth too much on the Low layer, you can add some texture variation back. If you remove too many blemishes on the High layer, you’ve lost natural character. The beauty of frequency separation is the ability to adjust each aspect independently.
Tips to Avoid the Plastic Look
The number one complaint about frequency separation is creating that fake, plastic appearance. This happens when retouching goes too far, removing all skin character. After making this mistake many times myself, I’ve developed guidelines that keep results natural.
First, never eliminate all texture. Real skin has pores, fine lines, and slight variations. When you look at your high frequency layer during retouching, some texture should remain visible. If the skin looks completely smooth, you’ve gone too far. Step back and restore some texture.
Second, work at reduced opacity. I do most of my low frequency smoothing at 50-70% opacity. This prevents over-smoothing in a single stroke and forces me to build up changes gradually. It’s much easier to add more smoothing than to undo excessive retouching.
Third, compare with the original frequently. Keep your original image layer visible and toggle your retouching layers on and off. This reality check prevents you from drifting too far from natural. If the difference is dramatic, you’re probably over-retouching.
Fourth, know when to stop. The goal isn’t perfect skin—it’s reducing distractions while maintaining character. I follow the 80% rule: fix about 80% of the problems, leaving 20% of natural variation. This approach creates results that look like good skin, not retouched skin.
Finally, step away and return with fresh eyes. After extended retouching, your perception adjusts to the edited version. Taking a break and coming back reveals whether you’ve crossed into unnatural territory.
Common Mistakes and Troubleshooting
Even with careful attention, problems arise. Here are the most common issues I encounter and how to fix them.
Your Image Looks Grey After Apply Image
If your High layer looks grey and doesn’t restore to normal after setting Linear Light, check your Apply Image settings. The most common cause is selecting the wrong layer in the Apply Image dialog—you should be selecting “Low” as the source, not “Merged” or another layer. Also verify your Scale and Offset values match your bit depth.
Halos Appear Around Edges
White or dark halos around the face, hair, or edges indicate your Gaussian Blur radius was too large for the image. The blur spread across edges, creating artifacts. Reduce your blur radius and recreate the frequency separation. Smaller radius values prevent this issue.
Results Look Posterized or Banded
Visible color bands or posterization usually means 16-bit Apply Image settings were used on an 8-bit image. Double-check your Offset value: 128 for 8-bit, 32768 for 16-bit. Using the wrong value creates immediate visible problems.
Changes Don’t Appear to Work
If you paint on a layer and see no changes, verify you’re working on the correct layer. It’s easy to think you’re on Low when you’re actually on High, or vice versa. Also check that your brush opacity isn’t set too low to see results.
Wrong Sampling Causes Strange Results
When using the Healing Brush on the High layer, make sure Sample is set to “Current & Below,” not just “Current Layer.” Sampling only the current layer gives incorrect results because you need texture context from both layers combined.
Creating a Frequency Separation Action
After setting up frequency separation manually a few times, you’ll want to automate it. Creating a Photoshop action saves the entire setup process as a single click.
Open the Actions panel (Window > Actions) and create a new action. Name it something clear like “Frequency Separation 8-bit.” Click Record, then perform all the setup steps: duplicate layers twice, name them, apply Gaussian Blur, run Apply Image with correct settings, and set Linear Light blend mode. Click Stop when finished.
Now whenever you need frequency separation, just play the action. Create separate actions for 8-bit and 16-bit workflows since the Apply Image settings differ. This simple automation has saved me hundreds of hours over the years.
FAQ
What is frequency separation in Photoshop?
Frequency separation is a retouching technique that separates image information into two layers: high frequency (texture, pores, fine details) and low frequency (color, tone, shadows). This allows you to edit each independently for natural-looking skin retouching.
What Gaussian blur radius should I use for frequency separation?
For most portraits, use a radius between 5-25 pixels. Start at 5 and increase until individual pores disappear but facial features remain visible. Typical headshots work well with 8-12 pixels, while larger images may need 15-25 pixels.
What are the Apply Image settings for frequency separation?
For 8-bit images: Blending = Subtract, Scale = 2, Offset = 128. For 16-bit images: Blending = Subtract, Scale = 2, Offset = 32768. Always select your Low layer as the source in the Apply Image dialog.
How do I avoid the plastic look when retouching skin?
Work at reduced opacity (50-70%), keep some visible texture, compare frequently with the original, and follow the 80% rule—fix most problems but leave natural variation. Stop retouching before skin looks completely smooth.
What blend mode should the high frequency layer use?
Set the high frequency layer blend mode to Linear Light. This mode correctly combines the texture information with the color information from the low frequency layer below, restoring the original image appearance.
Why does my frequency separation look grey?
A grey appearance after Apply Image is normal—the High layer should look grey before setting blend mode to Linear Light. If it stays grey after Linear Light, check that you selected the Low layer in Apply Image settings and verify your Scale and Offset values.
What tools work best for high frequency retouching?
The Healing Brush tool with Sample set to Current and Below works best for blemish removal. The Clone Stamp tool offers precise control for texture replacement. Work at 100% zoom or higher for clean corrections.
Can frequency separation be used for non-destructive editing?
Yes. Work on duplicate layers rather than the original, and use layer masks to limit edits to specific areas. You can also convert layers to Smart Objects before applying Gaussian Blur for additional flexibility.
Conclusion
Frequency separation Photoshop skin retouching is a technique that takes practice to master, but the results justify the learning curve. By separating texture from color and tone, you gain precise control that basic retouching tools simply cannot provide. The key is using this power responsibly—enhancing without creating artificial perfection.
Remember the fundamentals: set up your layers correctly with the right Apply Image settings for your bit depth, work gently on each layer with appropriate tools, and constantly compare your progress to the original. The plastic look comes from over-retouching, not from the technique itself.
I recommend practicing on test images before working on client photos. Set up frequency separation several times manually before creating an action—understanding each step helps you troubleshoot when things go wrong. Once comfortable, you’ll find this technique becoming an essential part of your portrait workflow.
The best retouching is invisible. Viewers should notice beautiful skin, not obvious retouching. With frequency separation and a restrained approach, your portraits will look naturally polished rather than artificially processed.