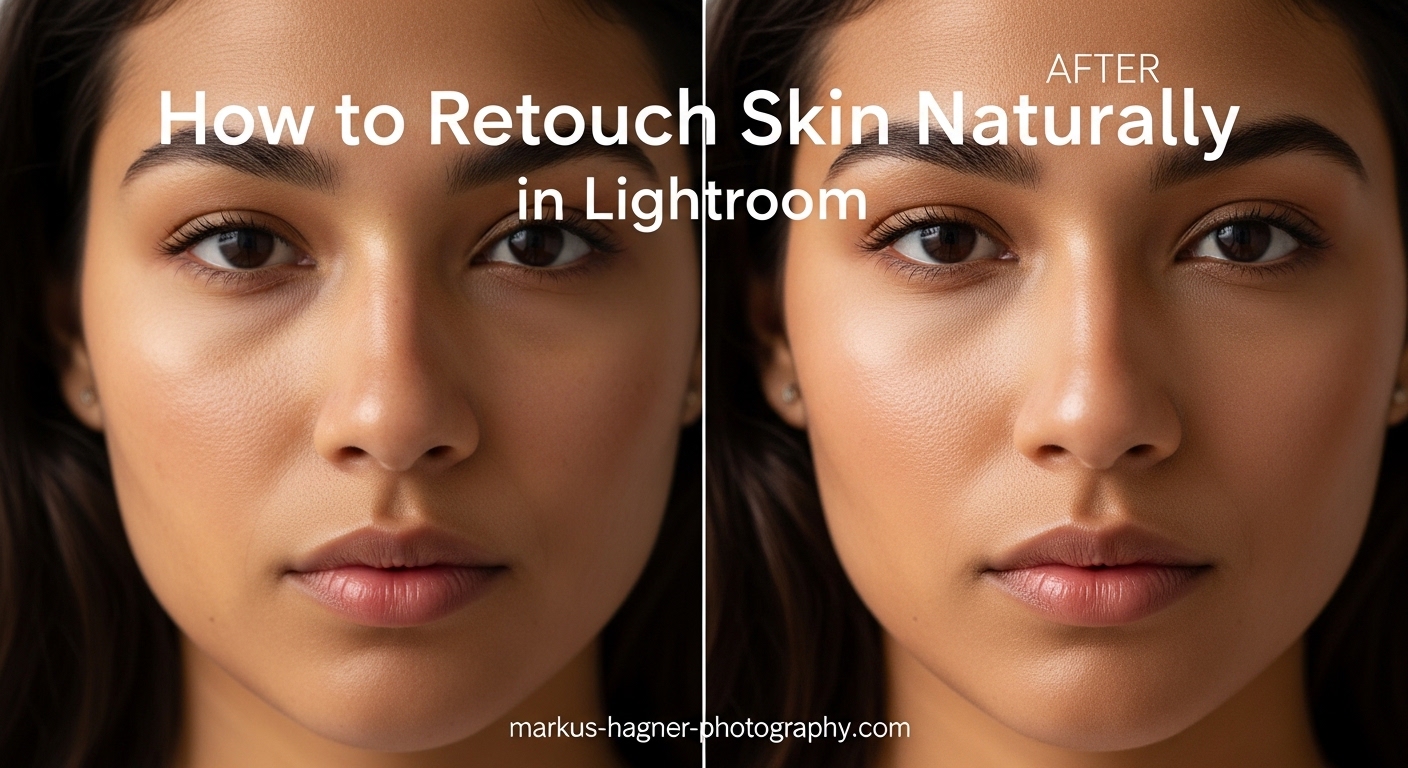
I have seen too many portraits ruined by heavy-handed skin smoothing. The plastic, airbrushed look that erases every pore and freckle does not flatter anyone. After editing thousands of portraits over the past decade, I have developed a Lightroom workflow that smooths skin while keeping it looking authentically human.
This guide teaches you how to retouch skin naturally in Lightroom without losing texture. You will learn specific slider values, brush techniques, and the common mistakes that separate amateur edits from professional results. Whether you shoot weddings, headshots, or street portraits, these techniques will elevate your editing.
By the end, you will understand how to use the Adjustment Brush, Spot Healing tool, and Clarity slider together for skin that looks polished yet real. Let us dive into the workflow that has become my standard for every portrait session.
Why Retouch Skin Naturally?
Natural skin retouching serves one purpose: removing distractions while preserving what makes a person unique. Blemishes, temporary redness, and stray hairs draw attention away from the eyes and expression. But freckles, moles, pores, and natural skin texture tell a story about the person in front of your camera.
The goal is not perfection. It is polish. When you over-smooth skin, you strip away the subtle details that make portraits compelling. Viewers subconsciously notice something is off even if they cannot pinpoint why. The image looks artificial, and the connection between subject and viewer weakens.
Professional photographers know that skin texture preservation separates good edits from great ones. Clients want to look their best, but they also want to look like themselves. My approach gives you both results.
Understanding Skin Tones and Texture
Before you touch a single slider, understand how skin tones behave in Lightroom. Skin contains undertones that range from warm (yellow, orange, peach) to cool (pink, red, blue). Different undertones respond differently to adjustments, especially white balance and saturation changes.
Skin texture includes pores, fine lines, and natural variations in tone. These elements create depth and dimension. When you smooth skin aggressively, you flatten these variations. The result is that waxy, doll-like appearance everyone wants to avoid.
Freckles and beauty marks deserve special consideration. These are identifying features, not flaws. I never remove them unless specifically requested. When smoothing skin around freckles, use a smaller brush size and lower flow settings to work carefully around these details.
Different skin tones also require different approaches. Darker skin often shows texture more prominently, which means you might need gentler smoothing settings. Lighter skin can show redness more easily, so color correction may be part of your workflow.
Preparing Your Image for Skin Retouching
Never start skin retouching on a raw, unadjusted image. Basic corrections create a solid foundation and prevent you from fighting color and exposure issues while trying to smooth skin. I follow this preparation sequence on every portrait.
First, adjust white balance. Skin tone accuracy depends on getting this right. Use the eyedropper on a neutral gray area or manually adjust temperature and tint until skin looks natural. Warmer temperatures add yellow; cooler temperatures add blue.
Second, set proper exposure. I aim for skin that looks properly lit without blown highlights. Use the histogram as your guide. If skin looks too dark, increase exposure slightly. If it looks washed out, bring it down.
Third, adjust contrast and highlights. I typically reduce highlights slightly to recover detail in bright skin areas. A subtle contrast reduction can also help skin look softer before you even begin retouching.
Fourth, zoom to 100% for detailed work. Skin retouching requires seeing actual pixels. You cannot judge smoothing quality at fit-to-screen view. Press the spacebar and click to zoom into different facial areas.
Step 1: Remove Blemishes with the Spot Healing Tool
The Spot Healing tool (Q key) should always be your first step. Removing blemishes before smoothing prevents you from blending imperfections into surrounding skin. This tool samples nearby texture and blends it seamlessly.
Access the Spot Healing tool from the toolbar or press Q. In the tool panel, set your brush size slightly larger than the blemish you are targeting. I typically work with sizes between 10-30 pixels depending on image resolution.
Set feather to around 50 for soft edges. Opacity should stay at 100 for full removal. Lightroom offers two healing modes: Heal and Clone. Heal blends texture and tone from surrounding areas. Clone copies pixels exactly. I use Heal for 95% of blemish work.
Click directly on each blemish you want to remove. Lightroom automatically samples from nearby areas. If the result looks unnatural, click and drag to manually select a better sample area. Look for skin with similar texture and lighting.
Remove temporary imperfections like pimples, redness spots, and stray hairs. Do not remove permanent features like moles, scars the subject is proud of, or freckles unless specifically asked. When in doubt, leave it.
Work systematically across the face. I start at the forehead and move down through cheeks, nose, and chin. This ensures nothing gets missed. Take breaks and look away from the screen periodically. Fresh eyes catch mistakes.
Step 2: Smooth Skin with the Adjustment Brush
The Adjustment Brush (K key) is your primary tool for skin smoothing. This localized editing tool lets you paint adjustments exactly where you need them. When configured properly, it creates that natural skin smoothing Lightroom is known for.
Press K to activate the Adjustment Brush. In the tool panel on the right, you will see various sliders. These are the exact settings I use for natural skin smoothing:
Clarity: -25 to -35. This is the magic slider for skin smoothing. Negative clarity reduces mid-tone contrast, which softens skin without destroying detail. I rarely go below -35. Going too far creates that plastic look.
Sharpness: +25 to +40. This counteracts the softness from negative clarity. The combination of reduced clarity and increased sharpness smooths skin while preserving pore texture. This balance is key to natural results.
Texture: -10 to -20. The Texture slider (available in newer Lightroom versions) affects fine detail differently than Clarity. I use it sparingly for additional smoothing on problem areas.
Now configure your brush behavior. Set Flow to around 50. This builds up effect gradually as you paint, giving you control. Keep Density at 100. Feather should be high, around 75-100, for soft transitions between edited and unedited areas.
Auto Mask can help stay within skin boundaries, but I often turn it off for smoother painting. It sometimes creates harsh edges. Test both approaches and see what works for your image.
Paint over skin areas only. Avoid eyes, eyebrows, lips, nostrils, and hair. These areas need sharpness and detail. If you accidentally paint over them, hold Alt (Option on Mac) and paint to erase that portion of the mask.
Work in sections. Paint across the forehead, then each cheek, then the nose and chin. This methodical approach ensures even coverage. Toggle the Show Selected Mask Overlay option (O key) to see exactly where you have painted.
After painting, assess the result at 100% zoom. The skin should look smoother but still show natural texture. If it looks too smooth, reduce the Clarity slider. If it still looks rough, increase negative Clarity slightly.
You can create multiple brush adjustments for different face areas. The forehead might need different settings than the cheeks. Click New at the top of the Adjustment Brush panel to create additional adjustments.
Save these settings as a preset for future use. Click the Custom dropdown at the top of the brush panel and choose Save Current Settings as New Preset. Name it something like “Natural Skin Smoothing.” This saves time on future edits.
Step 3: Preserve Natural Texture
Texture preservation separates amateur edits from professional work. The previous steps created a foundation. Now we refine for natural-looking results that do not scream “edited.”
First, check your work at multiple zoom levels. At 100%, skin should show pores and fine texture. At 50%, it should look smoother but still natural. At fit-to-screen, the portrait should look polished without appearing artificial.
Range Masking adds precision to your edits. This advanced technique helps target only skin tones, protecting eyes and hair from your smoothing adjustments. With your Adjustment Brush mask active, scroll down to the Range Mask section.
Select Color from the Range Mask dropdown. Use the eyedropper to sample skin tones in your image. Hold Shift and click multiple areas to add to the selection. Lightroom will now only apply your smoothing to similar colors.
Adjust the Amount slider to fine-tune the range. Higher values include more colors; lower values restrict the effect to closer matches. This prevents your smoothing from affecting lips, eyes, or background elements.
For images with varied skin tones, create separate brush adjustments for different areas. The forehead might have different coloring than the cheeks due to lighting. Treating them separately gives better control.
Protect freckles and beauty marks by painting around them with a small brush. If you accidentally smooth over them, use the Eraser mode (hold Alt/Option) to restore detail. These unique features add character to portraits.
Consider the eyes separately. Create a new Adjustment Brush with positive Clarity and Sharpness. Paint lightly over the irises and eyelashes to make them pop. This contrast between sharp eyes and smooth skin draws viewers to the most important part of a portrait.
Finally, step back and assess the entire image. Sometimes we get lost in the details and lose sight of the big picture. Take a break, return with fresh eyes, and ask yourself: does this person look like themselves?
Common Mistakes to Avoid
After teaching this workflow to hundreds of photographers, I see the same mistakes repeatedly. Avoiding these pitfalls will immediately improve your results.
Mistake 1: Over-smoothing. Setting Clarity to -100 destroys texture completely. Skin looks like plastic. Stay in the -25 to -35 range for natural results. You can always add another adjustment if needed, but you cannot recover lost texture.
Mistake 2: Ignoring skin undertones. Applying the same settings to every portrait fails because skin varies. Darker skin often needs gentler adjustments. Very fair skin might show redness that needs color correction before smoothing.
Mistake 3: Painting over facial features. Smoothing eyes, eyebrows, or lips creates an unnatural, blurry look. Stay on skin only. Use a smaller brush size around detailed areas for precision.
Mistake 4: Working at wrong zoom levels. Smoothing looks different at 50% versus 100%. Always check your work at actual pixel size. What looks perfect zoomed out might reveal problems up close.
Mistake 5: Removing character marks. That scar, those laugh lines, those freckles tell a story. Removing them strips personality from portraits. Smooth around these features rather than erasing them.
Lightroom Mobile: What is Different?
Lightroom Mobile offers skin smoothing capabilities, but with limitations compared to the desktop version. Understanding these differences helps you adapt the workflow for on-the-go editing.
The mobile app includes the Healing Brush for blemish removal. It works similarly to desktop, though with less precision. Tap the Healing icon, adjust brush size with the slider, and tap blemishes to remove them.
Selective edits on mobile use a different interface. Tap Selective, then the plus icon, then Brush. Paint over skin areas to create a mask. The available sliders include Texture, Clarity, and Sharpness, though with less granular control than desktop.
I recommend starting with Texture around -15 and Clarity around -20. Sharpness can go to +30. These gentler settings compensate for the less precise control on mobile devices.
Mobile editing works best for quick social media posts or when you need fast turnaround. For important portraits or print work, stick with Lightroom Classic on desktop. The precision difference is significant.
One mobile advantage: you can edit on a tablet with a stylus. This gives more brush control than finger editing. If you do extensive mobile editing, consider an iPad with Apple Pencil or equivalent Android setup.
How to Retouch Skin Naturally in Lightroom: Frequently Asked Questions
How do I improve skin texture in Lightroom?
To improve skin texture in Lightroom, use the Adjustment Brush with Clarity set to -25 and Sharpness set to +25. Paint over skin areas while avoiding eyes and lips. This combination smooths skin while preserving natural pore texture. Always work at 100% zoom to judge results accurately.
How do I smooth skin in Lightroom without losing texture?
The key to smoothing skin without losing texture is the Clarity and Sharpness combination. Set Clarity to a negative value between -25 and -35 to reduce mid-tone contrast. Then add positive Sharpness between +25 and +40 to restore fine detail. This balance keeps skin looking polished but natural.
How do I fix blemishes in Lightroom?
Use the Spot Healing tool (Q key) to fix blemishes in Lightroom. Set brush size slightly larger than the blemish, feather to 50, and use Heal mode. Click directly on pimples, redness spots, and temporary imperfections. For better results, manually drag to select a clean sample area nearby if the automatic sampling looks unnatural.
How do I get perfect skin tones in Lightroom?
Perfect skin tones start with accurate white balance. Use the eyedropper on a neutral gray area or manually adjust Temperature and Tint. Warmer temperatures add yellow; cooler adds blue. For color corrections, use the HSL panel. Target orange and red luminance to brighten skin without affecting the whole image.
What is the difference between Texture and Clarity for skin smoothing?
Clarity affects mid-tone contrast and creates broader smoothing effects. Texture targets fine detail more precisely. For skin, use Clarity between -25 to -35 for general smoothing. Add Texture at -10 to -20 only if additional softening is needed. Clarity has more impact; Texture is subtler and better for minor refinements.
How do I avoid the plastic or airbrushed look when smoothing skin?
Avoid the plastic look by keeping Clarity above -35 and adding positive Sharpness. Never use maximum negative Clarity values. Preserve freckles, pores, and natural skin variations. Step away from your edit and return with fresh eyes. If skin looks too smooth at 100% zoom, reduce your Clarity setting.
Final Thoughts on Natural Skin Retouching in Lightroom
Learning how to retouch skin naturally in Lightroom without losing texture takes practice, but the workflow is straightforward. Remove blemishes first with the Spot Healing tool. Apply gentle smoothing with the Adjustment Brush using Clarity at -25 to -35 and Sharpness at +25 to +40. Preserve unique features like freckles and moles. Check your work at 100% zoom.
The best skin retouching is invisible. When done right, viewers notice a great portrait, not the editing. They see the person, not the technique. That is the standard to aim for.
Start with these settings, then adjust to your style and your subjects. Every face is different, and your approach should adapt accordingly. The more portraits you edit, the better your intuition becomes. Now open Lightroom and put these techniques to work on your next image.