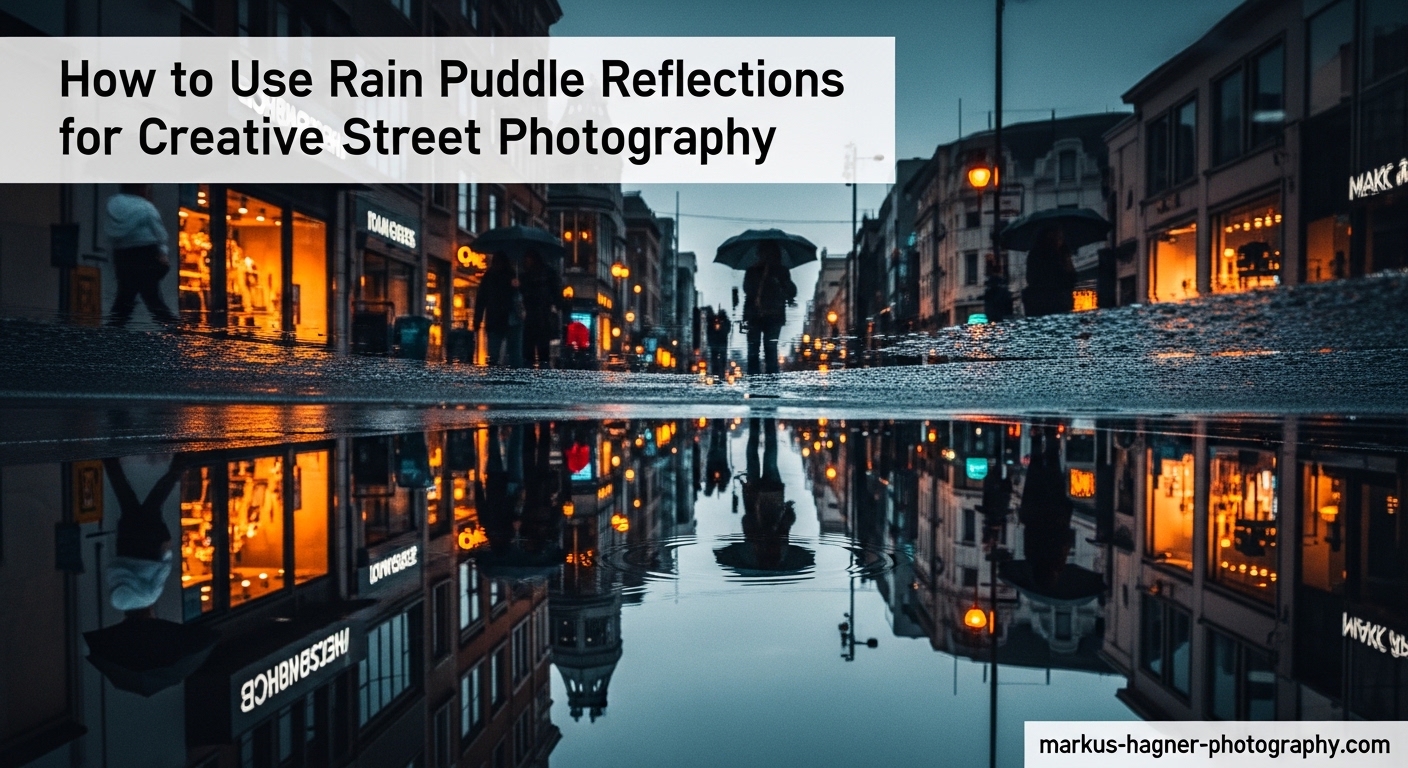
There’s something magical that happens when rain transforms ordinary streets into reflective canvases. I still remember the first time I crouched beside a puddle in downtown Seattle, camera hovering inches above the water, capturing an upside-down cityscape that looked more like a dream than reality. That moment changed how I see rainy days forever.
In this guide on how to use rain puddle reflections for creative street photography, you’ll learn everything from finding the perfect puddles to mastering camera settings that deliver sharp, striking reflection shots. Whether you’re shooting with a professional mirrorless camera or your smartphone, these techniques will help you turn wet streets into your creative playground.
Rainy weather often sends photographers running for cover, but those who embrace it discover a world of visual opportunities most people never notice. Puddle reflections add drama, symmetry, and an almost surreal quality to urban scenes that simply doesn’t exist when the ground is dry.
Why Puddle Reflections Transform Street Photography
Rain puddle reflections create unique street photography opportunities by turning the ground into a natural mirror. When you capture these reflections, you’re essentially photographing two worlds at once: the real one above and its inverted twin below. This dual perspective adds layers of visual interest that transform mundane street corners into cinematic scenes.
The reflective surface of a puddle acts like a wide-angle lens, capturing broad swaths of sky, buildings, and street life in a compact frame. A small puddle can reflect an entire city block, creating a “mirror world in miniature” effect that compresses vast scenes into intimate compositions.
Beyond the technical appeal, puddle reflections tell stories about urban life that feel more atmospheric and moody than typical street shots. The combination of wet surfaces, reflected lights, and the transient nature of puddles (they appear and disappear with weather) gives your images an ephemeral quality that resonates with viewers.
Finding the Perfect Puddles for Reflection Photography
The success of your puddle reflection photography depends heavily on location scouting. Not all puddles are created equal, and knowing what to look for will dramatically improve your results.
Location Scouting Tips
Urban areas with dark asphalt offer the best canvases for reflection photography. Dark surfaces absorb light rather than reflecting it, which means the puddle’s reflection becomes the brightest element in your frame. Parking lots, city streets, and paved plazas after rain provide ideal conditions.
Look for puddles near interesting architectural features, neon signs, or busy pedestrian areas. A puddle reflecting a historic building or colorful storefront will always be more compelling than one reflecting empty pavement.
Consider the time after rainfall carefully. The first 30-60 minutes after rain stops often provides the best conditions. Puddles are fresh and undisturbed, the ground is wet enough to create complementary reflections around the main puddle, and the light often has a soft, diffused quality from lingering clouds.
Evaluating Puddle Quality
Water clarity matters enormously for sharp reflections. Seek puddles with clear water rather than muddy ones. Fresh rain puddles typically offer the best clarity before debris settles or traffic disturbs them.
Stillness is golden in puddle photography. Even a gentle breeze can create ripples that blur your reflection. The calmest conditions usually occur in the early morning or late evening when winds die down. If you encounter ripples, try waiting a few minutes for the water to settle, or position yourself to block the wind with your body.
The angle of your light source affects reflection quality too. Direct overhead sunlight can create harsh glare on the water surface, while angled light (morning, evening, or reflected off buildings) tends to produce clearer, more contrasty reflections.
Size and Depth Considerations
Larger, shallower puddles often work better than deep ones because they spread across more surface area while maintaining a flat reflective plane. A puddle that extends several feet in front of you will capture more of the sky and surrounding environment than a small concentrated pool.
That said, don’t overlook smaller puddles entirely. Sometimes a tiny reflection of a single street light or person can create a more intimate, focused composition than a sprawling one.
Depth affects how much of the reflected scene you can capture. A shallow puddle with a flat bottom gives you a clear, undistorted reflection. Deeper puddles can create interesting distortions and refractions, which might work for abstract compositions but generally reduce sharpness.
Essential Gear for Puddle Reflection Photography
One of the beautiful aspects of puddle reflection photography is that virtually any camera can produce stunning results. The technique matters more than the equipment.
Camera Options
DSLR and mirrorless cameras give you the most control over settings, but compact cameras and smartphones work surprisingly well. Modern phones with their small sensors and wide-angle lenses can get extremely close to water surfaces, making them naturally suited for this type of photography.
If using a smartphone, enable grid lines for composition assistance and use the exposure lock feature to prevent the bright reflection from throwing off your metering. The latest smartphones even offer manual controls through third-party apps that let you adjust focus and exposure independently.
Cameras with articulating screens or tilt screens have a distinct advantage. You can compose your shot without lying on the wet ground. Simply flip out the screen, position your camera low, and frame your composition while standing or crouching.
Lens Recommendations
Wide-angle lenses (16-35mm on full frame) excel at puddle photography because they capture expansive reflections and emphasize the relationship between the puddle and its environment. Standard lenses (35-50mm) work well for more focused compositions where you want less distortion.
Telephoto lenses can compress the scene and isolate specific elements within a reflection, but they require more distance from the puddle, which reduces the reflection’s prominence in your frame.
If you’re using a zoom lens, you’ll appreciate the flexibility to adjust your framing without moving your camera position. This is especially valuable when you’ve carefully positioned your camera at the perfect low angle and don’t want to disturb it.
Useful Accessories
A polarizing filter (CPL) helps control glare on the water’s surface, though use it carefully. Some photographers prefer the natural sheen of wet pavement, while others want maximum reflection clarity. Rotate the filter while viewing your scene to see the effect.
A mini tripod or GorillaPod allows you to position your camera at extreme low angles without lying on wet ground. For smartphone photographers, a simple phone holder with a small stand works wonders.
Weather protection for your gear is essential. A rain cover for your camera, microfiber cloths for wiping splashes, and a waterproof bag for storage will keep your equipment safe during wet shooting sessions. A small towel in your bag gives you something to kneel on when the ground is wet.
A remote shutter release eliminates camera shake when shooting at slow shutter speeds. This becomes especially important for night puddle photography or when using a tripod at low angles where touching the camera might disturb your composition.
Camera Settings and Techniques for Sharp Reflections
Getting technically sound reflection shots requires understanding how different settings affect your final image. Here’s what works best for puddle reflection photography.
Aperture Settings
Use a narrow aperture between f/8 and f/16 for the best results. These settings provide sufficient depth of field to keep both the puddle surface and the reflected content sharp. At wider apertures like f/2.8, you risk having parts of your reflection fall outside the focus plane.
The exact aperture depends on your distance from the puddle and the focal length you’re using. When shooting very close to the water, even f/8 might not provide enough depth of field, so you may need to stop down further or focus stack multiple images.
Diffraction becomes a concern at very small apertures (f/22 and smaller). Your image may actually lose overall sharpness despite the increased depth of field. For most situations, f/11 or f/16 provides the best balance between depth of field and optical quality.
Shutter Speed Considerations
A faster shutter speed (1/125 second or faster) helps freeze any residual movement in the water and prevents blur from camera shake when shooting at awkward low angles. If you’re handholding your camera close to the ground, your natural stability decreases, making faster speeds important.
For night puddle photography with street lights and neon signs reflecting, you’ll need slower shutter speeds. In these cases, a tripod becomes essential, and you can embrace longer exposures that might introduce slight blur from passing cars or walking pedestrians.
Consider using your camera’s burst mode when shooting handheld. Taking several frames in quick succession increases your chances of getting a sharp shot, especially when you’re in an unstable low-angle position.
ISO Management
Keep your ISO as low as possible (ISO 100-400) to maintain image quality and avoid noise in the darker portions of your reflection. The high contrast between bright reflections and dark pavement can amplify noise if you’re shooting at higher ISOs.
When shooting at night, you may need to increase ISO to maintain a reasonable shutter speed. Modern cameras handle higher ISOs well, but try to stay below ISO 1600 if possible for the cleanest results.
The Critical “Get Low” Technique
This is the single most important technique in puddle reflection photography. The lower you position your camera to the water’s surface, the larger and more prominent the reflection becomes in your frame.
When your camera is high above the puddle, you see mostly the water’s surface with a small reflection. As you drop lower, the reflection grows until it dominates the frame. At extremely low angles, the reflection can appear larger than the actual scene above it.
I’ve found that getting the lens within 2-4 inches of the water surface produces the most dramatic results. This often means crouching, kneeling, or even lying on the ground. Some photographers use right-angle viewfinders or their camera’s articulating screen to compose without contorting themselves.
The physics behind this is straightforward. When you look at a puddle from above, the angle of reflection means you only see a small portion of the reflected scene. As your viewing angle decreases (camera gets lower), the angle of reflection changes, revealing more of what’s reflected in the water.
Focusing on Reflections
Autofocus can struggle with water surfaces because the reflection appears behind the actual focal plane (the water’s surface). Your camera might focus on debris floating in the puddle rather than the reflection itself.
Manual focus gives you precise control. Set your focus point on the reflection’s sharpest element, typically something with clear edges like a building outline or street light. Many cameras offer focus peaking, which highlights in-focus areas and makes manual focusing easier.
If using autofocus, try focusing on the edge of the puddle where the reflection meets the pavement, then recompose. Some photographers focus on the actual subject (like a building) and then recompose to include its reflection.
Another approach is to use single-point autofocus and position your focus point directly on the reflected subject. This works best when the reflection has strong contrast or clear edges for the autofocus system to lock onto.
Composition and Creative Approaches
Technical settings only get you partway there. How you compose your puddle reflection shots determines whether they feel like snapshots or intentional art.
Symmetrical Composition
The most common approach splits the frame horizontally, with the real world on top and its reflection below. Position your horizon line either dead center for perfect symmetry or slightly above/below center for a more dynamic feel.
Centered symmetry creates a formal, balanced composition that feels almost architectural. Off-center placement feels more candid and can lead the viewer’s eye through the frame in interesting ways.
Perfect symmetry requires careful attention to your camera angle. Even a slight tilt can throw off the reflection alignment. Use your camera’s built-in level or the grid overlay on your screen to ensure your camera is perfectly level.
Leading Lines with Reflections
Use the edges of puddles, curbs, or reflected lines to guide the viewer’s eye through your composition. A puddle positioned at the bottom of a leading line (like a row of street lights or building edges) creates a natural visual path that ends in the reflection.
Reflected lines can create unexpected leading lines that don’t exist in the real scene. The edge of a building reflected in water might point toward your subject in ways that add visual flow and direction to your composition.
The Rule of Thirds
Even with reflections, the rule of thirds applies. Position key reflected elements at intersection points rather than dead center. This works particularly well when you want to show context around the puddle rather than filling the frame entirely with reflection.
Consider placing the horizon line (where reflection meets reality) at either the upper or lower third line rather than in the middle. This creates a more dynamic composition while still acknowledging the reflection as a key element.
Making Puddles Look Bigger
To maximize a puddle’s apparent size, get extremely low and close to the water’s edge. Use a wide-angle lens and position the puddle in the foreground, letting it dominate the bottom portion of your frame. The combination of low angle and wide focal length exaggerates the puddle’s presence.
Shooting from the edge of a puddle rather than from above it creates a more immersive perspective. The reflection fills more of your frame and creates a stronger sense of entering another world.
Creative Ideas Beyond Basic Reflections
Night puddle photography opens entirely different creative possibilities. Street lights, neon signs, and car headlights create colorful, abstract reflections that feel almost painterly. The contrast between dark streets and bright reflections adds natural drama.
Include people in your reflections for added narrative interest. A reflection of a pedestrian walking through your frame creates a ghostly, transient quality. Their reflection exists only for that moment before they move on.
Abstract approaches focus on just the reflection, excluding the real world above entirely. These images look like inverted dreamscapes, with upside-down buildings and sky filling the frame without context.
Try combining puddle reflections with other street photography techniques. Long exposures can blur pedestrians while keeping their reflections sharp. Silhouettes against bright skies create dramatic contrast when reflected in dark water.
The Flip Technique
Some photographers rotate their puddle reflection images 180 degrees, making the reflection appear right-side-up while the real world becomes inverted above. This technique creates a surreal, disorienting effect that challenges viewers’ perceptions.
The flip works particularly well when the reflection is the main subject and contains the most interesting elements of your composition. Viewers often do a double-take, trying to figure out what they’re seeing.
Best Lighting and Timing for Puddle Photography
The quality and direction of light dramatically affects how your reflections appear. Understanding optimal timing helps you plan your shoots for maximum impact.
Golden Hour Advantages
The hour after sunrise and before sunset provides warm, directional light that enhances reflections beautifully. The low sun angle means light hits buildings and street features at angles that create interesting reflected content. Golden hour’s warm color temperature adds pleasing tones to both the real scene and its reflection.
The directional quality of golden hour light also creates stronger shadows and contrast, which can make your reflections appear more three-dimensional and dramatic.
Blue Hour and Night Photography
Blue hour (the period just after sunset when the sky takes on deep blue tones) combined with artificial lighting creates moody, atmospheric puddle shots. City lights begin reflecting while enough ambient light remains to illuminate buildings and sky.
Full night photography transforms puddles into mirrors for neon signs, street lights, and car trails. Long exposures can capture light streaks reflecting in the water, adding motion and energy to static scenes.
For night photography, look for puddles near sources of colorful light. Storefronts with interesting window displays, restaurants with warm interior lighting, and intersections with traffic signals all create compelling reflected content after dark.
Overcast Conditions
Overcast days offer soft, diffused light that reduces harsh contrasts. This works well when you want even illumination across your reflection without bright hotspots from direct sun. Cloud cover also creates interesting patterns in reflected sky.
Don’t avoid overcast days for puddle photography. The soft light can actually make it easier to capture details in both bright reflections and dark pavement without losing information to extreme contrast.
Best Time of Day
Early morning often provides the calmest conditions with minimal wind and foot traffic to disturb puddles. The streets haven’t yet filled with people, giving you more compositional freedom. Evening rush hour creates interesting pedestrian reflections but introduces more disturbance to water surfaces.
Consider the direction of light when choosing your shooting time. East-facing scenes receive warm morning light, while west-facing scenes get evening golden hour. Plan your location scouting around when the light will be most favorable for your chosen subjects.
Common Challenges and How to Overcome Them
Puddle reflection photography comes with unique obstacles. Here’s how to handle the most frequent problems you’ll encounter.
Dealing with Wind and Ripples
Wind creates ripples that blur reflections. If possible, wait for lulls in the wind. Position your body to block the breeze. Use faster shutter speeds to freeze any remaining movement. Sometimes a slightly rippled reflection adds character and movement that a perfectly still surface lacks.
In urban environments, buildings can create wind tunnels that disturb even protected puddles. Look for puddles in courtyards, alleys, or other sheltered areas where wind has less impact.
Avoiding Your Own Reflection
When shooting at low angles, you’ll often appear in your own frame. To avoid this, shoot from an angle rather than directly facing the reflection. Use a tripod or rest your camera on your bag while stepping to the side. Alternatively, embrace your presence and make yourself part of the composition.
Wearing dark clothing helps minimize your visibility in reflections. Your silhouette will be less distracting than a bright jacket that draws attention away from the main subject.
Dirty or Debris-Filled Puddles
Muddy water scatters light and produces soft, unclear reflections. Seek puddles with cleaner water, often found on higher ground or away from foot traffic. If debris floats in your frame, you can sometimes remove it in post-processing, or use it as a compositional element that adds texture.
Some photographers carry a small bottle of clean water to gently displace dirty surface water, creating a clearer patch for reflection. Use this technique sparingly and respectfully in public spaces.
Traffic Safety Considerations
Shooting in streets requires awareness of your surroundings. Never position yourself in active traffic lanes. Use crosswalks and sidewalks as your base, shooting into adjacent puddles. Wear visible clothing, especially during low-light conditions. If a shot requires standing in the street, skip it—no photograph is worth personal injury.
Consider bringing a friend who can watch for traffic while you focus on composing. This is especially important when you’re crouched low with limited peripheral vision.
Be aware of local laws regarding photography in public spaces. Some cities have restrictions on tripod use in certain areas, and you should always be prepared to move quickly if asked.
Weather Protection for Your Gear
Rain and wet ground pose risks to camera equipment. Use a rain cover or even a simple plastic bag with a hole cut for the lens. Keep microfiber cloths handy for wiping splashes. When setting your camera on wet ground, place it on your camera bag or a waterproof cloth first.
If you shoot frequently in wet conditions, consider investing in weather-sealed camera bodies and lenses. Many modern mirrorless cameras offer excellent weather resistance that gives you peace of mind during rainy shoots.
Post-Processing Tips for Reflection Photos
Post-processing can enhance your puddle reflection images and correct minor issues from the field.
Enhancing Reflections
Increase contrast and clarity in the reflected portion of your image to make it pop. The reflection often appears slightly darker than the real scene, so selective exposure adjustments can balance the two halves of your composition.
Saturation adjustments help compensate for the slight color loss that occurs in reflections. Be careful not to overdo it—subtlety maintains the natural feel.
The dehaze tool in Lightroom and similar software can dramatically improve reflection clarity by cutting through the slight fog that often affects reflected images.
Removing Unwanted Elements
Debris, your own feet, or distracting elements around the puddle can often be removed with content-aware fill or cloning tools. When shooting, try to capture a bit more of the scene than you need, giving yourself room to crop out distractions.
Healing brush tools work well for small debris floating in the water. For larger distractions, consider using the patch tool or even compositing multiple frames if you shot a burst.
The Flip Technique in Post
If you want to try the 180-degree rotation approach, flip your image vertically in your editing software. Some photographers flip just the reflection portion while keeping the real world right-side-up, creating a mirrored split effect.
This technique works best when your reflection contains the most interesting elements of the scene. Consider what story you’re telling with the flip—sometimes the disorientation adds meaning, other times it just confuses.
Color Grading for Mood
Puddle reflections often benefit from cooler color grades that enhance the moody, atmospheric quality. Blue and teal tones complement wet street scenes nicely. For night shots with neon reflections, embrace warmer highlights that contrast with cooler shadows.
Consider using graduated filters to apply different color grades to the reflection versus the real scene. This can help balance the two halves of your image or emphasize the otherworldly quality of the reflected portion.
How to Use Rain Puddle Reflections for Creative Street Photography: Quick Reference
Before heading out, run through this mental checklist to ensure you’re prepared for successful puddle reflection photography:
Location: Scout urban areas with dark surfaces, interesting architecture, and minimal traffic. Time your shoot for early morning calm or golden hour warmth. Check weather forecasts for recently ended rain or approaching storms.
Gear: Pack weather protection for your camera, a cloth for wiping surfaces, and a mini tripod if available. Consider bringing a polarizing filter for glare control.
Settings: Start at f/11, ISO 100-400, and 1/125 second or faster. Switch to manual focus for precise control over your reflection. Use burst mode for handheld shots.
Technique: Get as low as possible to the water surface. Position yourself at an angle to avoid your own reflection. Wait for still water between wind gusts.
Composition: Look for symmetry, leading lines, and interesting reflected subjects. Consider whether to split the frame evenly or emphasize either reality or reflection.
Frequently Asked Questions
What is the best time of day for puddle reflection photography?
The best times are golden hour (shortly after sunrise or before sunset) for warm, directional light, and blue hour for moody city scenes with artificial lighting. Early morning typically offers the calmest conditions with minimal wind to disturb water surfaces, plus fewer pedestrians to disrupt puddles or walk through your frame.
How do I get a sharp reflection in a puddle?
Use a narrow aperture (f/8 to f/16) for sufficient depth of field, a faster shutter speed (1/125 or faster) to freeze any water movement, and low ISO (100-400) to minimize noise. Focus manually on the reflection itself rather than the water surface, and ensure the water is still with no wind or ripples.
Can I do puddle reflection photography with my phone?
Yes, smartphones work excellently for puddle reflection photography because their small size allows you to get extremely close to water surfaces. Enable grid lines for composition, use exposure lock to prevent bright reflections from throwing off metering, and consider a small phone tripod for stability at low angles.
How do I avoid my own reflection in the puddle?
Shoot from an angle rather than directly facing the reflection, position yourself to the side of the puddle, or use a tripod and step away while triggering the shutter remotely. You can also embrace your presence and make yourself a compositional element in the frame.
What if the puddle is dirty or has debris?
Look for clearer puddles on higher ground or away from foot traffic where water stays cleaner. You can remove small debris in post-processing using content-aware fill or cloning tools. Sometimes floating debris adds texture and character to an image rather than detracting from it.
How do I make the puddle look bigger in my photo?
Get extremely low and close to the water’s edge, position the puddle prominently in the foreground, and use a wide-angle lens. The combination of low camera angle and wide focal length exaggerates the puddle’s apparent size and makes the reflection dominate the frame.
What aperture is best for reflection photography?
Use a narrow aperture between f/8 and f/16. These settings provide enough depth of field to keep both the puddle surface and the reflected content sharp. When shooting very close to water, you may need to stop down further or use focus stacking to maintain sharpness throughout.
How do you focus on reflections in water?
Manual focus works best because autofocus often locks onto the water surface rather than the reflection behind it. Focus on a clear edge within the reflection, like a building outline or street light. Use focus peaking if your camera offers it to highlight in-focus areas while adjusting manually.
Conclusion
Rain puddle reflections offer street photographers an endless source of creative inspiration. By mastering the essential techniques of getting low, choosing the right camera settings, and composing thoughtfully, you can transform ordinary wet streets into extraordinary visual stories.
The beauty of this approach lies in its accessibility. You don’t need expensive equipment or exotic locations. Every city has puddles after rain, and every photographer can learn to see them as creative opportunities rather than obstacles.
Next time clouds gather and rain begins to fall, grab your camera and head outside. The reflections waiting in those puddles might just become your favorite street photographs yet. Practice these techniques, experiment with different conditions, and develop your own signature style for capturing these ephemeral urban mirrors.