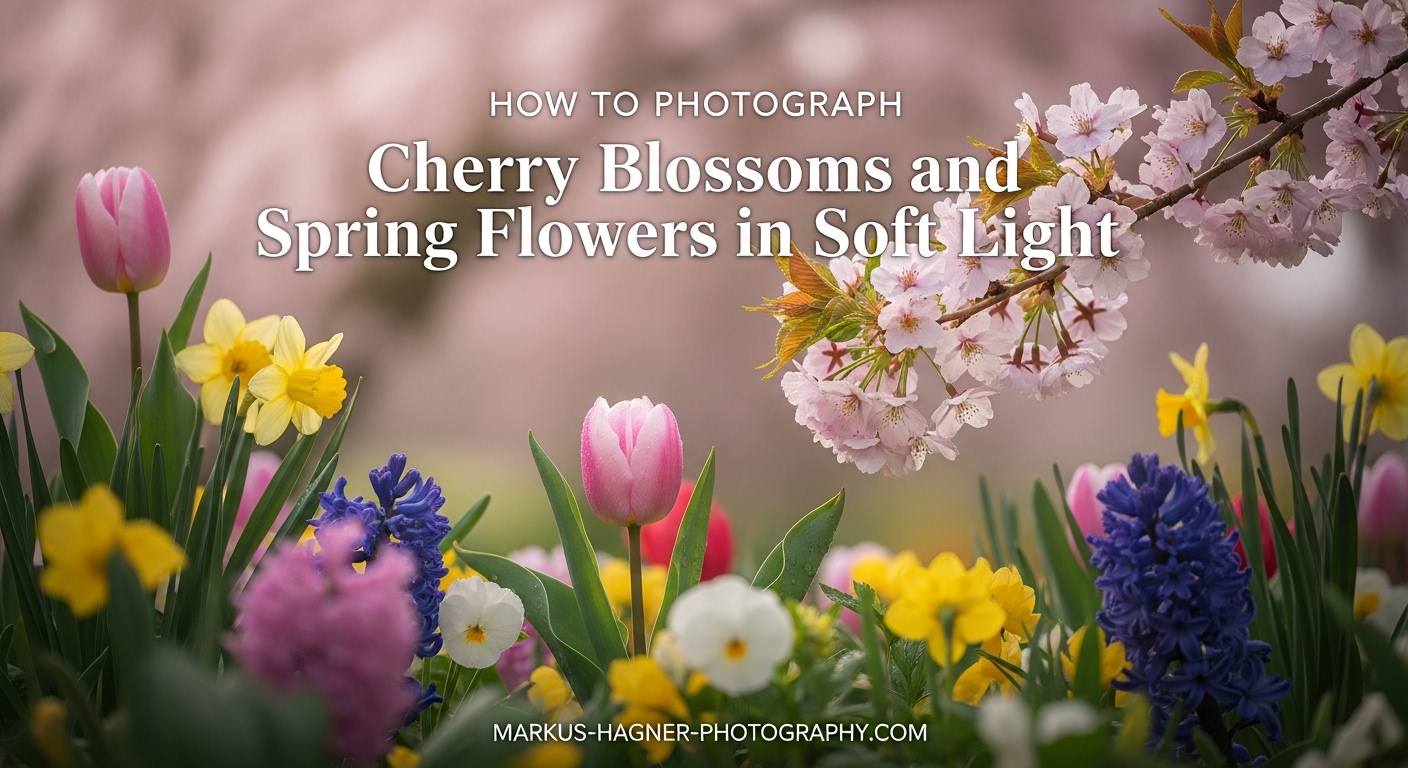
Spring arrives with a burst of color that transforms landscapes into living canvases. Cherry blossoms paint tree lines in delicate pinks while tulips, daffodils, and magnolias add their own hues to the seasonal display. Capturing these moments requires more than just pointing your camera at pretty flowers. The secret lies in understanding light, specifically how to harness soft light for cherry blossom and spring flower photography.
After years of shooting spring blooms across various conditions, I’ve learned that lighting makes or breaks flower photos. Harsh midday sun washes out those subtle pinks and creates ugly shadows across delicate petals. But soft light? That’s when the magic happens. Soft light wraps around flowers gently, revealing texture without harsh contrast and preserving the delicate color gradations that make spring flowers so captivating.
In this guide, I’ll walk you through everything you need to know about photographing cherry blossoms and spring flowers in soft light. We’ll cover the best times to shoot, essential gear recommendations, camera settings that actually work, composition techniques, and even post-processing tips. Whether you’re using a professional mirrorless camera or a smartphone with a macro adapter, these techniques will transform your spring flower photography.
Understanding Soft Light for Flower Photography
Soft light is the foundation of beautiful flower photography. But what exactly is it, and why does it matter so much for cherry blossoms and spring blooms?
What Is Soft Light in Photography?
Soft light refers to diffused, gentle illumination that creates minimal harsh shadows and wraps evenly around your subject. Think of the difference between direct sunlight on a clear day (hard light) versus light filtering through clouds or during golden hour (soft light). Hard light creates deep shadows and bright highlights with sharp transitions. Soft light creates gradual transitions between light and shadow, revealing detail across the entire tonal range.
The quality of softness comes from the apparent size of your light source relative to your subject. A small, distant light source like the sun on a clear day produces hard light. When clouds diffuse the sun, they become a large, close light source that scatters rays from multiple directions. This scattering is what creates that beautiful wrap-around quality.
Why Soft Light Matters for Spring Flowers
Cherry blossoms and spring flowers present unique challenges that soft light solves perfectly. These blooms often feature delicate, translucent petals in light colors ranging from pure white to soft pink. Hard light easily overexposes these tones, blowing out highlights and losing the subtle color variations that make each flower unique.
Soft light preserves these delicate details. It reveals the paper-thin texture of cherry blossom petals, the subtle veins running through tulip petals, and the gentle gradients in magnolia blooms. Without harsh shadows competing for attention, viewers can appreciate the full beauty of your subject.
There’s also an aesthetic quality to soft light that matches the mood of spring flowers. These blooms feel gentle, ephemeral, and dreamy. Soft light reinforces that emotional tone, creating images that feel as delicate as the flowers themselves.
Best Times of Day for Soft Light
The golden hour, that magical period shortly after sunrise and before sunset, delivers naturally soft light. During these times, the sun sits low in the sky, and its rays travel through more atmosphere. This filters out harsh rays and bathes everything in warm, directional light.
For cherry blossoms specifically, the hour after sunrise offers several advantages beyond just soft light. Morning often brings dew drops on petals, adding sparkle and dimension to your images. Parks and gardens see fewer visitors early in the day, making it easier to capture clean compositions without crowds. The light also tends to be cooler in tone during early morning, which complements pink cherry blossoms beautifully.
The blue hour, that period just before sunrise or after sunset when the sky takes on deep blue tones, offers another soft light opportunity. While less common for flower photography, it can create moody, ethereal images with a completely different feel.
Weather Conditions That Create Soft Light
Overcast days are your secret weapon for soft light flower photography. Clouds act as a massive diffuser, scattering sunlight into soft, even illumination. Many photographers avoid cloudy days, but for flower photography, they’re often ideal. The soft light prevents harsh shadows, and colors often appear more saturated without the competing brightness of direct sun.
Light overcast provides gentle, directional soft light with some shadow definition. Heavy overcast creates extremely flat, even illumination. Both work for flowers, though light overcast often produces more dimensional results. If you have a choice, partly cloudy days with thin cloud cover offer the best of both worlds.
Fog and mist take soft light to another level. These conditions not only diffuse light but also create atmospheric depth that can separate your subject from the background. Foggy morning cherry blossom shoots can yield incredibly moody, ethereal results.
Essential Gear for Soft Light Flower Photography
You don’t need expensive equipment to capture beautiful flower photos in soft light. Technique matters far more than gear. That said, certain tools make the process easier and expand your creative options.
Lens Selection for Flower Photography
Your lens choice dramatically affects how your flower photos look. Different focal lengths create different perspectives and background relationships.
Telephoto lenses in the 70-200mm range excel at flower photography. The compressed perspective makes backgrounds appear closer to your subject, creating beautiful bokeh when shooting wide open. I use my telephoto about 80% of the time when photographing cherry blossoms. The working distance also lets you isolate individual blooms without physically crowding the tree.
Macro lenses in the 90-105mm range open up a world of detail photography. These lenses let you focus close enough to fill the frame with a single flower or even a portion of one. The shallow depth of field at close focus distances creates dreamy, abstract backgrounds that make your subject pop.
Standard primes like a 50mm f/1.8 offer an affordable entry point. While not as specialized as macro or telephoto options, a fast 50mm can create beautiful flower images with soft backgrounds. The wide aperture helps in low light conditions like overcast days or golden hour.
Wide-angle lenses from 14-35mm work for environmental flower photography, showing blooms in their landscape context. These require getting close to your subject, which can create dramatic perspectives but may be challenging with elevated cherry blossoms.
Tripod vs Handheld Shooting
The debate between tripod and handheld shooting for flower photography has strong advocates on both sides. Each approach offers distinct advantages.
Tripods provide stability for slower shutter speeds, essential when shooting at low ISOs in soft light conditions. They also lock in your composition, allowing you to fine-tune every element without rushing. If you’re focus stacking for maximum depth of field or using extension tubes for extreme close-ups, a tripod becomes almost mandatory.
However, many experienced flower photographers prefer handheld shooting. The freedom to quickly change angles, move around your subject, and react to changing light often produces better results. I typically shoot handheld for flower photography because it lets me explore more compositions in less time. The key is maintaining a shutter speed fast enough to prevent camera shake, typically 1/focal length or faster.
Your choice depends on your shooting style and conditions. Windy days favor faster handheld shooting. Low light or careful composition work favors tripods. Many photographers use both approaches depending on the situation.
Reflectors and Diffusers for Creating Soft Light
When natural conditions don’t provide the soft light you want, reflectors and diffusers let you create it yourself. These affordable tools dramatically expand your shooting options.
Diffusers placed between the sun and your subject soften harsh direct light into gentle, even illumination. A simple 5-in-1 reflector with a diffusion panel works perfectly. Position it to block direct sun from hitting your flower, and watch harsh shadows disappear. This technique lets you shoot in conditions that would otherwise be too contrasty.
Reflectors bounce light back into shadow areas, reducing contrast without eliminating it entirely. White reflectors provide soft, neutral fill. Silver reflectors add more punch but can look harsh. Gold reflectors add warmth that may or may not suit your subject. For pink cherry blossoms, white or silver typically work best.
The combination of diffuser and reflector gives you complete control over lighting. Diffuse the main light from above, then reflect fill into shadows from below or the side. This setup mimics studio lighting control in the field.
Filters That Enhance Soft Light Effects
Diffusion filters have gained popularity for flower photography, and for good reason. These filters slightly soften highlights while maintaining sharpness in mid-tones and shadows. The effect mimics and enhances natural soft light qualities, creating dreamy, romantic images.
Black diffusion filters in 1/4 or 1/2 strength provide subtle effects that enhance rather than overwhelm your images. Stronger diffusion filters create more pronounced glow around highlights, which can be beautiful but may reduce overall contrast too much.
Polarizing filters help by reducing glare on glossy petals and increasing color saturation. They work best when shooting at angles to the sun rather than directly into or away from it. For overcast days, their effect is minimal.
Camera Settings for Soft Light Flower Photography
Getting your camera settings right ensures you capture the soft light qualities you’re working so hard to find. Here’s what works for cherry blossom and spring flower photography.
Aperture and Depth of Field Control
Aperture is your primary creative control for flower photography. It determines depth of field, which affects how much of your image appears sharp and how your background renders.
Wide apertures from f/1.8 to f/2.8 create very shallow depth of field. This isolates your subject against a soft, blurred background. The effect works beautifully for single flower portraits or when you want to emphasize one bloom among many. However, at these apertures, even small portions of your subject may fall outside the plane of focus.
Mid-range apertures from f/4 to f/5.6 offer a balance between subject sharpness and background blur. Most of your flower will be sharp while the background remains pleasantly soft. This range works well for most flower photography situations.
Smaller apertures from f/8 to f/11 increase depth of field, bringing more of your subject into focus. Backgrounds become more defined, which may or may not be desirable. Use these when you want environmental context or when shooting groups of flowers where multiple blooms should be sharp.
Avoid apertures smaller than f/11 for flower photography. Diffraction starts reducing overall sharpness, and backgrounds become distractingly detailed.
Shutter Speed Considerations
Shutter speed in flower photography primarily concerns two factors: preventing camera shake and freezing subject motion.
For handheld shooting, follow the reciprocal rule: use a shutter speed at least as fast as your focal length. Shooting at 100mm? Use 1/100 second or faster. On crop-sensor cameras, multiply your focal length by the crop factor first. Image stabilization lets you push this rule somewhat, but err on the side of faster speeds for critical sharpness.
Wind presents a real challenge for flower photography. Even gentle breezes set blooms swaying, creating motion blur at slower shutter speeds. In windy conditions, you may need shutter speeds of 1/250 second or faster to freeze motion. This often requires opening your aperture or raising ISO.
Some photographers embrace motion blur as a creative element. A slightly longer shutter speed with flowers swaying in wind can create impressionistic, abstract images. This works best when parts of your composition remain static, like a tree trunk or stationary foreground element.
ISO Settings for Different Lighting
ISO determines your camera’s sensitivity to light. In soft light conditions, you’ll often need higher ISOs than you’d use in bright sun, but the trade-off is increased noise.
Base ISO, typically ISO 100 or 200 on most cameras, provides the cleanest images with maximum dynamic range. Use this whenever your shutter speed and aperture allow. During golden hour with wider apertures, base ISO often works fine.
Overcast days may require ISO 400-800 to maintain reasonable shutter speeds. Modern cameras handle these ISOs well, with noise becoming visible only in deep shadows. For web and small prints, this noise rarely matters.
Early morning or evening shoots in dim conditions might push you to ISO 1600 or higher. At these settings, noise becomes more apparent, but a noisy image is better than a blurry one. Apply noise reduction in post-processing if needed.
White Balance for Accurate Flower Colors
Accurate color reproduction matters tremendously for flower photography. Pink cherry blossoms should look pink, not magenta or peach. White flowers should remain white without color casts.
Auto white balance works reasonably well in consistent lighting, but it can struggle with the mixed conditions often encountered in flower photography. Shadows under trees may read cooler than sunlit areas, creating inconsistent color.
Daylight white balance (around 5500K) provides a consistent baseline. During golden hour, this setting captures the warm tones naturally. In overcast conditions, you may want to warm the image slightly in post-processing.
For critical color accuracy, shoot a gray card or color checker at the start of your session. This gives you a perfect reference for color correction in post. Most of the time, shooting RAW and adjusting white balance in post provides enough flexibility.
Exposure Compensation for Light Flowers
Camera meters are calibrated to middle gray. When pointed at light-colored flowers like white cherry blossoms or pale tulips, they tend to underexpose, trying to make these bright subjects darker than they actually are.
Positive exposure compensation solves this problem. For white or very light flowers, start with +0.7 to +1.3 stops of compensation. Check your histogram to ensure you’re not clipping highlights. The goal is to render light flowers as light while preserving detail in the brightest petals.
For deeper colored flowers like red tulips or purple magnolias, standard metering often works fine. Some very saturated colors may even benefit from slight negative compensation to preserve color detail.
Review your images frequently and adjust compensation based on results. Each lighting situation may require different settings.
Techniques for Shooting in Soft Light
Understanding soft light is one thing. Using it effectively requires specific techniques that maximize its qualities for flower photography.
Positioning Yourself Relative to the Light
Where you position yourself relative to your light source dramatically affects your results. Even soft light has direction, and that direction shapes how your flowers appear.
Front lighting, with the light source behind you, evenly illuminates your subject. This works well for documentary-style flower photos where you want accurate color and even exposure. However, front lighting can appear flat, lacking the dimension that makes images compelling.
Side lighting creates depth and texture by casting subtle shadows across your subject. Even in soft light, this directional quality reveals the three-dimensional form of flowers. Look for light coming from the side and position yourself to take advantage of this modeling effect.
Backlighting, with your subject between you and the light source, creates dramatic effects with translucent flower petals. Cherry blossoms and many spring flowers have thin petals that glow when backlit. This technique requires careful exposure to avoid silhouettes, but the results can be stunning.
Backlighting Techniques for Translucent Petals
Backlighting transforms ordinary flower photos into luminous images that seem to glow from within. The technique works particularly well with cherry blossoms, dogwood, and other flowers with thin, translucent petals.
Position yourself so the sun (or main light source) is behind your subject, either directly behind or slightly to one side. Expose for the flower itself, not the bright background. This typically requires positive exposure compensation, sometimes as much as +1 to +2 stops.
The challenge with backlighting is avoiding flare and maintaining contrast. A lens hood helps, but you may need to shade your lens with your hand or a reflector. Watch for colorful flare artifacts that can distract from your subject.
Backlighting works best during golden hour when the sun is low and its rays are naturally soft. Midday backlighting creates too much contrast even with diffusers.
Creating Soft Light with Diffusers
When natural light is too harsh, diffusers let you create your own soft light conditions. This technique opens up shooting opportunities during times that would otherwise be unsuitable for flower photography.
Hold or position a diffusion panel between the sun and your subject. The closer the diffuser to your flower, the softer the light becomes. A diffuser held a few inches from a bloom creates dramatically different light than one held several feet away.
For larger subjects like entire cherry trees, a simple diffuser won’t cover everything. Focus on individual branches or clusters where you can control the lighting. Use the diffuser to create a pocket of soft light within an otherwise harsh scene.
White umbrellas, translucent fabric, or purpose-made diffusion panels all work. The key is material that spreads light without adding color cast. Test your diffuser by photographing a white surface with and without it to check for color shifts.
Using Reflectors to Fill Shadows
While soft light minimizes harsh shadows, some shadows remain. Reflectors bounce available light into these shadow areas, reducing contrast while maintaining the soft quality of your main light.
Position your reflector on the shadow side of your subject, opposite your main light source. White reflectors provide neutral fill that maintains color accuracy. The closer you place the reflector, the more fill light you create.
For backlit subjects, a reflector positioned below and in front of your flower can bounce light back into the front of the bloom. This prevents silhouettes while maintaining the glowing background effect.
You don’t need expensive equipment. A piece of white foam core, a white t-shirt, or even a light-colored wall can serve as a reflector. The principle remains the same: bounce light into shadows to reduce contrast.
Shooting in Overcast Conditions
Overcast days provide naturally soft, even light perfect for flower photography. Many photographers skip these conditions, missing excellent opportunities.
The even illumination of overcast conditions means you can shoot from any angle without worrying about harsh shadows. Colors appear more saturated without the competition from bright sunlight. White and pale pink flowers expose more easily without harsh highlights.
The main challenge with overcast light is maintaining dimension. Without directional shadows, images can appear flat. Create depth through composition instead: layer foreground, middle ground, and background elements; use perspective to create depth; seek out flowers at different distances from your camera.
Light overcast often produces better results than heavy overcast. Thin clouds maintain some directionality to the light while still diffusing it. Heavy overcast creates extremely flat light that can look lifeless.
Dealing with Wind and Moving Flowers
Wind ranks among the most frustrating challenges for flower photographers. Just as you compose the perfect shot, a breeze sets everything swaying. Several techniques help you cope.
Faster shutter speeds freeze motion but may require compromising on aperture or ISO. In windy conditions, prioritize a fast shutter even if it means shooting wide open or raising ISO. A sharp image with noise beats a blurry one every time.
Timing your shots between gusts works when wind is intermittent. Watch the pattern, wait for a lull, and fire a burst of frames. Continuous shooting mode increases your chances of capturing a moment of stillness.
Embracing motion blur as a creative element transforms the problem into a feature. Longer shutter speeds capture the graceful movement of swaying flowers, creating impressionistic images. This works best when some element in your frame remains static.
Physical wind blocks help in some situations. Position yourself to block wind with your body, or use a reflector or diffuser as a wind screen. For small subjects, your body creates a surprisingly effective calm zone.
Using Diffusion Filters for Dreamy Effects
Diffusion filters enhance the dreamy quality of soft light, creating romantic, ethereal images that complement spring flower subjects beautifully.
These filters work by slightly scattering light, softening highlights while maintaining shadow detail. The effect differs from soft focus, which uniformly blurs everything. Diffusion maintains sharpness in the main subject while creating a subtle glow around highlights.
Black diffusion or Pro-Mist filters in 1/4 strength provide subtle enhancement without overwhelming your image. The effect is most visible in highlights and backlit situations. Stronger filters create more obvious glow but may reduce overall contrast too much.
Use diffusion filters when natural light already has soft qualities. Adding diffusion to harsh midday light rarely improves it. The filter enhances what’s already there rather than creating softness from nothing.
Composition Approaches for Soft Light Flower Photography
Technical settings capture the light, but composition determines whether your image succeeds as art. These approaches specifically complement soft light flower photography.
Getting Low: Flower Eye Level Perspective
One of the most transformative techniques for flower photography costs nothing but requires physical effort. Getting down to flower level changes everything about your image.
Most people view flowers from standing height, looking down at blooms. This perspective feels familiar but rarely creates compelling images. Dropping to your knees, or even lying down, puts you at flower eye level, revealing a completely different world.
At flower level, you see the structure of blooms from their own perspective. Backgrounds become the sky, distant trees, or other flowers rather than the ground. This separation creates cleaner compositions with more appealing bokeh.
Low angles also reveal the translucency of backlit petals. Light passing through thin flower petals creates a glow that’s invisible from above. This effect pairs perfectly with soft light techniques.
Cameras with tilting or articulating screens make low-angle shooting easier. Without this feature, you’ll be spending time on the ground. A gardening pad or waterproof pants make the experience more comfortable.
Background Selection and Bokeh Control
Background often matters more than your subject in flower photography. A beautiful flower against a messy, distracting background fails to impress. The same bloom against a clean, complementary background becomes a stunning image.
Move around your subject to find the best background. A single step left or right can replace a cluttered background with a clean one. Look for single-color backgrounds like grass, sky, or distant foliage that won’t compete with your flower.
Distance between your subject and background affects bokeh quality. More distance creates smoother, more abstract backgrounds. When your flower is close to other elements, backgrounds become distracting even at wide apertures.
Background color matters too. Complementary colors make your subject pop: pink cherry blossoms against blue sky or green foliage create visual tension that draws the eye. Similar colors create harmonious, peaceful images.
Watch for bright spots in backgrounds that draw attention away from your subject. Dappled light, reflections, or bright sky patches create competing focal points. Reposition to eliminate these distractions.
Foreground Elements and Depth
Including foreground elements creates depth and draws viewers into your image. This technique works particularly well for environmental flower photography showing blooms in their context.
Position other flowers, branches, or foliage in the immediate foreground, close enough to your lens that they blur into abstract shapes. These out-of-focus elements frame your subject and create a sense of dimension.
The key is balance. Foreground elements should enhance, not compete with, your main subject. Keep them simple and complementary. A mass of blurry pink cherry blossoms framing a sharp cluster works beautifully. A chaotic tangle of branches creates visual noise.
Foreground elements also help with composition by creating layers. The eye moves from foreground blur through the sharp subject to the soft background, creating a three-dimensional feel in a two-dimensional image.
Rule of Thirds and Leading Lines
Classic compositional rules apply to flower photography, though soft light conditions may call for some adaptations.
The rule of thirds places your subject at intersection points rather than dead center. For single flower portraits, position the bloom at one of these points, leaving space for the flower to “breathe.” For groups of flowers, use the grid to balance your composition.
Leading lines guide the eye through your image. Branches, stems, rows of flowers, or paths all create natural lines that draw attention to your subject. In cherry blossom photography, the sweep of a branch often provides a natural leading line.
Diagonal lines create more dynamic energy than horizontal or vertical ones. A diagonal branch feels more active than a level one. Use this energy to create more engaging compositions.
Negative Space for Minimal Compositions
Sometimes what you leave out matters more than what you include. Negative space, the empty areas around your subject, creates breathing room and emphasis.
Minimal compositions with lots of negative space suit soft light flower photography perfectly. The gentle illumination and dreamy backgrounds naturally support this aesthetic. A single cherry blossom against a field of soft color creates a peaceful, contemplative image.
Sky provides excellent negative space. Shooting upward at cherry blossoms against blue sky creates clean compositions with natural color contrast. Overcast skies work too, providing a neutral backdrop that lets your subject shine.
Resist the urge to fill every corner of your frame. Let your subject have space. The empty areas aren’t wasted; they’re part of what makes the image work.
Post-Processing for Soft Light Enhancement
Post-processing lets you enhance the soft light qualities you captured and fix any issues that arose during shooting. The goal is enhancement, not transformation.
Basic Adjustments to Enhance Soft Light
Start with global adjustments that affect your entire image. These foundational changes set the stage for more targeted edits.
Exposure adjustments fix overall brightness. If you shot with exposure compensation for white flowers, you may need to fine-tune brightness. Use your histogram as a guide rather than relying on the screen preview.
Contrast control shapes the soft light feel. Lower contrast enhances the gentle quality of soft light. Higher contrast adds punch but may fight against the soft aesthetic. Find the balance that suits your vision.
Highlights and shadows sliders provide fine control over tonal range. Lowering highlights recovers detail in bright petals. Raising shadows opens up dark areas without affecting mid-tones. Both tools help manage the dynamic range that soft light naturally compresses.
Clarity and texture adjustments affect local contrast. Lower clarity enhances the soft, dreamy quality. Higher clarity adds definition that may appear harsh. For soft light flower photography, subtle reductions in clarity often improve the aesthetic.
Color Correction for Accurate Flower Tones
Accurate color matters enormously for flower photography. Spring flowers come in specific hues that viewers recognize. Off-color renditions look wrong even if viewers can’t identify exactly why.
White balance adjustments form the foundation of color correction. Even if you set custom white balance in camera, fine-tuning often helps. Pay attention to the overall color cast rather than just neutral grays.
HSL (Hue, Saturation, Luminance) controls let you target specific colors. For cherry blossoms, the pink/red/orange range matters most. Adjust hue to correct color shifts, saturation to control intensity, and luminance to brighten or darken specific colors.
Be subtle with saturation adjustments. Over-saturated flowers look artificial and lose the delicate quality that makes them beautiful. Small shifts of 5-10 points usually suffice.
Subtle Glow Effects to Enhance Dreaminess
Post-processing glow effects complement the natural glow from backlighting and diffusion filters. These techniques add to the dreamy, romantic aesthetic.
The Orton effect creates a soft glow by blending a blurred version of your image with the sharp original. Many editing programs offer this as a one-click effect. Apply it subtly; heavy Orton effects look dated and artificial.
Soft focus layers simulate diffusion filter effects in post. Duplicate your image, apply a Gaussian blur, then blend the blurred layer using soft light or overlay modes. Reduce opacity until the effect enhances without overwhelming.
Highlight glow specifically targets bright areas, creating a subtle halo around luminous petals. This works particularly well for backlit images where you want to emphasize the glowing quality.
Preserving Detail While Maintaining Soft Aesthetic
The challenge in soft light flower photography is balancing the dreamy aesthetic with sufficient detail. Your images should feel soft without looking out of focus.
Sharpening applied selectively maintains detail in your subject while preserving soft backgrounds. Use masking to limit sharpening to edges and mid-tones. Avoid sharpening smooth areas like sky or out-of-focus backgrounds.
Noise reduction helps when shooting at higher ISOs. Modern noise reduction tools can eliminate noise while preserving detail. Apply it globally or selectively depending on your needs.
Local adjustments let you treat different areas differently. Increase clarity on your main subject while reducing it in the background. Sharpen the flower while leaving bokeh untouched. This targeted approach maintains the best of both worlds.
Frequently Asked Questions
What is the best time of day to photograph cherry blossoms?
The best time is during golden hour, either the first hour after sunrise or the last hour before sunset. Early morning offers additional benefits including dew drops on petals, fewer crowds, and cooler light tones that complement pink blossoms beautifully. Overcast days also provide excellent soft light throughout the entire day.
What camera settings should I use for flower photography?
Start with aperture priority mode at f/4 to f/5.6 for a balance of subject sharpness and background blur. Use base ISO (100-200) when possible, raising it as needed for adequate shutter speed. Apply positive exposure compensation of +0.7 to +1.3 stops for light-colored flowers. Shoot in RAW for maximum editing flexibility.
What lens is best for photographing flowers?
Telephoto lenses in the 70-200mm range excel for flower photography, offering compressed perspectives and beautiful bokeh. Macro lenses (90-105mm) are ideal for close-up detail work. A 50mm f/1.8 prime provides an affordable option with pleasing background blur. Your choice depends on whether you want environmental context or isolated portraits.
How do you get soft light in flower photography?
Shoot during golden hour when natural light is soft and warm. Overcast days provide naturally diffused light throughout the day. Use diffusers to soften harsh direct sunlight, and reflectors to fill shadows. Position yourself to use backlighting through translucent petals. Avoid midday sun on clear days when light is hardest.
What aperture is best for flower photography?
For single flower portraits with soft backgrounds, use f/1.8 to f/2.8. For balanced sharpness on your subject with pleasing bokeh, f/4 to f/5.6 works well. For environmental shots where multiple flowers should be sharp, try f/8 to f/11. Avoid apertures smaller than f/11 due to diffraction reducing overall sharpness.
Should I use a tripod for flower photography?
Both approaches work depending on conditions. Handheld shooting offers flexibility to quickly explore different angles and compositions, ideal for reacting to changing light. Tripods provide stability for slower shutter speeds and precise composition, essential for focus stacking or extreme close-ups. Many photographers use both methods depending on the situation.
Conclusion
Photographing cherry blossoms and spring flowers in soft light transforms ordinary snapshots into compelling images that capture the delicate beauty of the season. The techniques in this guide, from timing your shoots to choosing the right aperture to positioning yourself relative to the light, all work together to help you make the most of soft light conditions.
Remember that soft light is your ally. Whether it comes naturally from golden hour and overcast skies or whether you create it with diffusers and reflectors, this gentle illumination preserves the subtle colors and textures that make spring flowers so captivating. Get low, watch your backgrounds, and don’t be afraid to shoot handheld when conditions demand flexibility.
Most importantly, practice these techniques. Each flower season brings new opportunities to refine your approach. The more you shoot, the more intuitive these decisions become, until finding and using soft light feels like second nature.