Every photographer knows the frustration of capturing the perfect shot, only to discover dark spots scattered across the image during post-processing. These stubborn dust spots on your camera sensor can ruin otherwise pristine photographs, particularly when shooting at small apertures. While sending your camera to professional service is always an option, learning how to clean your camera sensor safely at home can save you time, money, and keep your gear ready for any shooting opportunity.
Camera sensor cleaning might seem intimidating, but with the right tools, techniques, and precautions, it’s a manageable maintenance task that every photographer should master. This comprehensive guide will walk you through everything you need to know about sensor cleaning, from identifying when your sensor needs attention to performing safe and effective cleaning procedures that will protect your valuable equipment.
Why Sensor Cleaning Matters for Your Photography?
Your camera’s image sensor is the heart of your digital photography system. When dust, pollen, oil, or other contaminants settle on the sensor filter, they create dark, circular spots that become visible in your images, especially at apertures of f/11 or smaller. These spots are most noticeable in solid-color areas like blue skies, white walls, or any uniform surface.
Sensor dust becomes particularly problematic for certain types of photography:
- Landscape photography: Clear skies show every dust spot
- Astrophotography: Bright stars against dark backgrounds reveal sensor debris
- Product photography: Clean backgrounds emphasize imperfections
- Architectural photography: Large uniform surfaces highlight sensor dust
Modern cameras include built-in sensor cleaning systems that use ultrasonic vibrations to shake off dust, but these systems aren’t perfect. Over time, stubborn particles and moisture-related spots can accumulate, requiring manual intervention. Understanding how to clean your sensor properly extends the life of your equipment and ensures consistently high-quality images.
How to Check if Your Sensor Needs Cleaning?
Before you begin any cleaning procedure, it’s essential to confirm that your sensor actually needs attention. Many photographers mistake dust on their lens or viewfinder for sensor dust, leading to unnecessary cleaning attempts. Here’s how to perform a proper sensor test:
The Sensor Test Shot Method
- Find a suitable subject: Use a plain white wall, a clear blue sky, or a light-colored surface. Uniform lighting works best for revealing dust spots.
- Set up your camera: Mount your camera on a tripod to ensure stability during the test.
- Configure your settings: Set your aperture to f/16 or f/22 (the smallest available), use a low ISO (100-200), and set your focus to manual.
- Defocus the lens: Manually focus so the subject is completely blurry. This ensures any spots you see are from the sensor, not the subject itself.
- Take the shot: Capture an image of your uniform subject.
- Review the image: Transfer the image to your computer and zoom in to 100%. Look for dark, circular spots scattered across the frame. These are sensor dust spots.
Before and After Comparison
Dirty Sensor: Dark circular spots visible across the image, particularly noticeable in sky areas and uniform backgrounds. Spots remain in the same position relative to the frame regardless of lens changes.
Clean Sensor: Clear, uniform areas without dark spots. When you change lenses, dust spots don’t reappear in the same positions.
Tip: Save your test shot for comparison after cleaning. This gives you concrete proof of your cleaning effectiveness.
Types of Sensor Contaminants
Not all sensor spots are created equal. Identifying the type of contaminant helps determine the best cleaning approach:
- Dust and pollen: Dry, loose particles that appear as dark, sharp-edged spots. Usually respond well to air blower methods.
- Oil spots: Soft, circular smudges that typically come from internal camera lubricants. Often require wet cleaning methods.
- Moisture spots: Irregular marks that may result from humidity changes or condensation. Can leave water-soluble residue.
- Fibers: Thread-like debris that usually appears as thin lines or curved shapes. Often from improper cleaning materials or environment.
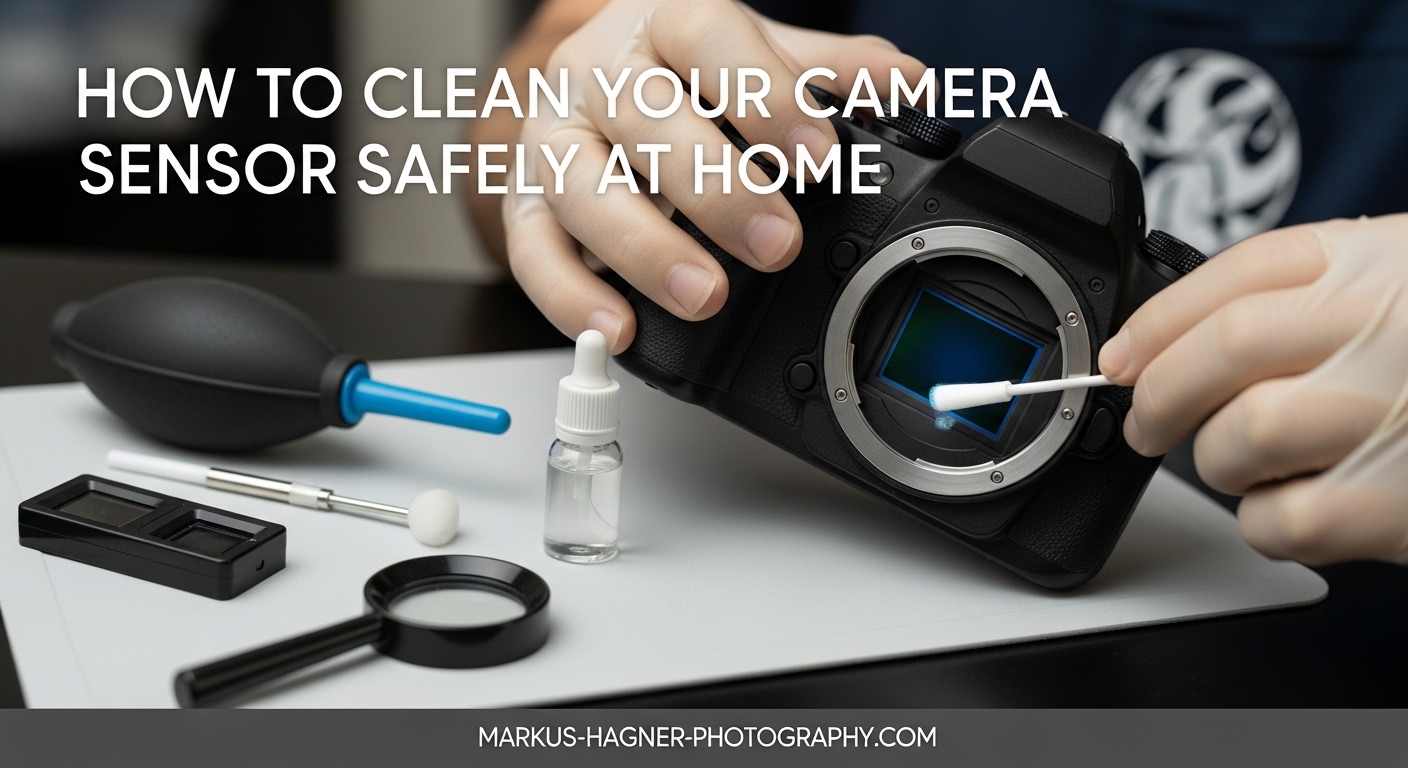
Essential Tools and Supplies for Sensor Cleaning
Having the right tools is crucial for safe and effective sensor cleaning. Using improper materials can damage your sensor or make the problem worse. Here’s what you need in your sensor cleaning kit:
Mandatory Tools
Rocket Blower (Air Blower)
A manual air blower like the Giottos Rocket Blower or Hähnel Rocket Air Blower is the safest first tool for sensor cleaning. It uses manual pressure to blow air across the sensor surface, dislodging loose dust particles without any contact. Price range: $15-25.
Why essential: The only tool that cleans without touching the sensor surface, making it the safest option for removing loose dust.
Sensor Swabs
Specially designed swabs like Sensor Swabs by Photographic Solutions or Visible Dust sensor swabs feature a synthetic material head mounted on a plastic wand. They come in different sizes to match various sensor dimensions (Type 1 for full-frame, Type 2 for APS-C, Type 3 for smaller sensors). Price: $5-8 per swab.
Why essential: The correct width ensures complete sensor coverage in one or two passes, minimizing streaks and missed spots.
Sensor Cleaning Fluid
Specialized solutions like Eclipse Fluid by Photographic Solutions are formulated specifically for sensor cleaning. They’re highly purified, fast-drying, and leave no residue. Price: $15-25 per small bottle.
Why essential: Regular cleaning solutions can leave residue or damage sensor coatings. Sensor-specific fluids are designed for the sensitive sensor filter coating.
Optional but Helpful Tools
Sensor Loupe
A magnifying device like the Visible Dust Sensor Loupe illuminates and magnifies the sensor surface, allowing you to see dust particles clearly before cleaning. Price: $50-100.
Why helpful: Allows precise targeting of dust spots and verification of cleaning results without test shots.
Arctic Butterfly
A specialized brush like the Visible Dust Arctic Butterfly uses static electricity to attract dust away from the sensor. Price: $80-120.
Why helpful: Effective for removing loose dust without fluid, especially useful for frequent maintenance between wet cleanings.
Sensor Cleaning Pen
Products like the LensPen SensorKlear feature a carbon-based cleaning tip for removing stubborn spots. Price: $20-30.
Why helpful: Good for targeted spot removal of individual dust particles without full sensor cleaning.
Estimated Costs Comparison
| Cleaning Approach | Initial Investment | Cost Per Cleaning | Long-term Value |
|---|---|---|---|
| Professional Service | $0 | $50-100 per cleaning | Low cost initially, high recurring cost |
| Basic DIY Kit | $40-60 | $5-10 per cleaning | Breaks even after 2-3 cleanings |
| Comprehensive DIY Kit | $150-250 | $5-10 per cleaning | Pays for itself after 3-5 cleanings |
Preparing Your Camera for Sensor Cleaning
Before you begin any cleaning procedure, proper preparation is essential to protect your camera and ensure effective cleaning:
- Charge your battery completely: A fully charged battery prevents the camera from shutting down mid-cleaning, which could damage the shutter mechanism if the mirror is in the locked-up position.
- Find a clean environment: Choose a dust-free room with still air. Avoid cleaning outdoors or in areas with fans, vents, or open windows. A bathroom after running the shower can work well—the humidity settles dust particles.
- Gather your tools: Have all cleaning supplies ready and within reach before starting. You don’t want to search for items with your camera’s sensor exposed.
- Wash your hands: Clean hands prevent transferring oils and dirt to your camera or cleaning tools.
- Work in good light: Adequate lighting helps you see the sensor surface clearly and identify any remaining dust after cleaning.
Method 1: The Air Blower Technique (Safest First Approach)
The air blower method is the safest way to clean your sensor and should always be your first approach. It removes loose dust without any physical contact with the sensor surface, virtually eliminating the risk of damage. This method resolves approximately 70-80% of sensor dust problems.
Step-by-Step Air Blower Cleaning
- Activate sensor cleaning mode: Most cameras have a specific menu option for “Sensor Cleaning” or “Mirror Lock-up.” This opens the shutter and exposes the sensor while moving the mirror out of the way. On DSLRs, you may need to select “Manual Cleaning” in the setup menu.
- Remove the lens: With the camera body facing downward, carefully remove the lens. Keeping the camera facing down prevents dust from settling into the camera body.
- Position the camera: Hold the camera with the lens mount facing downward at approximately a 45-degree angle. This orientation uses gravity to help dislodged dust fall away from the sensor.
- Use the rocket blower: Insert the nozzle of the rocket blower into the lens mount without touching anything. Give it several firm, short bursts of air. Move the blower around to direct air across different areas of the sensor.
- Be thorough but gentle: Use 5-10 bursts of air, directing them from different angles. Don’t use continuous air blasts—short bursts are more effective at dislodging dust.
- Turn off the camera: Once finished, turn off the camera. The shutter will close and the mirror will return to its normal position, protecting the sensor.
- Remount the lens: With the camera still facing downward, carefully remount your lens.
- Test your results: Take another test shot using the same procedure as before. Compare with your initial test shot to see if the dust spots have been removed.
Important Air Blower Tips
- Never use compressed air cans—the force can damage the sensor and the propellant can leave harmful residue
- Don’t use your mouth to blow air—moisture from your breath can create water spots
- Avoid touching the sensor with the blower nozzle
- Use short bursts rather than continuous air flow
- Always keep the camera facing downward during the process
When the Air Blower Method Isn’t Enough
If the air blower method doesn’t remove all the dust spots, or if you’re dealing with oil smudges or sticky spots, you’ll need to move to contact cleaning methods. However, always try the blower first—it’s safe, quick, and effective for most common dust problems.
Method 2: Dry Sensor Cleaning (Sensor Swabs Without Fluid)
Dry sensor cleaning uses sensor swabs without any cleaning fluid to physically remove dust particles from the sensor surface. This method is effective for stubborn dust that doesn’t respond to the air blower but isn’t stuck to the sensor.
Step-by-Step Dry Cleaning
- Prepare your workspace: Ensure you’re in a clean, still-air environment with good lighting. Have your sensor swabs ready and opened.
- Activate sensor cleaning mode: Put your camera into sensor cleaning or mirror lock-up mode as described in Method 1.
- Remove the lens: With the camera facing downward, remove the lens to expose the sensor.
- Position the camera: Place the camera on a stable surface with the lens mount facing upward. This positioning makes it easier to manipulate the swab across the sensor.
- Prepare the swab: Remove the sensor swab from its packaging. Handle it only by the plastic wand, being careful not to touch the cleaning head with your fingers or allow it to contact any other surface.
- Make the first pass: Starting at one side of the sensor, gently place the swab head flat against the sensor surface. Using light pressure, swipe smoothly across the sensor in one continuous motion from one side to the other. Move in a single direction—don’t go back and forth.
- Lift and turn: At the end of the first pass, lift the swab away from the sensor, flip it over to use the clean side, and prepare for the return pass.
- Make the return pass: Starting at the opposite side, swipe back across the sensor using the clean side of the swab. Again, use a single smooth motion with light pressure.
- Inspect and discard: Examine the swab head—it should show the collected dust. Immediately discard the used swab; never reuse sensor swabs.
- Close up and test: Turn off the camera, remount the lens, and take a test shot to assess the results.
Pro Tips for Dry Cleaning Success
- Use the correct swab size for your sensor—swabs that are too small require multiple passes and increase streaking risk
- Apply minimal pressure—you’re not scrubbing, just gently lifting dust
- Work deliberately and slowly—rushed movements increase the risk of slips
- Keep unused swabs in their sealed packaging until ready to use
- Have multiple swabs available in case the first attempt isn’t successful
When to Use Dry Cleaning vs. Wet Cleaning
Dry cleaning works well for dust particles that are electrostatically attracted to the sensor but not physically stuck. If you see:
- Sharp, dark spots that didn’t respond to air blowing → Try dry cleaning first
- Soft, circular smudges or oil spots → Skip to wet cleaning method
- Streaks after dry cleaning → Follow up with wet cleaning
Method 3: Wet Sensor Cleaning (With Sensor Cleaning Fluid)
Wet sensor cleaning is the most thorough cleaning method and is necessary for removing stubborn dust, oil spots, or residue that dry cleaning can’t handle. This method requires more care and practice but produces the cleanest results when done correctly.
Step-by-Step Wet Cleaning
- Prepare your supplies: Open your sensor cleaning fluid and have 2-3 sensor swabs ready. Ensure you’re working in a clean, well-lit environment.
- Activate sensor cleaning mode: Put your camera into sensor cleaning or mirror lock-up mode. Make sure your battery is fully charged before this step.
- Remove and position the camera: Remove the lens and place the camera on a stable surface with the lens mount facing upward.
- Apply fluid to the swab: Place 2-3 drops of sensor cleaning fluid on the swab head. You want it moist but not dripping—excess fluid can leave streaks or potentially seep into sensor components.
- First pass: Gently place the moistened swab head on one side of the sensor. Using light, even pressure, swipe smoothly across the entire sensor surface in one continuous motion.
- Lift and turn: Lift the swab away from the sensor at the end of the pass. Flip it over to use the clean side for the return pass.
- Return pass: Starting from the opposite side, swipe back across the sensor using the clean side of the swab. Use a single smooth motion with consistent pressure.
- Inspect immediately: Examine the sensor surface under good light. You’re looking for streaks, missed spots, or remaining debris. A sensor loupe is very helpful for this step.
- Repeat if necessary: If streaks or spots remain, use a fresh swab with fluid and repeat the process. Most sensors require 1-2 cleaning cycles for thorough cleaning.
- Allow drying time: After the final pass, wait 1-2 minutes for any remaining fluid to evaporate completely before closing up the camera.
- Close and test: Turn off the camera, remount the lens, and take a test shot to verify your results.
Critical Wet Cleaning Warnings
- Never use regular rubbing alcohol—it can leave residue and damage sensor coatings
- Don’t apply fluid directly to the sensor—always apply it to the swab first
- Avoid over-moistening the swab—2-3 drops is sufficient for most sensors
- Don’t reuse swabs—each swab should be used once and discarded
- Never apply excessive pressure—you’re not scrubbing, just gently wiping
- Keep fluid away from camera electronics—apply carefully to avoid spills
Dealing with Stubborn Oil Spots
Oil spots from internal camera lubricants are particularly stubborn and may require special techniques:
- Use fresh fluid: Sensor cleaning fluid can evaporate or become contaminated over time. Use fresh fluid for best results.
- Allow brief dwell time: Some photographers find that letting the moistened swab sit on the oil spot for 3-5 seconds before wiping helps break down the oil.
- Multiple light passes: Several light passes may be more effective than one aggressive pass.
- Consider professional help: If oil spots persist after 2-3 attempts, professional cleaning may be necessary.
What NOT to Do: Common Sensor Cleaning Mistakes
Protecting your sensor means knowing what to avoid. These mistakes can cause permanent damage to your camera:
Dangerous Cleaning Methods to Avoid
- NEVER use canned compressed air: The force can damage the sensor, and the propellant can freeze sensor components or leave harmful residue. The high pressure can also blow dust deeper into the camera mechanism.
- NEVER use your mouth to blow air: The moisture in your breath can create water spots on the sensor that are difficult to remove and may cause temporary sensor malfunctions.
- NEVER use Q-tips or cotton swabs: These can leave lint and fibers on the sensor that are difficult to remove. Cotton fibers can become stuck to the sensor coating.
- NEVER use regular microfiber cloths: Even photography-grade microfiber cloths can leave lint and aren’t designed for the sensitive sensor coating. They may also carry abrasive particles.
- NEVER use rubbing alcohol or household cleaners: These can damage the sensor’s special coatings and leave residue that affects image quality. Only use sensor-specific cleaning fluid.
- NEVER use WD-40 or any lubricant: These products can permanently damage your sensor and camera internals. The question “Can you use WD-40 to clean sensors?” has a definitive answer: absolutely not.
- NEVER touch the sensor with your fingers: The oils from your skin can create stubborn smudges that require professional cleaning to remove.
- NEVER use compressed air from a garage compressor: Unless specifically filtered for breathing air, compressors can contain oil and moisture that will damage your sensor.
Procedural Mistakes to Avoid
- Don’t clean unnecessarily: Only clean when test shots show visible dust spots. Unnecessary cleaning increases risk.
- Don’t rush the process: Haste leads to mistakes and accidents. Set aside adequate time for the task.
- Don’t ignore battery warnings: Never attempt sensor cleaning with a low battery. If the camera shuts down mid-cleaning, it can damage the shutter mechanism.
- Don’t reuse swabs: Each cleaning should use a fresh swab. Reused swabs can redistribute previously collected dust.
- Don’t skip the test shot: Always verify your results with a proper test shot before declaring the cleaning complete.
DSLR vs. Mirrorless: Special Considerations
While the basic cleaning principles apply to both DSLR and mirrorless cameras, there are important differences to consider:
DSLR Sensor Cleaning
DSLR cameras have a reflex mirror that must be moved out of the way to access the sensor. Key considerations:
- Mirror lock-up procedure: Most DSLRs require a specific menu setting to lock up the mirror. This keeps the mirror out of the way during cleaning.
- More exposed sensor: When the mirror is locked up, DSLR sensors are fully exposed, making them slightly more vulnerable to accidental contact.
- Focus screen dust: Dust on the focus screen can sometimes be mistaken for sensor dust. Verify dust is on the sensor by checking if it appears in photos.
- Brand-specific modes: Canon, Nikon, and Sony each have slightly different procedures for accessing sensor cleaning mode.
Mirrorless Sensor Cleaning
Mirrorless cameras lack a reflex mirror, making sensor access more straightforward:
- No mirror to consider: The sensor is directly accessible when the lens is removed and the shutter is open.
- Sensor always exposed during lens changes: Because there’s no mirror to protect the sensor, mirrorless cameras may need more frequent cleaning.
- Electronic first curtain: Some mirrorless cameras use an electronic first curtain shutter, which can affect how dust appears in images.
- Easier access: The lack of a mirror assembly makes it easier to see and access the entire sensor surface.
Brand-Specific Tips
Canon
Canon cameras typically have a “Sensor Cleaning” option in the setup menu. Some models have a “Manual Cleaning” option that keeps the shutter open. Canon’s full-frame sensors often require Type 1 Sensor Swabs.
Nikon
Nikon cameras feature “Lock Mirror Up for Cleaning” in the setup menu. Nikon cameras often display an icon warning when battery power is low for sensor cleaning. APS-C Nikon sensors typically require Type 2 Sensor Swabs.
Sony
Sony mirrorless cameras have a “Cleaning Mode” in the setup menu. Sony sensors are particularly sensitive to static electricity, making the Arctic Butterfly brush a useful tool. Sony full-frame sensors require Type 1 Sensor Swabs.
Fujifilm
Fujifilm X-series cameras include “Sensor Cleaning” in the setup menu. Fujifilm’s X-Trans sensors may show dust differently than traditional Bayer array sensors. APS-C Fujifilm sensors typically use Type 2 Sensor Swabs.
When to Seek Professional Sensor Cleaning?
While DIY sensor cleaning is safe and effective for most situations, there are times when professional cleaning is the better choice:
Signs You Need Professional Help
- Persistent oil spots: If oil spots remain after 2-3 wet cleaning attempts, professional cleaning is recommended.
- Scratches on the sensor: If you see scratches that affect image quality, professional assessment is necessary.
- Water damage: Cameras exposed to significant moisture should be professionally cleaned to prevent corrosion.
- Lack of confidence: If you’re uncomfortable with any aspect of sensor cleaning, professional service is worth the cost for peace of mind.
- Expensive equipment: High-end professional cameras may warrant professional service to protect your investment.
- Under warranty: If your camera is under warranty, professional service may be covered or prevent warranty issues.
Professional Cleaning vs. DIY: Decision Framework
Use this framework to decide between DIY and professional cleaning:
Choose DIY Cleaning If:
- Test shots show only dust spots (no oil or water damage)
- You have the proper tools and supplies
- You’re working in a clean environment
- Your camera battery is fully charged
- You’re comfortable with the procedures
- Your camera is out of warranty or you’re willing to accept the risk
Choose Professional Cleaning If:
- You see oil smudges or water damage
- DIY attempts haven’t resolved the issue
- You lack proper tools or supplies
- You’re uncomfortable with any aspect of the process
- Your camera is expensive and under warranty
- You need the camera cleaned urgently for important work
- You notice scratches or sensor damage
What Professional Cleaning Offers
Professional sensor cleaning services provide several advantages:
- Expert assessment: Professionals can identify sensor issues beyond simple dust accumulation.
- Thorough cleaning: Professional equipment and techniques achieve thorough cleaning.
- Warranty protection: Professional cleaning maintains manufacturer warranty coverage.
- Calibration checks: Many services include sensor calibration and function testing.
- Internal cleaning: Professionals can clean internal camera components that owners can’t access.
Troubleshooting Common Sensor Cleaning Issues
Even with proper technique, you may encounter issues during sensor cleaning. Here’s how to address common problems:
Streaks After Cleaning
Cause: Usually caused by too much fluid, old fluid, or a contaminated swab.
Solution: Allow the sensor to dry completely (5-10 minutes), then perform another cleaning pass with a fresh swab and fresh fluid. Use less fluid than before—2 drops should be sufficient.
Persistent Dust Spots
Cause: May be dust on the sensor’s cover glass rather than the sensor filter itself, or dust in the camera chamber that falls back onto the sensor.
Solution: First, try multiple passes with the air blower to dislodge dust from the chamber. Then perform wet cleaning. If spots persist, they may be on the sensor cover glass and require professional cleaning.
New Spots Appear After Cleaning
Cause: Usually dust from the swab packaging or chamber falling onto the freshly cleaned sensor.
Solution: Use the air blower to remove new spots. This is why it’s important to work in a clean environment and have fresh air in the cleaning area.
Scratches Visible on Sensor
Cause: Too much pressure during cleaning, contaminated swab, or debris trapped between swab and sensor.
Solution: Stop cleaning immediately. Scratches on the sensor filter typically require professional repair. Assess whether scratches affect actual images—sometimes sensor cover glass scratches have minimal impact on image quality.
Camera Won’t Enter Cleaning Mode
Cause: Usually low battery power.
Solution: Charge your battery fully and try again. Most cameras require at least 50% battery power to engage sensor cleaning mode.
Prevention Tips: Keeping Your Sensor Cleaner Longer
Preventing sensor dust is easier than removing it. These practices will help keep your sensor cleaner between cleanings:
Proper Lens Changing Technique
- Turn off the camera: Powering off reduces static charge that attracts dust.
- Point the camera downward: Gravity helps prevent dust from entering the camera body.
- Have the new lens ready: Minimize the time the camera body is open.
- Work quickly but carefully: Don’t rush, but don’t leave the camera exposed longer than necessary.
- Use body caps: When storing the camera without a lens, always use a body cap.
Environmental Considerations
The environment where you use and change lenses significantly affects sensor dust:
- Avoid dusty environments: Beaches, deserts, and construction sites are particularly challenging. If you must shoot in these conditions, consider using a weather-sealed camera and changing lenses as infrequently as possible.
- Humidity considerations: Very dry conditions increase static electricity that attracts dust. Very humid conditions can cause moisture-related issues.
- Wind awareness: Avoid changing lenses in windy conditions when possible. If necessary, use your body to shield the camera.
- Vehicle considerations: Avoid changing lenses inside moving vehicles where dust circulates.
Regular Maintenance Practices
- Use the camera’s self-cleaning: Enable automatic sensor cleaning (usually triggered at camera startup and shutdown). This isn’t a substitute for manual cleaning but helps reduce dust accumulation.
- Regular inspection: Perform test shots periodically, especially after lens-heavy shooting sessions or dusty environments.
- Keep your gear clean: Clean camera bags and lens cases regularly to remove dust that can transfer to your equipment.
- Store lenses with rear caps: Always keep rear lens caps on when lenses are stored.
- Avoid unnecessary cleaning: Only clean when test shots show visible dust. Unnecessary cleaning increases risk.
How Often Should You Clean Your Sensor?
There’s no set schedule for sensor cleaning—it depends on your shooting conditions and lens-changing habits. However:
- Heavy outdoor photographers: May need cleaning every 1-3 months
- Studio photographers: May only need cleaning once or twice per year
- Frequent lens changers: Should test for dust monthly and clean as needed
- Minimal lens changes: May go 6-12 months between cleanings
The key is to perform regular test shots and clean only when dust becomes visible in your images.
Frequently Asked Questions About Sensor Cleaning
Can I clean my camera sensor myself?
Yes, absolutely. With the proper tools and techniques, sensor cleaning is a safe DIY maintenance task. However, you should always start with the air blower method (no contact) before progressing to contact cleaning methods. If you’re uncomfortable or dealing with stubborn oil spots or scratches, professional cleaning is a reasonable alternative.
What can I use to clean my camera sensor?
For safe sensor cleaning, use only purpose-designed tools: a rocket air blower for non-contact cleaning, sensor swabs sized for your sensor, and sensor-specific cleaning fluid like Eclipse Fluid. Avoid household items like Q-tips, microfiber cloths, rubbing alcohol, compressed air cans, and especially WD-40—all of these can damage your sensor.
Is it safe to clean a camera sensor?
Yes, when done properly with the right tools. The sensor is protected by a filter glass cover, so you’re not actually touching the sensitive sensor elements. However, this cover can be scratched by improper tools or technique. Start with the safest methods (air blower) and progress to more invasive methods only as needed. When in doubt, professional service is always available.
How do I know if my sensor is dirty?
Perform a test shot: photograph a plain white wall or blue sky at f/16 or f/22, with the lens defocused. Zoom in to 100% on your computer and look for dark, circular spots. These are sensor dust spots. If spots appear in the same location across multiple images regardless of lens used, it’s sensor dust. If spots change position when you change lenses, the dust is on your lens, not your sensor.
Can you use WD-40 to clean camera sensors?
Absolutely not. WD-40 and similar lubricants can permanently damage your sensor and camera internals. WD-40 leaves residue that attracts more dust and can interfere with the sensor’s delicate coatings. Never use any lubricant or household cleaner on your sensor—only use sensor-specific cleaning fluid designed for camera sensors.
Can I use Q-tips to clean my camera sensor?
No, Q-tips and cotton swabs are not recommended for sensor cleaning. They can leave lint and fibers on the sensor that are difficult to remove and may scratch the sensor filter. The cotton can also snag on sensor components. Use only sensor swabs specifically designed for camera sensors—these have specially engineered heads that won’t shed fibers.
Can I use compressed air on my camera sensor?
No, never use canned compressed air on your camera sensor. The force is too strong and can damage the sensor or other camera components. The propellant in canned air can also freeze sensor components or leave harmful residue. Use only a manual rocket blower, which provides safe, gentle air pressure.
Can I use alcohol to clean my camera sensor?
Only if it’s sensor-specific cleaning fluid. Regular rubbing alcohol from drugstores can leave residue and may damage the sensor’s special coatings. Use only sensor cleaning fluids like Eclipse Fluid that are specifically formulated for camera sensors and leave no residue.
How much does professional sensor cleaning cost?
Professional sensor cleaning typically costs $50-100 per cleaning, with some high-end services charging up to $150. Many camera stores offer same-day service, while manufacturer service centers may take longer but provide more comprehensive testing. Consider that a basic DIY cleaning kit costs $40-60 and pays for itself after just 2-3 cleanings.
How do I remove oil from my camera sensor?
Oil spots from internal camera lubricants usually require wet cleaning with sensor swabs and sensor-specific fluid. Apply 2-3 drops of fluid to a sensor swab and make smooth passes across the sensor. Stubborn oil spots may require 2-3 cleaning cycles. If oil spots persist after multiple attempts, professional cleaning is recommended.
How often should I clean my camera sensor?
Clean your sensor only when test shots show visible dust spots. There’s no set schedule—it depends on how frequently you change lenses and the environments you shoot in. Some photographers need monthly cleaning, while others may go a year between cleanings. Perform test shots regularly and clean as needed rather than on a fixed schedule.
Can I use a microfiber cloth on my camera sensor?
No, regular microfiber cloths are not recommended for sensor cleaning. Even high-quality photography microfiber cloths can leave lint and fibers on the sensor that are difficult to remove. They may also carry abrasive particles that can scratch the sensor filter. Use only sensor swabs designed specifically for camera sensors.
Conclusion: Confident Sensor Maintenance for Better Images
Learning how to clean your camera sensor safely at home is a valuable skill that every photographer should develop. With the right tools, proper technique, and appropriate precautions, sensor cleaning is a straightforward maintenance task that can significantly improve your image quality and save you time and money on professional services.
Remember the key principles: always start with the safest method (air blower), progress to more invasive methods only as needed, use only sensor-specific tools and supplies, and work in a clean, calm environment. When in doubt, professional cleaning services are always available and may be the better choice for expensive equipment or stubborn problems.
Regular sensor inspections and proper lens-changing habits will help minimize dust accumulation and reduce the frequency of cleaning needed. By incorporating sensor maintenance into your regular photography workflow, you’ll ensure that your gear is always ready to capture the perfect shot without distracting dust spots.
Whether you’re a landscape photographer dealing with visible sky spots, an astrophotographer needing perfectly clear sensors, or any photographer who cares about image quality, proper sensor cleaning is an essential skill. Approach it with patience and respect for your equipment, and you’ll enjoy consistently cleaner images and more confidence in your gear.