Have you ever captured what should have been a perfect video shot, only to find the footage looks wobbly and distorted when you play it back? Maybe you noticed that straight lines appear curved, or that fast-moving objects seem to bend in unnatural ways. This frustrating phenomenon is called the jello effect, and it is caused by something called rolling shutter. In this guide, I will explain exactly what rolling shutter is, why it happens, and most importantly, how you can avoid it in your own video productions.
Over the years, I have worked with countless cameras and encountered rolling shutter issues in everything from smartphone footage to professional cinema cameras. The good news is that once you understand the mechanics behind it, rolling shutter becomes much easier to manage. You will learn practical techniques that work whether you are shooting with a DSLR, mirrorless camera, drone, or even your phone.
This article covers the technical explanation of how rolling shutter works, the different types of artifacts it creates, and proven methods to minimize or eliminate these issues both in-camera and in post-production. By the end, you will have a complete understanding of rolling shutter and the confidence to capture cleaner, more professional-looking video.
What Is Rolling Shutter?
Rolling shutter is a method of image capture used by most modern digital cameras where the sensor records the frame line-by-line from top to bottom rather than capturing the entire image simultaneously. This sequential scanning creates a slight time delay between when the top of the frame is recorded and when the bottom is captured. While this happens in just milliseconds, it is enough to cause visible distortion when either your subject moves quickly or your camera moves during recording.
The term rolling shutter comes from the way the exposure “rolls” across the sensor, much like a scanner moving down a page. The top row of pixels starts exposing first, then the second row, then the third, continuing until the bottom row is finally captured. This creates a temporal displacement between different parts of the image that becomes visible as various artifacts in your footage.
Most cameras using CMOS (Complementary Metal-Oxide-Semiconductor) sensors employ rolling shutter technology. These sensors are popular because they are energy-efficient, fast enough for most applications, and significantly cheaper to manufacture than the alternative global shutter sensors. You will find CMOS rolling shutter sensors in everything from iPhones to high-end cinema cameras from Sony, Canon, and Blackmagic.
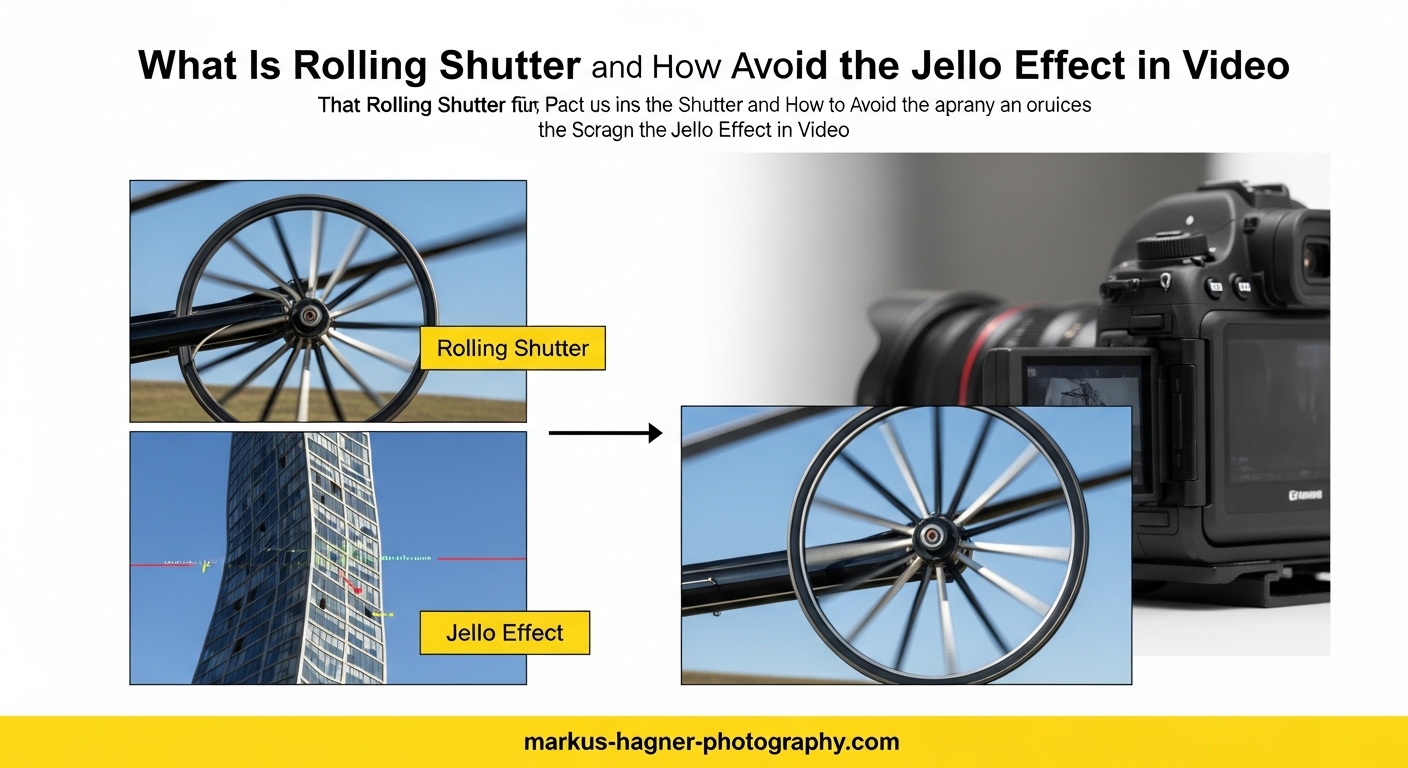
The classic example that demonstrates rolling shutter is helicopter or airplane propellers appearing bent or curved rather than straight. When you photograph or film a spinning propeller with a rolling shutter camera, each line of the sensor captures the blade at a slightly different position, creating that distinctive curved shape. Guitar strings vibrating rapidly show the same effect, appearing as wavy lines instead of straight ones.
Understanding rolling shutter matters because it affects nearly every videographer at some point. Whether you are panning across a cityscape, filming sports, flying a drone, or shooting handheld in challenging conditions, rolling shutter artifacts can degrade your footage quality. The key is knowing when it will be a problem and how to minimize its impact.
How Rolling Shutter Works
To truly understand rolling shutter, you need to visualize how your camera sensor actually captures each frame of video. Unlike a film camera that exposes the entire frame at once through a mechanical shutter, a CMOS sensor with rolling shutter reads out each pixel row sequentially. Think of it like reading a book line by line rather than taking in the whole page at a glance.
The sensor readout process starts at the top of the frame and works its way down. Each row of pixels begins its exposure, collects light for the predetermined shutter speed duration, and then stops collecting while the data is read out. By the time the bottom row finishes capturing, the top row was recorded several milliseconds earlier. This time difference between the first and last line is called the readout time or scan time.
Readout times vary significantly between cameras. A typical consumer camera might have a readout time of 20 to 30 milliseconds, while professional cinema cameras can achieve readout times under 10 milliseconds. The shorter the readout time, the less noticeable rolling shutter becomes because there is less temporal difference between the top and bottom of the frame.
When your camera is stationary and your subject is not moving quickly, rolling shutter is invisible because nothing changes significantly during that brief readout window. Problems emerge when either the camera moves rapidly (like a fast pan) or the subject moves quickly (like a race car). The movement that occurs during the readout creates the characteristic distortions.
Modern camera manufacturers have developed several technologies to reduce rolling shutter effects. Stacked sensors place the memory and processing circuitry directly beneath each pixel, allowing for dramatically faster readout speeds. Some cameras offer different readout modes, allowing you to choose between full sensor readout with more rolling shutter or crop modes with faster readout but reduced resolution.
Types of Rolling Shutter Artifacts
Rolling shutter creates several distinct types of visual artifacts, each with its own characteristics and causes. Understanding these different manifestations helps you identify rolling shutter problems in your footage and choose the right solutions.
The Jello Effect (Wobble)
The jello effect is the most common and recognizable rolling shutter artifact. It causes footage to appear unstable and wobbly, as if the entire image is made of gelatin that quivers with every camera movement. This effect is particularly noticeable in handheld shots, drone footage with vibration issues, and any situation where the camera experiences rapid, small movements.
Drone videographers frequently battle the jello effect because propeller vibrations transmit through the frame to the camera. Even with a gimbal stabilizing the camera, high-frequency vibrations can cause this distinctive wobbling. The problem becomes worse at longer focal lengths and higher resolutions where any instability is magnified.
Skew
Skew appears as vertical lines leaning at an angle when they should be straight. This happens most commonly during horizontal camera movements like panning. If you pan quickly from left to right, vertical buildings or poles will temporarily lean in the direction opposite to your pan. The faster you pan, the more pronounced the skew becomes.
This artifact is particularly problematic in architectural videography, real estate walkthroughs, and any scenario where maintaining geometric accuracy matters. Wide-angle lenses exaggerate the effect, making even moderate pans show visible skew in buildings and other vertical elements.
Smear and Partial Exposure
Smear occurs when a bright, fast-moving object creates a stretched, distorted trail across the frame. This is different from natural motion blur and appears as an unnatural elongation of the moving subject. Flash photography during video recording creates a related issue called partial exposure or flash banding, where the flash illuminates only part of the frame because it occurs during the rolling readout.
You will see smear most often when filming subjects like car headlights at night, fireworks, or any bright object moving rapidly through the frame. The effect is more pronounced in cameras with slower readout speeds.
Banding Under LED and Strobe Lighting
Banding occurs when filming under artificial lighting that flickers at a specific frequency, particularly LED lights and fluorescent tubes. Because the rolling shutter captures different parts of the frame at different times, it can catch the light in different phases of its flicker cycle. This creates horizontal bands of varying brightness moving through your footage.
This issue is especially problematic for event videographers shooting in venues with LED stage lighting, wedding photographers working in reception halls, and anyone filming under older fluorescent lighting. The 50Hz or 60Hz frequency of electrical grids combined with the camera’s frame rate and shutter speed determines whether banding will occur.
Rolling Shutter vs Global Shutter
Understanding the difference between rolling shutter and global shutter helps you appreciate why rolling shutter exists and when a global shutter camera might be worth the investment.
Global shutter captures every pixel in the frame simultaneously, exactly like a film camera exposes an entire frame at once. There is no temporal difference between the top and bottom of the image, which means no rolling shutter artifacts regardless of camera movement or subject speed. Fast pans, vibrating drones, spinning propellers, and strobing lights all render correctly without distortion.
So why do not all cameras use global shutter? The technology comes with significant trade-offs. Global shutter sensors are more complex to manufacture, require more circuitry per pixel, and typically deliver lower dynamic range and more noise compared to equivalent rolling shutter sensors. They are also considerably more expensive, which is why global shutter cameras remain relatively rare outside of high-end professional cinema equipment.
Most working videographers find that understanding and managing rolling shutter is more practical than investing in global shutter equipment. Cameras like the Sony A9 series and some Blackmagic models offer faster readout speeds that minimize rolling shutter to nearly imperceptible levels while maintaining excellent image quality.
The comparison between these technologies matters most for specific use cases. If you shoot a lot of fast action sports, aerial footage with drones, or VFX work requiring precise geometry, global shutter or fast-readout rolling shutter cameras provide real advantages. For narrative filmmaking, interviews, and most commercial work, standard rolling shutter cameras perform admirably when used correctly.
How to Avoid Rolling Shutter and the Jello Effect
Now we get to the practical solutions. Avoiding rolling shutter artifacts comes down to three main strategies: controlling your shutter speed, stabilizing your camera, and adjusting your shooting technique. Mastering these approaches will dramatically reduce rolling shutter problems in your footage.
Master Your Shutter Speed with the 180-Degree Rule
The 180-degree shutter rule is the foundation of cinematic motion and your first line of defense against rolling shutter. This rule states that your shutter speed should be approximately twice your frame rate. Shooting at 24fps means using 1/48 second shutter speed (rounded to 1/50 on most cameras), 30fps calls for 1/60 second, and 60fps needs 1/120 second.
This shutter speed introduces natural motion blur that helps mask rolling shutter artifacts. When each frame includes motion blur from subject movement, the temporal displacement from rolling shutter becomes less noticeable. Faster shutter speeds freeze motion more sharply, which actually makes rolling shutter more visible because there is no blur to disguise the distortion.
The challenge comes in bright lighting conditions where achieving 1/50 second shutter speed would overexpose your image even at minimum ISO and maximum aperture. This is where ND (neutral density) filters become essential tools. An ND filter acts like sunglasses for your lens, allowing you to maintain proper exposure while keeping your shutter speed at that ideal 2x frame rate setting.
For different frame rates, here are your target shutter speeds: 24fps uses 1/50, 25fps uses 1/50, 30fps uses 1/60, 50fps uses 1/100, and 60fps uses 1/120. These settings produce natural motion rendering while minimizing the appearance of rolling shutter distortion.
Stabilize Your Camera Effectively
Camera movement during recording is a primary cause of rolling shutter artifacts, particularly the jello effect. Proper stabilization reduces the high-frequency movements and vibrations that cause wobbling footage.
For static shots, nothing beats a good tripod. A quality video tripod with a fluid head provides stable, smooth camera movements without the micro-vibrations that trigger rolling shutter. When you need to move the camera, consider a gimbal stabilizer. Three-axis gimbals have become affordable and do an excellent job of smoothing out handheld movements.
Drone operators should pay special attention to propeller balance and gimbal isolation. Unbalanced propellers create vibrations that travel through the drone frame to the camera, causing jello effect even with electronic stabilization. Many drone cameras also offer electronic stabilization options that can help reduce rolling shutter wobble, though these sometimes crop the image slightly.
For run-and-gun shooting where tripods and gimbals are impractical, develop stable handheld technique. Keep your elbows tucked against your body, use a camera strap pulled taut against your neck for additional stability, and move smoothly rather than making quick, jerky motions. Some cameras include in-body image stabilization (IBIS) that helps significantly with handheld rolling shutter issues.
Adjust Your Shooting Technique
How you move your camera during shooting has a massive impact on rolling shutter visibility. The key principle is smooth, controlled movement rather than rapid, jerky motions.
When panning, move slowly and consistently. Fast pans are the worst offenders for skew artifacts because the camera orientation changes significantly during the sensor readout. A slow pan gives the sensor time to capture each frame with minimal orientation change between the top and bottom rows. If you need to capture fast action, consider letting the subject move through a relatively static frame rather than trying to follow every movement.
Avoid the temptation to use very high shutter speeds for “crisper” footage. While frozen motion might look sharp frame-by-frame, it actually makes rolling shutter more apparent and creates a stuttery, unnatural look in motion. Embrace the motion blur from proper shutter speed settings.
Consider your focal length when planning shots. Longer lenses magnify not just your subject but also any camera movement and rolling shutter distortion. If rolling shutter is a concern, wider focal lengths tend to show fewer artifacts because the angular change during readout is smaller.
Choose Camera Settings That Minimize Rolling Shutter
Many cameras offer recording options that affect rolling shutter performance. Understanding these settings helps you optimize for situations where rolling shutter might be problematic.
Some cameras read the full sensor and downsample to create 4K video, while others use a cropped region of the sensor. Full sensor readout typically produces better image quality but requires reading more pixels, which means slower readout and more rolling shutter. Crop modes read fewer pixels faster, reducing rolling shutter at the cost of some image quality and field of view.
Lower resolution recording modes often have faster readout times. If you are delivering in 1080p anyway, shooting 1080p instead of 4K might reduce rolling shutter visibility. Some cameras also offer specific video modes optimized for reduced rolling shutter, trading other image quality parameters for faster readout.
Electronic shutter vs mechanical shutter is another consideration for hybrid shooters. In video mode, you are almost always using electronic shutter. For still photography, mechanical shutter eliminates rolling shutter for flash sync and fast-moving subjects, but this does not help with video recording.
How to Test Your Camera for Rolling Shutter
Testing your specific camera helps you understand its rolling shutter characteristics and plan accordingly. Here is a simple test you can perform with basic equipment.
You will need a smartphone with a flash and a camera to test. Set up in a dimly lit room so the flash will be clearly visible. Point your test camera at the smartphone screen and start recording. Have someone else turn on the smartphone flashlight, or use a quick burst of flash photography while recording video.
Review your footage frame by frame. If your camera has significant rolling shutter, you will see the flash illuminate only part of each frame rather than the entire image. The flash band position indicates how far through the readout the camera was when the flash occurred. A narrow band indicates slower readout and more rolling shutter susceptibility.
Another effective test uses a computer fan or desk fan. Record the spinning fan blades and examine the footage. The more curved and distorted the blades appear, the more rolling shutter your camera exhibits. This test is particularly useful because it mimics the real-world scenario of filming spinning propellers or other rotating machinery.
For a more scientific approach, you can measure actual readout time using a method involving a rotating disk with a distinctive mark. By filming the disk at a known rotation speed and measuring how much the mark appears displaced between top and bottom of frame, you can calculate the actual readout time in milliseconds. Professional reviews often include these measurements, typically ranging from under 10ms for excellent cameras to over 30ms for cameras with noticeable rolling shutter.
Post-Production Solutions for Rolling Shutter
Despite your best efforts during shooting, sometimes rolling shutter artifacts still appear in your footage. Several post-production tools can help reduce or eliminate these issues.
Adobe Premiere Pro includes a Rolling Shutter Repair effect specifically designed to address this problem. The effect analyzes your footage and attempts to correct the temporal displacement by warping pixels to compensate for the rolling shutter distortion. Results vary depending on the severity of the artifact and the complexity of the scene, but for moderate skew and wobble, it can make a significant improvement.
DaVinci Resolve offers similar correction through its stabilization features. The software includes rolling shutter correction options within the stabilization panel that can reduce wobble and skew. The tracker-based approach in Resolve can be particularly effective for footage with consistent rolling shutter characteristics throughout.
Final Cut Pro provides rolling shutter correction through its Stabilization feature. The Rolling Shutter amount slider lets you dial in correction specific to your footage. Like other software solutions, it works best on moderate artifacts and may introduce some image degradation with heavy correction.
The important limitation to understand is that post-production fixes work by warping and stretching pixels, which can introduce its own artifacts and reduce image sharpness. These tools are best thought of as rescue options for problematic footage rather than substitutes for proper shooting technique. Heavy correction can also create strange artifacts around the edges of the frame where pixels are being manipulated most aggressively.
For VFX work involving matchmoving or camera tracking, rolling shutter presents special challenges. The geometric distortion makes accurate tracking difficult because the relationship between tracked points changes throughout each frame. Some professional tracking software includes rolling shutter compensation, but the best approach remains capturing clean footage during production.
Frequently Asked Questions
How to avoid rolling shutter in video?
To avoid rolling shutter in video, follow the 180-degree shutter rule by setting your shutter speed to approximately twice your frame rate (1/50 second for 24fps, 1/60 for 30fps). Use camera stabilization equipment like tripods or gimbals, avoid fast panning movements, and consider using ND filters to maintain proper shutter speed in bright conditions.
What is the jello effect in video?
The jello effect is a video distortion caused by rolling shutter where footage appears wobbly or unstable, similar to gelatin quivering. It occurs when the camera vibrates or moves rapidly during the sensor’s line-by-line readout process, creating a temporal mismatch between different parts of the frame that manifests as visible wobbling.
What is rolling shutter in videography?
Rolling shutter in videography is a method of image capture where the camera sensor records each frame line-by-line from top to bottom rather than capturing the entire image simultaneously. This sequential scanning creates a time delay between when the top and bottom of the frame are recorded, which can cause distortion when filming fast-moving subjects or during rapid camera movements.
What is the jelly effect on a camera?
The jelly effect (also called jello effect) is rolling shutter distortion that makes video footage appear to wobble unnaturally. Objects in the frame seem to quiver and deform, especially during camera vibration or fast movement. It is caused by the camera sensor capturing different parts of the frame at slightly different times, creating visible temporal artifacts in the footage.
Conclusion
Rolling shutter and the jello effect are realities of modern CMOS sensor technology, but they do not have to ruin your footage. By understanding what rolling shutter is and how it works, you can anticipate when it will be problematic and take steps to minimize its impact.
The most effective approach combines proper camera settings with thoughtful shooting technique. Remember the 180-degree shutter rule, use appropriate stabilization for your shooting situation, and avoid rapid camera movements when possible. When shooting conditions are challenging, post-production tools can help rescue footage with visible rolling shutter artifacts.
Keep perspective on when rolling shutter actually matters. For most narrative and commercial work, minor rolling shutter goes unnoticed by audiences. The problem becomes significant primarily with fast action, drone footage, handheld work in challenging conditions, and specialized applications like VFX. Focus your energy on these scenarios rather than worrying about rolling shutter in every shot.
As camera technology continues improving with faster sensor readout and stacked sensor designs, rolling shutter becomes less problematic with each generation. But the fundamental principles of proper shutter speed and stable camera technique remain valuable skills that will serve you well regardless of what equipment you use. Master these techniques and rolling shutter will rarely be more than a minor consideration in your video production workflow.