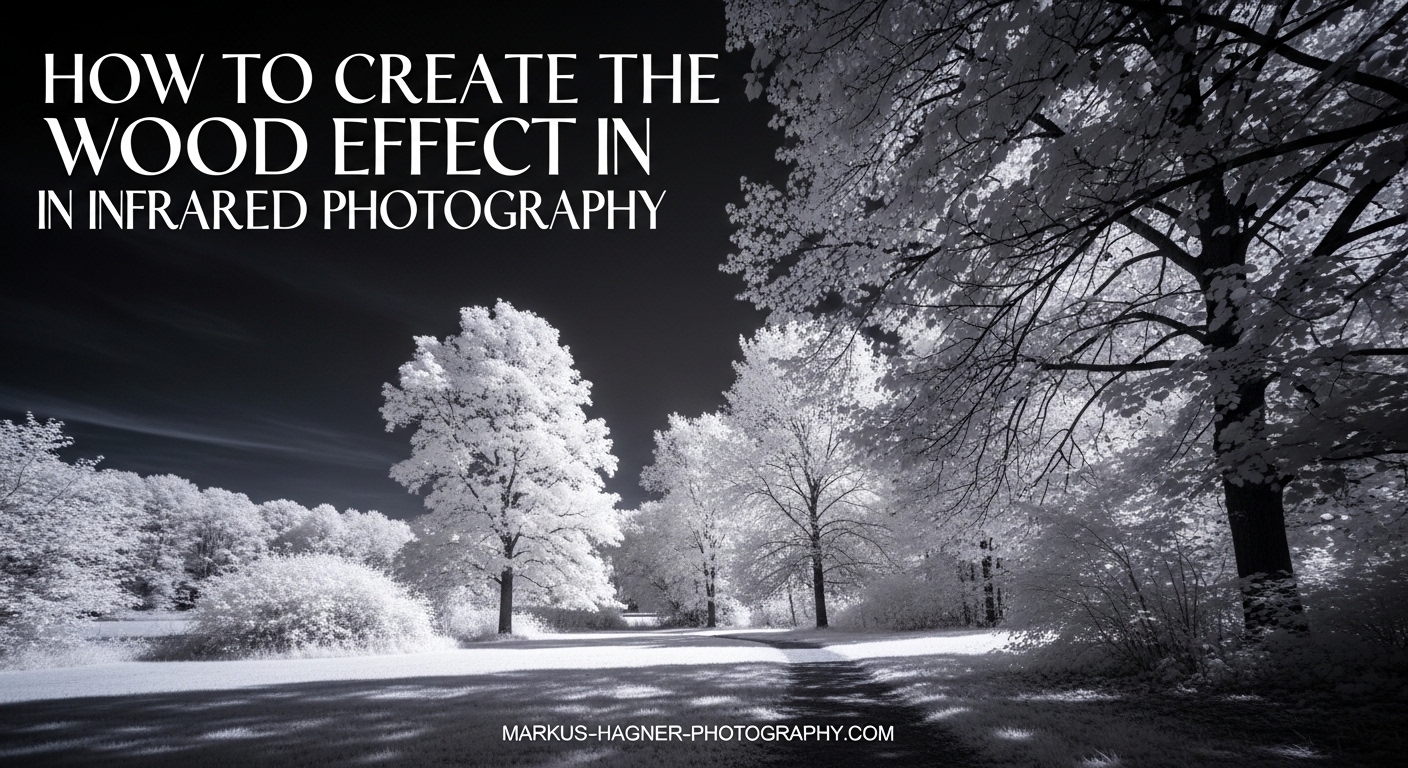
Imagine capturing a summer landscape where every tree glows with brilliant white foliage against a dark, moody sky. That surreal transformation is the Wood Effect, and it remains one of the most striking techniques in infrared photography. This guide explores everything needed to create the wood effect in infrared photography, from the science behind it to the exact post-processing steps that make those glowing leaves pop.
Whether you are a complete beginner wondering why trees look white in infrared or an experienced photographer ready to invest in a converted camera, this comprehensive guide covers it all. This guide explains which wavelengths produce the strongest Wood Effect, how to handle common issues like hot spots and focus shift, and shares a complete workflow from capture to final edit. By the end, you will have a clear roadmap for creating dream-like infrared landscapes that stand out from ordinary visible light photographs.
What Is the Wood Effect in Infrared Photography?
The Wood Effect refers to the bright white or glowing appearance of deciduous foliage in infrared photographs. This phenomenon occurs because chlorophyll in plant leaves reflects near-infrared light rather than absorbing it like visible light. The effect creates a dramatic visual transformation where green trees and grass appear snow-white against dark skies.
The name comes from Robert W. Wood, an American physicist who pioneered infrared photography in the early 1900s. His 1910 book “Physical Optics” included some of the first infrared photographs ever published, showing this distinctive white foliage effect. Wood discovered that certain wavelengths of infrared light passed through or reflected off plant matter differently than visible light, creating images that looked almost like winter scenes captured in summer.
The Science Behind Why Trees Look White in Infrared
Here is what actually happens at the molecular level. Chlorophyll, the pigment that makes leaves green, absorbs most visible light in the blue and red wavelengths. However, chlorophyll is essentially transparent to near-infrared light in the 600-700 nanometer range. Instead of absorbing this infrared energy, the leaf’s internal cell structure reflects it back, creating that bright, glowing appearance.
This reflectivity serves a biological purpose. Plants evolved to reflect near-infrared light as a cooling mechanism, preventing overheating from solar radiation. The near-infrared spectrum sits just beyond what human eyes can see, but digital camera sensors can capture it when the internal blocking filter is removed or when you use an external IR filter.
Deciduous trees with broad, thin leaves produce the strongest Wood Effect because their chlorophyll-rich foliage reflects the most infrared light. Evergreens like pines and spruces have waxy, thick needles that absorb more infrared, producing a darker, less dramatic appearance. This is why summer forests create the most striking infrared images while pine forests often disappoint.
Equipment Options for Creating the Wood Effect
You have two main paths to capture infrared images: using screw-on filters on an unconverted camera or converting a camera by removing its internal infrared blocking filter. Each approach has distinct advantages and limitations that affect both your shooting experience and final results.
Option 1: Infrared Filters (Budget Approach)
Screw-on infrared filters block visible light while allowing infrared wavelengths to pass through to your sensor. This approach costs significantly less than camera conversion and works with any camera you already own. You simply attach the filter to your lens and shoot.
The tradeoff is convenience. Because these filters block most visible light, your viewfinder becomes nearly black, making composition difficult. You will need to compose first, then attach the filter. Exposure times also increase dramatically, often requiring a tripod and exposures of several seconds to a minute depending on your filter strength and lighting conditions.
Despite these challenges, filters remain a popular entry point. Many photographers start here before committing to a full conversion. If you enjoy the infrared look and find yourself shooting it regularly, the filter limitations eventually push most people toward conversion.
Option 2: Camera Conversion (Professional Route)
Converting a camera involves removing the internal blocking filter that manufacturers install over the sensor. Professional conversion services like Life Pixel and Kolari Vision perform this modification, replacing the original filter with one that allows infrared light to pass. After conversion, your camera functions normally with regular exposure times and full viewfinder visibility.
The main benefit is convenience. You can shoot handheld at normal shutter speeds, compose through the viewfinder, and capture infrared images as easily as regular photographs. The conversion also improves image quality since you are not stacking additional glass elements in front of your lens.
Cost varies by service and camera model, typically ranging from $200 to $450 for the conversion itself. You also need a dedicated camera body since the conversion makes it an infrared-only device. Many photographers convert an older body they no longer use for regular photography.
Wavelength Comparison: Which Filter Produces the Best Wood Effect?
Different wavelengths create different infrared effects. Here is how the common options compare for achieving the Wood Effect:
590nm (Super Color): Allows some visible orange light to mix with infrared. Produces vibrant false-color images with golden skies and strong Wood Effect. Best for creative color work but requires significant post-processing.
630nm (Enhanced Color): The sweet spot many photographers recommend for beginners. Provides strong white foliage effect while retaining some color information for creative processing. Good balance between Wood Effect intensity and post-processing flexibility.
720nm (Standard IR): The most popular choice for pure infrared. Produces very strong Wood Effect with bright white foliage. Images start with a strong red/magenta cast that processes into classic blue-sky infrared or converts beautifully to black and white.
850nm (Deep IR): Maximum infrared effect with minimal color information. Creates very high contrast images with extreme Wood Effect. Best suited for black and white conversion since little color data remains.
For the strongest Wood Effect, 720nm and 850nm deliver the brightest white foliage. For beginners wanting flexibility, 630nm offers the best starting point with room to experiment.
Lens Compatibility and Hot Spot Issues
Not all lenses perform equally in infrared photography. Some lenses create a bright spot in the center of images called a “hot spot,” caused by internal reflections of infrared light bouncing between lens elements. This issue is invisible in regular photography but ruins infrared images.
Older manual focus lenses generally perform better than modern designs with many coated elements. Lens coatings optimized for visible light sometimes cause unexpected behavior with infrared. Before committing to a lens for infrared work, research whether it has known hot spot issues.
Wide-angle lenses tend to show more hot spot problems than telephoto designs. Prime lenses often outperform zooms. If you notice a bright center spot in your infrared images, try a different lens or stop down to smaller apertures, which sometimes reduces the effect.
How to Create the Wood Effect in Infrared Photography: Step-by-Step
Now let’s walk through a complete shooting workflow. The guide covers both filter-based and converted camera approaches since the techniques differ significantly.
Step 1: Prepare Your Equipment
For filter users, mount your camera on a sturdy tripod. You will need stability for the long exposures infrared filters require. Check that your lens accepts the filter size you have, or purchase step-up rings to adapt larger filters to smaller filter threads.
For converted camera users, ensure your battery is charged and your memory card has space. One advantage of conversion is shooting infrared just like regular photography, so no special preparation beyond normal camera readiness.
Step 2: Set Custom White Balance
Infrared images come out of the camera with a strong red or magenta cast because the camera expects visible light, not infrared. Setting a custom white balance while shooting saves significant post-processing time later.
Point your camera at green foliage in sunlight and use that to set custom white balance. The foliage should render neutral rather than red. This works better than trying to correct white balance entirely in post-processing. Some cameras limit how far you can adjust white balance, so this step matters more for filter users with unconverted cameras.
Step 3: Focus Correctly for Infrared
Infrared light focuses at a different point than visible light. This “IR focus shift” means your autofocus will not nail focus perfectly, and manual focus through the viewfinder will also miss. The difference is small but noticeable, especially at wider apertures.
For filter users, compose your shot before attaching the filter. Switch to manual focus, then attach your filter. Use Live View with magnification to fine-tune focus, since Live View shows the actual infrared image on your LCD. Many lenses have a small red dot or line near the focus scale mark indicating the infrared focus offset.
For converted cameras, most conversion services recalibrate autofocus for infrared. Your camera should focus normally. If you notice focus issues, send the camera back for adjustment or learn to compensate manually.
Step 4: Determine Exposure Settings
Infrared exposure differs significantly from visible light. Filter users should expect exposures of 10-30 seconds in bright sunlight at ISO 100-400 with apertures around f/8. Use your histogram rather than the LCD preview, which will appear mostly red before processing.
Converted camera users can shoot at normal exposures. Starting at ISO 200, f/8, and adjust shutter speed based on the histogram works well. Infrared light levels vary throughout the day, so check your histogram frequently and adjust accordingly.
Avoid relying on your camera’s light meter for filter photography. It is calibrated for visible light and will give incorrect readings. Bracket exposures liberally when starting out.
Step 5: Choose the Right Time and Conditions
Here is where infrared photography contradicts traditional landscape wisdom. While golden hour produces beautiful visible light images, infrared actually works best during midday when the sun is high and strong. Strong sunlight means more infrared radiation reaching your sensor.
Summer is the ideal season for the Wood Effect because deciduous trees have full, chlorophyll-rich foliage. Spring works once leaves have fully emerged. Autumn can produce interesting results as chlorophyll breaks down, but the Wood Effect weakens. Winter bare branches obviously cannot produce the white foliage effect.
Clear or partly cloudy days work better than overcast conditions. Clouds diffuse light and reduce the infrared intensity. However, dramatic clouds add interest to infrared skies, so partly cloudy days often create the most compelling compositions.
Step 6: Compose for Maximum Impact
Look for scenes with strong foliage content mixed with contrasting elements. A single white tree against a dark sky makes a powerful subject. Forest paths with overhead canopy create tunnels of glowing leaves. Reflections in water double the visual impact of white foliage.
Include sky in your compositions. Infrared darkens blue skies dramatically, creating contrast with bright foliage. This high contrast between white trees and dark sky defines the classic infrared landscape aesthetic.
Avoid scenes dominated by evergreens. Pine trees and spruce simply do not produce the same glowing effect. Mixed forests with both deciduous and evergreen trees can work well, with the contrast between white and dark foliage adding visual interest.
Post-Processing the Wood Effect
Your infrared images will not look impressive straight out of camera. They need processing to reveal the Wood Effect properly. Let’s walk through a complete workflow.
Understanding the Red Image Problem
Raw infrared files appear overwhelmingly red or magenta. This happens because the camera’s color interpretation expects visible light, not infrared. The red channel receives most of the infrared data while blue and green channels receive much less. Processing transforms this red mess into the classic infrared look.
Step 1: White Balance Correction
If you set custom white balance in camera, your starting point will already look better. If not, use your raw processor’s white balance tool. Click on green foliage that should appear neutral. This brings the overall color cast toward something more workable.
Do not expect perfect white balance immediately. Infrared processing requires aggressive adjustments that may exceed your software’s typical white balance range. Get close, then proceed to the next steps.
Step 2: The Channel Swap Technique
Channel swapping is the signature processing technique for color infrared photography. It exchanges the red and blue channels, transforming red foliage into blue-white and creating the classic infrared color palette with blue skies and glowing white leaves.
In Photoshop, go to Image > Adjustments > Channel Mixer. For the Red Output Channel, set Red to 0% and Blue to 100%. For the Blue Output Channel, set Blue to 0% and Red to 100%. Keep Green at 100% for the Green Output Channel. This swap instantly transforms your image.
In Lightroom or Camera Raw, the process is less direct. You can use the HSL panel to shift red hues toward blue and blue hues toward red, approximating the channel swap effect. For true channel swapping, export to Photoshop or use a plugin that offers this capability.
Step 3: Black and White Conversion
Many photographers prefer black and white for infrared images. The high contrast between white foliage and dark skies translates beautifully to monochrome, and black and white eliminates any color accuracy concerns.
For best results, apply your channel swap first, then convert to black and white. The channel swap redistributes tonal information in ways that benefit monochrome conversion. Use a black and white mix that emphasizes the red channel for foliage and blue channel for skies.
Silver Efex Pro and similar plugins offer excellent black and white conversions with infrared-specific presets. These tools give you fine control over how different colors translate to grayscale tones.
Step 4: Fine-Tuning Contrast and Clarity
Infrared images typically need contrast enhancement to maximize the Wood Effect impact. Increase contrast globally, then consider local adjustments. Foliage often benefits from clarity or texture adjustments that emphasize the glowing, ethereal quality.
Be careful with clarity on skies. Heavy clarity on already dark infrared skies can introduce unwanted artifacts. Use adjustment brushes to apply different settings to foliage versus sky.
Vignettes work well with infrared landscapes. The darkening edges draw attention to your glowing white subject. Apply subtly to avoid an obvious, heavy-handed look.
Best Subjects for the Wood Effect
Not all scenes translate well to infrared. Understanding which subjects produce the strongest Wood Effect helps you choose locations worth visiting with your infrared gear.
Deciduous Trees and Forests
Broadleaf trees are the stars of infrared photography. Oak, maple, birch, aspen, and similar species with thin, chlorophyll-rich leaves produce the brightest white foliage effect. A single magnificent deciduous tree against a clear sky creates a stunning infrared portrait.
Forests with overhead canopy create magical tunnel effects. Paths winding through deciduous woods become otherworldly corridors of white. The density of foliage amplifies the Wood Effect, so fully leafed summer forests outperform sparse spring growth.
Parks and Gardens
Manicured landscapes often combine the best elements for infrared photography. Parks frequently feature deciduous trees, open sky, and interesting paths or structures. Gardens with flowering plants add variety, though flowers behave unpredictably in infrared depending on their pigmentation.
Historic estates and botanical gardens make excellent infrared destinations. The combination of architecture, planned landscapes, and mature trees provides diverse composition opportunities.
Architecture with Surrounding Foliage
Buildings surrounded by trees create compelling infrared subjects. The contrast between solid, dark structures and glowing white foliage produces striking compositions. Barns, churches, and historic buildings work particularly well.
Modern architecture can also shine in infrared. Glass and steel reflect infrared differently than visible light, creating unexpected effects. Combined with landscape elements, architectural infrared photography offers unique creative possibilities.
Seasonal Planning Guide
Timing matters significantly for the Wood Effect. Here is when to shoot throughout the year:
Late Spring (May-June): Fresh, bright green foliage produces strong Wood Effect. Trees have fully leafed out with maximum chlorophyll content. Excellent for vibrant infrared captures.
Summer (June-August): Peak season for the Wood Effect. Full canopy, maximum chlorophyll, strong sunlight. Plan your infrared trips for this window if possible.
Early Autumn (September): Foliage still present but chlorophyll beginning to break down. Wood Effect weakens but autumn color combinations with infrared can produce unique results.
Late Autumn (October-November): Fading and falling leaves mean weak or no Wood Effect. Infrared still works for other subjects but expect disappointing foliage results.
Winter: No Wood Effect possible without leaves. Focus on architectural subjects, evergreen forests, or snow scenes instead.
Subjects to Avoid
Evergreen forests produce disappointing infrared images. Pine, spruce, and fir needles absorb rather than reflect infrared, appearing dark rather than glowing. A scene dominated by evergreens will lack the dramatic contrast that makes infrared photography compelling.
Overcast days flatten infrared images significantly. Without direct sunlight, infrared intensity drops and the Wood Effect weakens. Check weather forecasts and plan infrared shoots for sunny conditions.
Bare winter trees obviously cannot produce white foliage. Save infrared photography for seasons with active growth, or focus on non-foliage subjects during winter months.
Troubleshooting Common Wood Effect Issues
Even with proper technique, infrared photography presents specific challenges. Here are solutions to the most common problems.
Hot Spots in Your Images
A hot spot appears as a brighter circle in the center of your image, caused by infrared light reflecting internally within your lens. This issue is lens-specific and unrelated to your camera body or filter.
If you encounter hot spots, try these solutions: First, stop down your aperture. Smaller apertures sometimes reduce hot spot visibility. Second, avoid wide-angle lenses, which show hot spots more prominently. Third, switch to a different lens known to perform well with infrared.
Some photographers maintain a list of IR-friendly lenses tested specifically for hot spot performance. Research your lenses before committing to them for important infrared work.
Focus Problems and IR Focus Shift
Infrared light focuses at a slightly different point than visible light. This focus shift means images focused normally will appear slightly soft. The effect increases at wider apertures.
For unconverted cameras using filters, always focus using Live View after attaching your filter. The Live View display shows actual infrared light, allowing accurate focus. Never trust the viewfinder or autofocus when shooting infrared with filters.
For converted cameras, professional conversion services typically recalibrate autofocus for infrared wavelengths. If your converted camera consistently front-focuses or back-focuses, contact your conversion service for adjustment.
Red Images That Will Not Correct
Sometimes white balance adjustments seem insufficient to correct the red cast. This happens most often with unconverted cameras using strong filters like 720nm or 850nm.
If in-camera white balance cannot correct enough, shoot in raw format. Raw files allow much more aggressive white balance adjustments than JPEG. You can also create a custom DNG profile using Adobe’s DNG Profile Editor, which provides extreme color correction capabilities specifically for infrared photography.
Remember that some red cast is normal and expected. The channel swap technique transforms this red information into the classic infrared color palette. Do not fight the red entirely; work with it through proper processing.
Long Exposure Challenges with Filters
Filter-based infrared photography requires exposures measured in seconds rather than fractions of a second. This creates several challenges: camera shake, subject movement, and practical inconvenience.
Always use a sturdy tripod and remote release. Enable mirror lock-up or electronic shutter to minimize vibration. Wind becomes a major problem, as leaves moving during long exposures blur the very foliage you want to capture glowing. Check weather forecasts and choose calm days for filter-based infrared work.
Consider investing in a converted camera if you find yourself frustrated by long exposure limitations. The convenience of normal shutter speeds transforms the infrared shooting experience.
Start Creating Dream-Like Infrared Images
The Wood Effect transforms ordinary landscapes into surreal, otherworldly scenes. With the right wavelength choice, proper shooting technique, and thoughtful post-processing, you can create infrared images that stop viewers in their tracks.
Start simple if you are new to infrared. Try a 720nm filter on your existing camera and experiment during summer months when deciduous trees have full foliage. Learn the exposure and focusing challenges before investing in a converted camera. Once you understand the basics and find yourself wanting to shoot infrared more frequently, conversion becomes an easy decision.
Remember that the Wood Effect depends on living, chlorophyll-rich foliage. Time your infrared photography for late spring through early autumn, aim for sunny midday conditions rather than golden hour, and seek out deciduous trees rather than evergreens. Follow the post-processing workflow outlined, especially the channel swap technique that creates those signature blue skies and glowing white leaves.
Infrared photography opens a window into light our eyes cannot see. The wood effect in infrared photography lets you capture that hidden world and share it with others. Grab your camera, find a forest full of deciduous trees, and start exploring this fascinating technique.
Frequently Asked Questions
What is the wood effect in infrared photography?
The Wood Effect is a phenomenon in infrared photography where deciduous trees and foliage appear bright white or glowing due to chlorophyll’s transparency to near-infrared light (around 600-700nm wavelength), named after infrared photography pioneer Robert W. Wood.
Why do trees look white in infrared?
Trees look white in infrared because chlorophyll in plant leaves reflects near-infrared light rather than absorbing it. The leaf’s internal cell structure reflects infrared wavelengths around 600-700nm, creating the bright white appearance that defines the Wood Effect.
What filter is best for the wood effect?
A 720nm infrared filter produces the strongest Wood Effect for most photographers. For beginners wanting more post-processing flexibility, a 630nm filter offers a good balance between white foliage intensity and color control. 850nm filters create maximum contrast but work best for black and white conversion.
Do I need to convert my camera for infrared photography?
No, you can use screw-on infrared filters on an unconverted camera, though this requires long exposures and tripod use. Camera conversion offers convenience with normal shutter speeds and handheld shooting but costs $200-450 and dedicates that body to infrared only. Many photographers start with filters before committing to conversion.
What time of day is best for infrared photography?
Midday produces the best infrared results, opposite of traditional landscape photography. Strong overhead sunlight provides maximum infrared radiation. Avoid overcast conditions and golden hour when infrared intensity drops significantly.
Can I do infrared photography with my smartphone?
Most smartphones have strong infrared blocking filters built into their cameras, making true infrared photography difficult. Some older phones or modified smartphones can capture infrared, but results vary significantly. Dedicated cameras with filters or conversion produce far superior Wood Effect images.