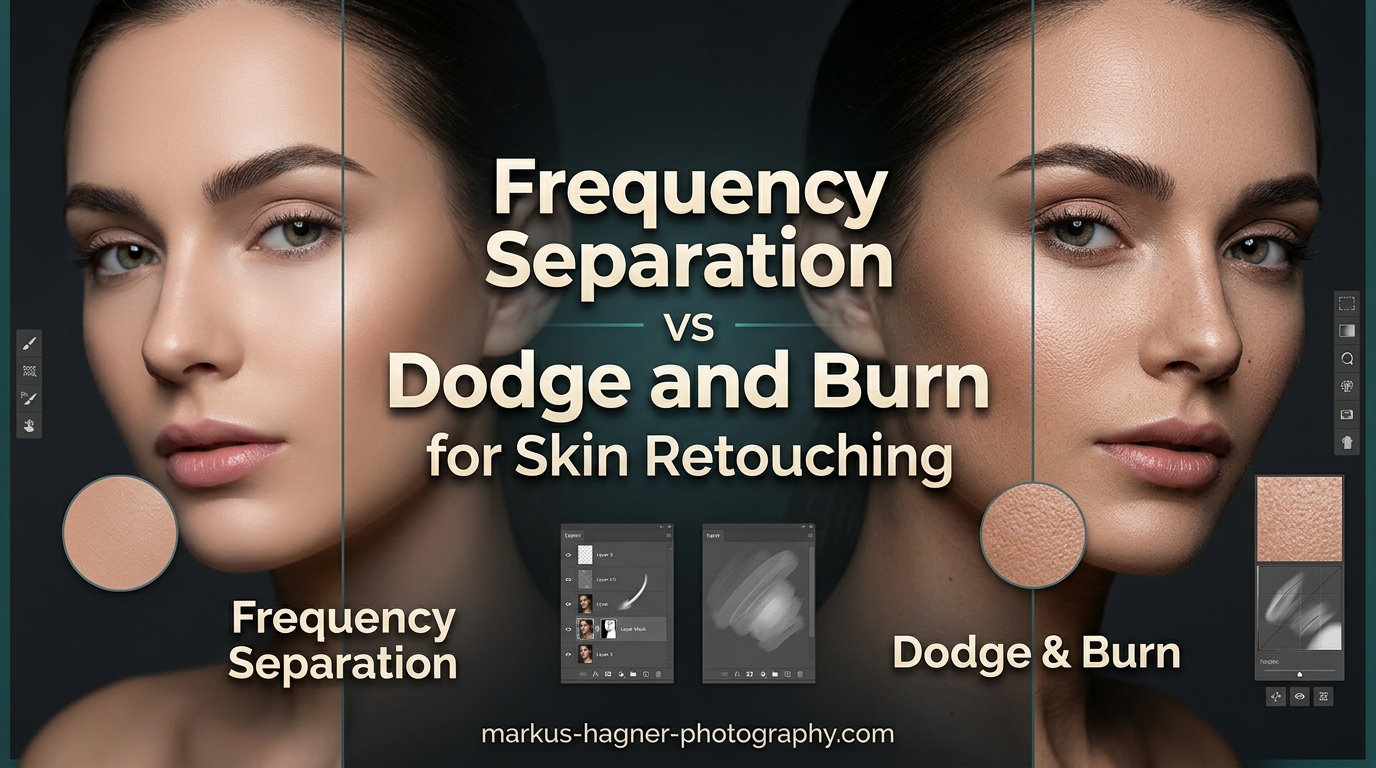
Frequency Separation separates color from texture while Dodge & Burn manipulates light and shadow. That is the core difference between these two essential retouching techniques. Think of it like comparing a fork to a spoon. Neither is better. They serve different purposes, and a skilled retoucher needs both in their toolkit.
When I first started retouching portraits, I struggled with this same question. After years of editing hundreds of images and testing both methods extensively, I have learned exactly when each technique shines. This guide breaks down everything you need to know about Frequency Separation vs Dodge and Burn so you can choose the right approach for your workflow.
In this article, I will explain how each technique works, when to use them, and why most professional retouchers combine both for the best results. By the end, you will have a clear understanding of which method fits your specific retouching needs.
What Is Frequency Separation?
Frequency Separation is a photo retouching technique that splits an image into two separate layers. One layer contains high-frequency information (texture, fine details, pores, and small imperfections). The other layer holds low-frequency information (color, tone, and gradual lighting changes). This separation lets you edit skin texture without affecting color, or correct color issues without destroying natural detail.
The technique works by applying a Gaussian Blur to create the low-frequency layer. The high-frequency layer is then extracted using specific blend modes that isolate the texture information. Most retouchers use a radius value between 5 and 25 pixels depending on image resolution. For a 20-megapixel portrait, I typically start with a radius of 8-12 pixels.
Once separated, you can paint on the low-frequency layer to even out skin tones, remove color blotches, or fix uneven lighting. The high-frequency layer lets you clone or heal blemishes, stray hairs, and other fine imperfections while keeping the surrounding texture intact. This non-destructive workflow preserves the natural look that clients expect from professional retouching.
When to Use Frequency Separation
Frequency Separation excels at fixing color and tone problems across large areas of skin. I reach for it when I need to even out redness in cheeks, remove dark circles under eyes, or correct blotchy skin tones. It is also my go-to technique for removing temporary blemishes like acne while keeping permanent features like freckles and moles intact.
This technique works particularly well for beauty and fashion photography where flawless but natural-looking skin is essential. Commercial retouchers use it extensively because it delivers consistent results across multiple images in a series. If you are editing a batch of headshots or product shots featuring models, Frequency Separation provides the speed and consistency you need.
What Is Dodge and Burn?
Dodge and Burn is a retouching technique that selectively lightens (dodges) and darkens (burns) areas of an image. Dodging lightens pixels while burning darkens them. The terms come from traditional darkroom photography where printers would physically block or add light during exposure to adjust specific areas of a print.
In digital retouching, I typically apply Dodge and Burn on a separate layer set to Soft Light or Overlay blend mode filled with 50% gray. Using a soft brush at low opacity (5-15%), I paint with white to dodge (lighten) shadows and with black to burn (darken) highlights. This approach contours the face, enhances bone structure, and adds depth and dimension to flat lighting.
Micro Dodge and Burn takes this concept further by working at the pixel level to smooth skin transitions without blurring. Instead of averaging pixels like Frequency Separation, this method selectively adjusts luminosity to even out skin while preserving every pore and fine detail. The result looks more natural but requires significantly more time and skill.
When to Use Dodge and Burn
Dodge and Burn shines when you need to sculpt and shape facial features. I use it to enhance cheekbones, define jawlines, and create more dramatic lighting effects. It is the preferred technique for editorial and high-end beauty work where maintaining perfect skin texture is non-negotiable.
This method also works well for fixing local exposure problems. If one side of a face is slightly shadowed or highlights are too bright, careful dodging and burning can balance the exposure without affecting color. Many portrait photographers prefer D&B for majority of their skin work because it maintains natural texture throughout the editing process.
Experienced retouchers often use Dodge and Burn as their primary skin smoothing technique, reserving Frequency Separation only for specific color corrections. This approach takes longer but produces the most natural results. I have spent upwards of 2 hours on a single portrait using only D&B for skin work.
Key Differences: Frequency Separation vs Dodge and Burn
Understanding the core differences between these techniques helps you choose the right tool for each job. The table below summarizes how Frequency Separation and Dodge and Burn compare across important factors.
| Aspect | Frequency Separation | Dodge and Burn |
|---|---|---|
| Primary Focus | Separates texture from color/tone | Manipulates light and shadow |
| Best For | Color correction, blemish removal, skin tone evening | Contouring, depth creation, local exposure fixes |
| Texture Preservation | Good (can degrade if overused) | Excellent (pixel-level adjustments) |
| Speed | Fast (10-30 minutes per image) | Slow (1-3 hours per image) |
| Learning Curve | Moderate | Steep |
| Risk of Over-Retouching | High (plastic skin effect) | Low (maintains natural detail) |
| Color Impact | None (color on separate layer) | Can cause color shifts (greyish tones) |
The fundamental distinction lies in what each technique targets. Frequency Separation works on two independent layers, letting you fix color problems without touching texture details. Dodge and Burn works on a single luminosity plane, adjusting brightness values to shape and contour. They solve different problems.
Speed is another major differentiator. A typical Frequency Separation workflow takes me 15-25 minutes per portrait. The same image using pure Dodge and Burn might require 90 minutes to 3 hours depending on how much correction is needed. This is why many working professionals combine both techniques strategically.
When to Use Each Technique
Choosing between Frequency Separation and Dodge and Burn depends on your specific retouching goals, available time, and desired aesthetic. Here is a detailed breakdown of scenarios where each technique performs best.
Scenarios for Frequency Separation
Use Frequency Separation when you need to fix widespread color or tone issues across large skin areas. This includes evening out red cheeks, removing sun damage patches, correcting uneven spray tan, or fixing color casts from mixed lighting. The technique handles these global corrections quickly and effectively.
Frequency Separation also works well for removing temporary blemishes like acne, minor rashes, or recent scars. The healing and cloning tools on the high-frequency layer make quick work of these imperfections. I can clean up 20-30 small blemishes in under 10 minutes using this method.
Commercial and catalog work benefits from Frequency Separation because it delivers consistent results across many images. When you need to process 50 headshots with similar retouching requirements, FS provides the efficiency needed without sacrificing quality. The technique is also forgiving for beginners who are still developing their retouching eye.
Scenarios for Dodge and Burn
Choose Dodge and Burn when texture preservation is your top priority. High-end beauty campaigns, editorial spreads, and fine art portraits demand natural skin that looks untouched. D&B achieves this by working at the pixel level rather than averaging areas together.
Use D&B for contouring and adding dimension to flat lighting. If your portrait looks two-dimensional or lacks definition in the cheekbones and jawline, careful dodging and burning can sculpt the face without any blurring. This technique essentially applies virtual makeup through light manipulation.
Dodge and Burn also handles local exposure corrections beautifully. When one area of skin is slightly darker or lighter than surrounding areas, targeted adjustments can blend these transitions seamlessly. I use this approach for fixing under-eye shadows, brightening the bridge of the nose, or reducing hot spots on foreheads.
Combining Both Techniques
Most professional retouchers use both techniques in a single workflow. The combination approach delivers the best of both worlds. I typically start with Frequency Separation to handle color corrections and obvious blemishes. This foundational work takes 10-15 minutes and addresses the major issues.
Then I move to Dodge and Burn for fine-tuning and contouring. Because the heavy lifting is already done, the D&B phase focuses on enhancement rather than correction. This combined workflow has cut my total retouching time from 3 hours to roughly 1.5 hours per high-end portrait.
The key is working in the right order. Start with Frequency Separation for cleanup and color work. Follow with Dodge and Burn for shaping and final polish. Some retouchers add a second round of color correction after D&B because the luminosity adjustments can sometimes cause subtle color shifts, especially in deeper skin tones.
Pros and Cons Comparison
Both techniques have distinct advantages and limitations. Understanding these helps you make informed decisions about which approach fits your specific project.
Frequency Separation Pros and Cons
Pros:
- Fast workflow for bulk corrections
- Separates texture from color for independent editing
- Effective for large-area color and tone fixes
- Easier learning curve for beginners
- Consistent results across multiple images
- Non-destructive when set up properly
Cons:
- Easy to overdo, creating plastic or mannequin-like skin
- Can blur fine details if radius is too large
- Less control over subtle transitions
- May remove natural features like freckles unintentionally
- Requires proper setup with correct radius values
Dodge and Burn Pros and Cons
Pros:
- Superior texture preservation at pixel level
- Natural-looking results when done well
- Excellent for contouring and dimensional enhancement
- Complete control over luminosity adjustments
- No averaging or blurring of skin detail
Cons:
- Extremely time-consuming (hours per image)
- Steep learning curve requiring significant practice
- Can cause color shifts (greyish or washed appearance)
- Requires color correction pass afterward
- Demanding on wrist and hand during long sessions
Common Mistakes to Avoid
Both techniques have pitfalls that can ruin your retouching. Here are the most common errors I see photographers make and how to avoid them.
Frequency Separation Mistakes
The biggest mistake is overusing Frequency Separation. Many beginners apply it too aggressively, resulting in that dreaded plastic skin effect. I follow the two-week rule: only remove what could naturally heal or change in two weeks. Temporary blemishes go. Permanent features like moles and freckles stay.
Another common error is using the wrong radius value. Too small and you will not separate enough information. Too large and you will blur important details. For most portraits, I recommend testing your radius on the transition between the nose and cheek. You should see the color separate from the texture without the edge becoming indistinct.
Dodge and Burn Mistakes
Working with opacity too high is the most frequent D&B error. When your brush opacity exceeds 20-25%, the adjustments become visible and unnatural. I keep my brush between 5-15% and build up effects gradually through multiple passes. This approach produces smoother transitions.
Ignoring color shifts is another major issue. Dodge and Burn can desaturate skin, creating greyish or washed-out patches. Always check your work by toggling the D&B layer visibility. If you notice color problems, add a Hue/Saturation or Vibrance adjustment to correct them. Some retouchers work on a separate color correction layer specifically to address this.
Frequently Asked Questions
What is the difference between frequency separation and Dodge and Burn?
Frequency Separation separates color from texture while Dodge & Burn manipulates light and shadow. FS allows you to edit skin tone and texture independently, while D&B shapes and contours by selectively lightening and darkening areas of the image.
What is frequency separation in retouching?
Frequency Separation is a photo retouching technique that separates an image into two layers: a high-frequency layer containing texture and fine details, and a low-frequency layer containing color and tone information. This allows retouchers to edit each aspect independently without affecting the other.
Does Dodge lighten or darken?
Dodging lightens areas of an image while burning darkens them. These terms originate from traditional darkroom techniques where photographers would dodge (block) light to lighten areas or burn (add extra exposure) to darken specific regions of a print.
When should I use frequency separation vs dodge and burn?
Use Frequency Separation for color correction, blemish removal, and evening out skin tones while preserving texture. Use Dodge and Burn for shaping, contouring, and adding depth and dimension through light and shadow manipulation. Many professionals combine both for optimal results.
Conclusion: Which Technique Wins?
Neither Frequency Separation nor Dodge and Burn is inherently better. They are complementary tools that serve different purposes in professional retouching. Frequency Separation excels at color correction and efficient blemish removal. Dodge and Burn provides superior texture preservation and dimensional enhancement.
If you are new to retouching, start with Frequency Separation to build your skills. It delivers solid results with a manageable learning curve. As you develop your eye for detail, incorporate Dodge and Burn for finishing work. Most professionals eventually adopt a combined workflow that leverages the strengths of both techniques.
The best retouchers know when to use each method. They understand that great skin retouching is not about removing every imperfection. It is about enhancing the subject while maintaining the natural character that makes each person unique. Master both techniques, and you will have complete control over your portrait retouching results.