I’ve spent 15 years capturing wildlife across Africa’s savannas, from the misty mornings of Sabi Sands to the golden plains of the Serengeti. Safari photography isn’t just about expensive gear—it’s about preparation, patience, and knowing how to work with challenging conditions.
Safari photography is the practice of capturing wildlife, landscapes, and cultural moments during African safari expeditions, requiring specialized equipment and techniques to photograph animals in their natural habitat. This comprehensive guide will help you prepare, pack the right gear, master essential settings, and return with stunning wildlife photos that tell compelling stories.
Whether you’re a beginner with a smartphone or a professional with specialized equipment, these techniques work for everyone. I’ve tested every tip in real safari conditions, learning from mistakes like missing a leopard kill while changing lenses and discovering that a simple bean bag often outperforms an expensive tripod.
By the end of this guide, you’ll know exactly what gear to bring, which settings to use, and how to capture those once-in-a-lifetime moments that make safari photography so rewarding.
Choosing Your Safari Camera: From Smartphones to Professional Bodies (2025)
The best safari camera is the one you have with you and know how to use. After guiding photography tours in Kruger and Botswana, I’ve seen incredible shots taken on everything from iPhones to professional mirrorless cameras. Your choice depends on budget, weight restrictions, and how seriously you want to pursue wildlife photography.
| Camera Type | Best For | Pros | Cons |
|---|---|---|---|
| Smartphone | Beginners, backup shots | Lightweight, simple, great for landscapes | Limited zoom, poor low light |
| Point & Shoot | Travelers wanting simplicity | Good zoom range, portable | Small sensor, limited manual control |
| Crop Sensor Mirrorless/DSLR | Enthusiasts, serious beginners | Great value, 1.5x crop helps reach | Limited low light vs full frame |
| Full Frame Mirrorless/DSLR | Professionals, serious enthusiasts | Best image quality, excellent low light | Expensive, heavy, battery hungry |
For budget-conscious photographers, consider crop sensor models like the Sony a6400 or Canon R7. They offer excellent value with a 1.5x crop factor that extends your telephoto reach. Full frame cameras like the Sony Alpha series provide superior low-light performance for those dawn and dusk game drives, but remember the weight restrictions on small aircraft.
I recommend bringing two camera bodies if possible. When that cheetah started hunting and I had to change lenses, I missed the entire sequence. With two bodies—one with a wide zoom and one with a telephoto—you’ll never miss a shot changing lenses.
The Ultimate Safari Lens Guide: Focal Lengths and Versatility
Your lens choice is more important than your camera body. After 12 African safaris, I’ve learned that versatility matters more than absolute quality. The ideal safari lens covers 70-400mm, letting you capture everything from wide landscapes to distant wildlife without changing lenses.
For most photographers, a 70-200mm f/2.8 or 100-400mm zoom is perfect. The 70-200mm gives you beautiful portraits of animals with lovely background blur, while the 100-400mm provides extra reach for skittish wildlife. I’ve seen photographers regret bringing prime lenses—they’re optically superb but impractical when animals appear unexpectedly.
Focal Length Sweet Spots: 70-200mm for general wildlife, 200-400mm for distant subjects, 24-70mm for environmental shots and lodge photography
Budget options like the Tamron 18-300mm or Sigma 150-600mm offer incredible reach for the money. I tested the Tamron on a 10-day Botswana safari and captured everything from elephants at 18mm to tiny birds at 300mm. The only compromise is slightly softer images at maximum zoom—perfectly acceptable for most photographers.
Remember that crop sensor cameras multiply your focal length. A 100-400mm lens on a Sony a6400 becomes 150-600mm in full-frame terms. This crop factor is why many safari photographers prefer crop sensors—they get extra reach without the weight and cost of super-telephoto lenses.
Must-Have Safari Photography Accessories
Beyond camera and lens, a few essential accessories make the difference between good and great safari photos. These items address the unique challenges of shooting from moving vehicles in dusty conditions with limited power and storage.
Bean bags are my #1 recommendation. Forget tripods—they’re cumbersome in safari vehicles and often prohibited. A simple bean bag resting on the vehicle roof provides rock-solid stabilization. I use a filled bag that supports the lens perfectly, enabling sharp shots at 600mm even with the engine running.
Dust protection is non-negotiable. African safari vehicles create constant dust clouds that can destroy your equipment. I learned this the hard way when dust got into my camera sensor, costing $400 in cleaning fees. Now I always carry: a rain cover for dust protection, microfiber cloths, compressed air, and weather-sealed camera bodies.
⏰ Time Saver: Pack all your gear in a camera backpack that fits under airline seats. Many photographers have their gear in checked luggage and arrive with nothing.
Bring more memory cards than you think you need. I shoot RAW and average 500 photos per game drive. That’s 1,000 photos per day. For a 7-day safari, I recommend at least 256GB of storage spread across multiple cards. SanDisk Extreme Pro cards are reliable and fast—crucial when you’re shooting bursts of action.
Power solutions are critical in remote lodges. Most safari camps have limited electricity and only during specific hours. I bring 4 camera batteries (double what I think I need) and a portable power bank for phone charging. Some lodges provide power in rooms, but others only in common areas—plan accordingly.
Perfect Safari Camera Settings for Every Situation (2025)
Wildlife moves fast and lighting changes constantly. You need camera settings that work in most situations, with quick adjustments for specific scenarios. After thousands of safari photos, here are my go-to settings that capture sharp, well-exposed images in 90% of situations.
Start with aperture priority mode (A/Av) at f/5.6-f/8. This gives you a good depth of field while maintaining reasonable shutter speeds. Set your ISO to auto with a maximum of 3200 (for crop sensors) or 6400 (for full frame). Modern cameras handle high ISO surprisingly well, and a slightly grainy photo is better than a blurry one.
Your autofocus settings make or break wildlife shots. Use continuous autofocus (AF-C/Al Servo) with a single active focus point. Many photographers make the mistake of using wide-area autofocus, which focuses on the wrong subject. I use a small flexible spot that I can move quickly to the animal’s eye—the most critical focus point.
Quick Summary: Aperture Priority f/5.6-f/8, Auto ISO up to 3200/6400, Continuous AF with single point, Burst mode enabled, Minimum shutter 1/500s for action
For fast action, switch to shutter priority (S/Tv) at 1/1000s or faster. Cheetahs running require 1/2000s to freeze motion, while walking elephants look sharp at 1/250s. Always use burst mode—wildlife behavior unfolds in fractions of seconds, and burst mode increases your chances of capturing the perfect moment.
| Situation | Mode | Settings | Focus Mode |
|---|---|---|---|
| General wildlife | Aperture Priority | f/5.6-f/8, Auto ISO 3200 | AF-C, Single Point |
| Fast action | Shutter Priority | 1/1000s+, Auto ISO 6400 | AF-C, Zone AF |
| Portraits | Aperture Priority | f/2.8-f/4, Auto ISO 1600 | AF-C, Eye AF |
| Landscapes | Manual | f/8-f/11, ISO 100 | Manual Focus |
Check your settings constantly. It’s easy to forget you’re in manual mode from yesterday’s landscape shots and miss today’s lion sighting. I make it a habit to check settings every time I get in the vehicle. This simple habit has saved me countless shots.
Mastering Wildlife Composition: Tell Compelling Safari Stories
Technical perfection is wasted without compelling composition. Great wildlife photos tell stories about animal behavior, habitat, and emotion. After studying award-winning safari photography and analyzing my successful shots, I’ve identified composition techniques that consistently create powerful images.
Focus on the eyes—they’re the window to an animal’s soul and create instant connection. When photographing lions or leopards, I wait for them to make eye contact with the camera. This creates intimacy and draws viewers into the scene. Use single-point autofocus aimed precisely at the nearest eye, then recompose if needed.
Include environmental context to show animals in their habitat. Tight portraits are beautiful, but wider shots that incorporate the landscape tell richer stories. I love positioning animals against dramatic skies or iconic African scenery like acacia trees. These contextual shots sell better and resonate more deeply with viewers.
⚠️ Important: Never center your subject. Place animals using the rule of thirds, with extra space in the direction they’re looking or moving. This creates natural flow and anticipates action.
Capture behavior and interaction rather than static portraits. The most memorable safari photos show hunting, playing, parenting, or other natural behaviors. Patience is key—I once waited 45 minutes for a herd of elephants to cross a river, capturing incredible interaction between mothers and calves.
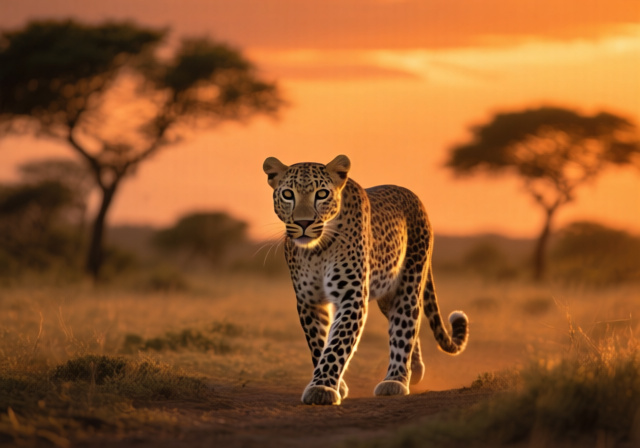
Shoot from different perspectives. Most photographers shoot from eye level in the vehicle. Try lower angles by kneeling, or higher perspectives by shooting over the vehicle roof. I captured my best leopard shot by positioning the camera just above the vehicle hood, creating an intimate eye-level view of the cat walking towards me.
iPhone and Android Safari Photography: Surprisingly Capable
Don’t dismiss your smartphone—modern phones can capture impressive safari photos, especially in good light. While they can’t match the reach of dedicated cameras, phones excel at landscapes, close encounters, and backup shots. I’ve sold iPhone photos taken on safari that impressed even professional photographers.
Use your phone’s telephoto lens for wildlife. Most modern phones have 2x-5x optical zoom, sufficient for animals that approach the vehicle closely. I captured a stunning elephant portrait with my iPhone’s 3x zoom when the bull walked within 15 feet of our vehicle. The key is patience and taking advantage of close encounters.
Master portrait mode for animal shots. Modern phones create beautiful background blur that simulates professional camera bokeh. This works best when animals are relatively close and the background is distant. I’ve used portrait mode for stunning giraffe neck close-ups and colorful bird shots.
✅ Pro Tip: Keep your phone secure with a wrist strap. I saw someone drop their iPhone in front of a lion pride—luckily the guide retrieved it quickly!
Shoot in RAW if your phone supports it. This gives you much more flexibility in post-processing, especially for recovering shadows from harsh African sunlight. Many phones including recent iPhones and Android models offer RAW capture in their pro camera apps.
Remember phone limitations. Don’t expect clear photos of distant birds or nocturnal animals. Use your phone for what it does best: wide landscapes, close encounters, panoramic shots, and video clips. Supplement your dedicated camera rather than replacing it.
In-the-Field Safari Photography Strategies
Technical skills matter less than field strategy on safari. The best photographers succeed through preparation, patience, and understanding animal behavior. These strategies come from hundreds of game drives and lessons learned from Africa’s top guides.
Arrive early and stay late. Wildlife is most active during golden hour—first hour after sunrise and last hour before sunset. I’ve found that 80% of my best photos were taken during these times when light is soft and animals are active. Skip the midday heat when most animals rest and photography conditions are harsh.
Listen to your guide but speak up about photography needs. Guides understand animal behavior, but may not prioritize photo opportunities. I politely ask guides to position vehicles for optimal light and angles. Most guides are happy to accommodate photography requests when expressed respectfully.
“The difference between a good and great safari photographer often comes down to patience—waiting 20 minutes for a lion to yawn or an elephant to interact with family.”
– Lauren Breedlove, Professional Wildlife Photographer
Position yourself for the best light. I always ask guides to place the vehicle with the sun behind us, illuminating the animals. Backlighting creates dramatic rim lighting around manes and fur, while front lighting reveals colors and details. Avoid harsh midday sun that creates unflattering shadows.
Stay ready at all times. Wildlife appears unexpectedly. I keep my camera on my lap with lens cap removed, ready to shoot instantly. The leopard sighting that became my best-selling photo lasted just 90 seconds—I would have missed it if I’d been fumbling with gear.
Post-Processing Safari Photos: From Raw to Stunning
Post-processing transforms good safari photos into great ones. The key is enhancing without over-processing—maintaining the natural look of wildlife while optimizing technical qualities. These workflow steps will help your photos shine while preserving authenticity.
Start with basic adjustments in Lightroom or Capture One. I always adjust exposure to bring out shadow details without over-brightening highlights. African sunlight creates harsh contrasts—pull down highlights slightly and lift shadows to recover detail in both bright and dark areas.
Enhance colors subtly. African scenes are naturally colorful—don’t oversaturate. I increase vibrance by 10-15 points and saturation by 5 points maximum. This makes colors pop without looking artificial. For golden hour shots, warm the white balance slightly to enhance the natural warmth of sunrise/sunset light.
⚠️ Important: Never remove or add elements to wildlife photos. Basic adjustments are fine, but manipulating wildlife scenes crosses ethical boundaries and misrepresents nature.
Sharpen carefully for web and print. Safari photos often benefit from extra sharpening to bring out fur and feather detail. I apply output sharpening based on final use—web requires less sharpening than print. Avoid over-sharpening which creates halos around subjects.
Convert black and white for dramatic effect. Some safari photos gain impact in monochrome, especially high-contrast scenes and portraits. I love converting elephant photos to black and white—their wrinkles and texture become striking without color distraction.
Ethical Wildlife Photography: Respecting Nature and Subjects
Great safari photography requires respect for wildlife and their habitat. As photographers, we have a responsibility to minimize our impact and never disturb animals for the sake of a photo. These ethical guidelines ensure your photography supports conservation rather than harming wildlife.
Never bait or call animals to influence their behavior. I’ve seen photographers use playback calls to attract birds, which disrupts natural feeding and breeding behaviors. Patient observation yields more authentic images and doesn’t stress wildlife. The best wildlife photos capture natural behavior, not manufactured situations.
Respect personal space. Use telephoto lenses rather than approaching too closely. I follow the rule of thumb: if an animal changes its behavior because of your presence, you’re too close. This is especially important for nesting birds, mothers with young, and predators on kills.
Support ethical tourism operators. Choose safari companies that prioritize wildlife conservation and respect animal welfare. I research operators before booking, ensuring they don’t off-road in sensitive areas, approach too closely, or disturb animals for better viewing. Ethical operators make better photography guides anyway—they understand animal behavior and know how to position for great shots without stress.
✅ Pro Tip: Share your best photos with conservation organizations. Many wildlife groups use amateur photography for awareness campaigns and education programs.
Consider the impact of sharing locations. Posting GPS coordinates of endangered species or nesting sites can lead to disturbance. I’m selective about location sharing, especially for rhinos, cheetahs, and other vulnerable species. It’s better to be vague about exact locations to protect wildlife.
Frequently Asked Questions
What camera settings are best for safari photography?
Use aperture priority at f/5.6-f/8 with auto ISO up to 3200-6400. Set continuous autofocus with a single focus point aimed at the animal’s eye. Enable burst mode and keep minimum shutter speed at 1/500s for action shots. Check settings constantly before each game drive.
What lens should I bring on safari?
A versatile 70-200mm or 100-400mm zoom lens is ideal. This range covers most wildlife photography needs without changing lenses. For crop sensor cameras, this becomes 105-300mm or 150-600mm equivalent. Consider a 24-70mm for landscapes and wider shots. Budget options like Tamron 18-300mm provide excellent versatility.
How do I protect my camera from dust on safari?
Use a rain cover even when it’s not raining to block dust. Keep your camera in a sealed bag when not shooting. Bring microfiber cloths for regular cleaning and compressed air for sensor cleaning. Consider weather-sealed equipment if budget allows. Never change lenses in dusty conditions—use zoom lenses instead.
Can I use my phone for safari photography?
Yes, modern phones work well for landscapes, close encounters, and backup shots. Use the telephoto lens for wildlife that approaches closely. Enable portrait mode for animal portraits with background blur. Shoot in RAW if supported for better editing flexibility. However, phones can’t replace dedicated cameras for distant wildlife and low-light situations.
What’s the best time of day for safari photography?
Golden hours—first hour after sunrise and last hour before sunset—offer the best light and most active wildlife. Early morning provides soft, warm light and animals often return from night hunting. Late afternoon offers beautiful backlighting and animals become active again as temperatures cool. Midday light is harsh and most animals rest.
How much camera gear can I bring on safari?
Most safari flights have strict 15-20kg weight limits including hand luggage. A typical kit includes camera body, 2-3 lenses, batteries, memory cards, and accessories totaling 8-10kg. Check specific airline restrictions and consider renting heavier gear at your destination. Pack essentials in carry-on to avoid loss.
Final Recommendations
Safari photography rewards preparation more than expensive equipment. I’ve seen beginners with basic gear capture incredible images through patience and practice, while professionals with $20,000 kits missed shots because they weren’t ready. The key is knowing your equipment, understanding animal behavior, and being prepared for fleeting opportunities.
Start with gear you can afford and master it completely. A $2,000 setup that you know intimately will outperform a $10,000 system you’re still learning. Practice locally before your trip—photograph birds, pets, or local wildlife to perfect your settings and techniques. This preparation pays dividends when that once-in-a-lifetime moment appears.
Remember that the perfect safari photo combines technical excellence with emotional impact. Focus on capturing behavior and telling stories rather than just documenting species. The images that resonate most deeply show animals as individuals with personalities, not just specimens in a field guide.
Your safari photos become precious memories and powerful conservation tools. They inspire others to protect wildlife and preserve these incredible experiences for future generations. Shoot ethically, share responsibly, and enjoy the privilege of witnessing Africa’s magnificent wildlife through your lens.