If you’ve ever photographed a high-contrast scene and struggled to capture detail in both the brightest highlights and darkest shadows, you’re not alone. That’s where HDR photography comes in, and Lightroom’s built-in HDR merge feature makes it easier than ever. I’ve been using this tool for years to create natural-looking HDR images that maintain detail throughout the entire tonal range.
Can you merge HDR photos in Lightroom? Yes, absolutely. Lightroom Classic includes a powerful Photo Merge > HDR tool that combines multiple bracketed exposures into a single 32-bit floating point DNG file. This gives you extended dynamic range that exceeds what a single exposure can capture, all while preserving the flexibility of RAW editing.
Unlike the overprocessed, oversaturated HDR look from a decade ago, Lightroom’s approach creates clean, natural results. I’ll walk you through the entire workflow from capturing bracketed exposures to processing the final DNG file, with tips I’ve learned from processing hundreds of HDR merges over the years.
What is HDR Photography and Why Use It?
HDR (High Dynamic Range) photography is a technique that captures a wider range of tonal values than a single camera exposure can record. The human eye can perceive about 20 stops of dynamic range, while even the best modern cameras capture only 10-14 stops in a single shot. This limitation becomes obvious when photographing scenes with extreme contrast.
Think about a landscape at sunset with a bright sky and dark foreground. A single exposure either blows out the sky to preserve shadow detail, or renders the foreground as black to keep the sky intact. HDR photography solves this by merging multiple exposures captured at different brightness levels.
Lightroom’s HDR merge creates a 32-bit floating point DNG file that contains data from all your exposures. This gives you tremendous editing flexibility—the resulting file retains highlight and shadow detail that would be lost in a standard RAW file. I’ve found this especially valuable for landscape photography, real estate interiors, and any backlit situation.
The advantage of using Lightroom’s built-in HDR merge over specialized HDR software is the seamless workflow. The merged DNG behaves like any other RAW file in your catalog, with all of Lightroom’s editing tools available. No round-tripping to separate applications or dealing with complicated tone mapping interfaces.
How to Capture Bracketed Exposures for HDR?
Before you can merge HDR photos in Lightroom, you need to capture bracketed exposures. Exposure bracketing means taking multiple photos of the same scene at different exposure values. Most cameras offer an Auto Exposure Bracketing (AEB) feature that automates this process.
For HDR photography, I recommend shooting in RAW format to maximize quality. RAW files contain more data than JPEGs, which is crucial when you’re pushing the dynamic range during processing. Set your camera to aperture priority or manual mode, then enable AEB in your shooting menu.
How many exposures should you capture? It depends on the scene’s contrast range:
- Low contrast scenes: 2-3 exposures separated by 1-2 EV
- Moderate contrast: 3-5 exposures separated by 2 EV
- Extreme contrast: 5-7 exposures separated by 2-3 EV
Most of the time, I use a 3-shot bracket at -2, 0, and +2 EV. This covers the vast majority of real-world situations without overwhelming the merge process. Some photographers report success with just 2 exposures (-2 and +2 EV) for moderate scenes, skipping the middle exposure.
A tripod is ideal for HDR photography to ensure perfect alignment between shots. However, Lightroom’s Auto Align feature can handle minor movement if you need to shoot handheld. I’ve successfully merged handheld brackets when using shutter speeds fast enough to freeze motion, but results vary.
When setting up your camera, keep the aperture constant between exposures to maintain consistent depth of field. Your camera’s AEB mode should handle this automatically by adjusting shutter speed rather than aperture. Use a remote trigger or 2-second timer to avoid camera shake during the bracketing sequence.
How to Merge HDR Photos in Lightroom: Step-by-Step Guide
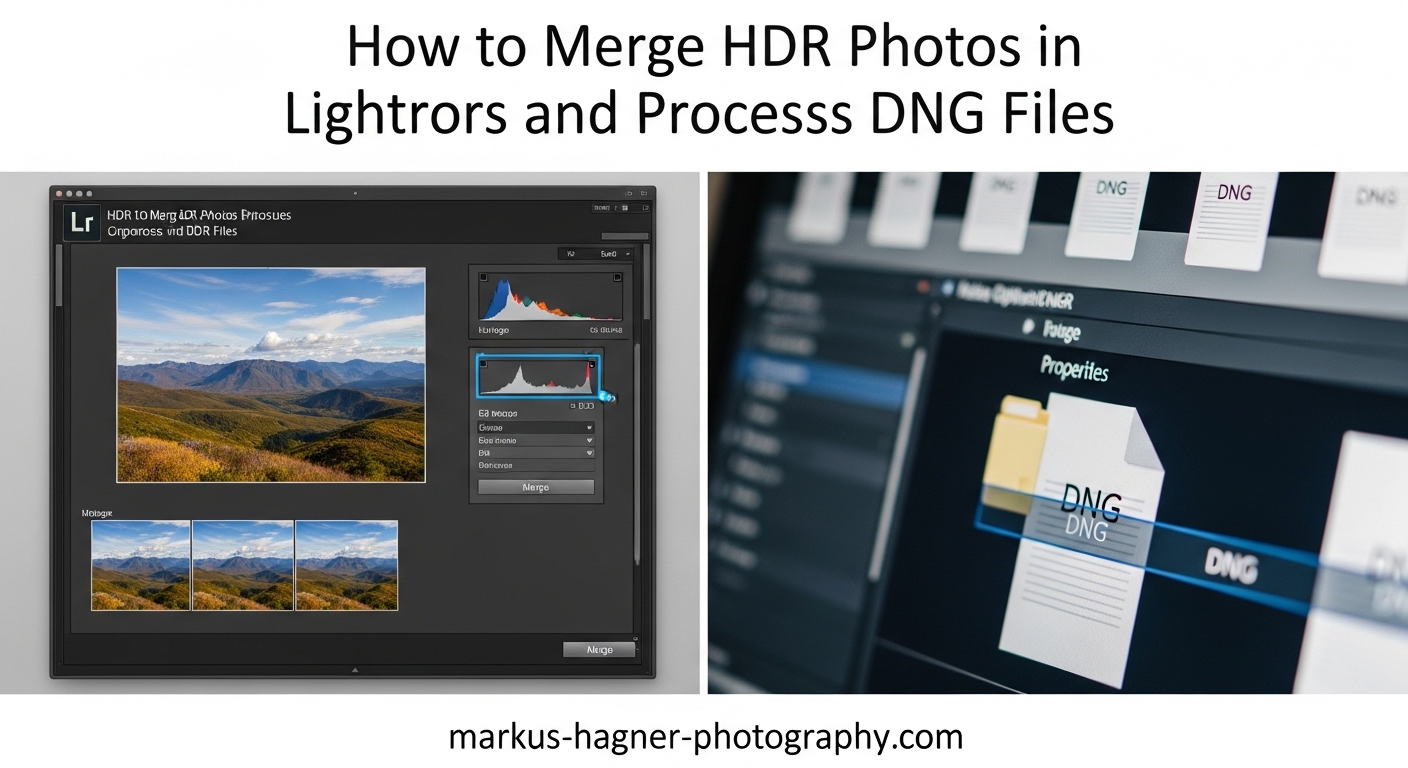
Once you’ve captured your bracketed exposures and imported them into Lightroom Classic, merging them into an HDR DNG file is straightforward. Here’s the exact workflow I use:
Step 1: Select Your Bracketed Photos
In the Library module, locate the series of bracketed exposures you want to merge. Click on the first image, then Shift-click the last image to select the entire sequence. You can also Ctrl-click (Windows) or Cmd-click (Mac) to select non-consecutive images if your brackets are interspersed with other shots.
Make sure you’ve selected the correct number of exposures in the right order. Lightroom will merge them in the order selected, but for most scenes this doesn’t significantly affect the result as long as you include your darkest and brightest exposures.
Step 2: Access the HDR Merge Tool
With your images selected, go to Photo > Photo Merge > HDR in the menu bar. The keyboard shortcut is Ctrl+H on Windows or Cmd+H on Mac—I use this constantly to speed up my workflow.
Lightroom will begin generating a preview of the HDR merge. This process can take anywhere from a few seconds to several minutes depending on your computer’s speed and the resolution of your images. You’ll see a progress indicator as Lightroom aligns, merges, and tone maps the exposures.
Step 3: Configure HDR Merge Settings
Once the preview is ready, the HDR Merge Preview dialog will appear. This window shows you a preview of the merged result along with several options for controlling the merge process. I’ll explain each setting in detail in the next section, but here are the basics:
- Auto Align: Corrects minor camera movement between shots
- Auto Tone: Applies initial tonal adjustments automatically
- Deghost Amount: Controls how Lightroom handles moving subjects
- Show Deghost Overlay: Highlights areas affected by deghosting
For most landscape shots on a tripod, I enable Auto Align and Auto Tone with Deghost set to Low. If there’s significant movement in the scene (water, trees, people), I’ll increase the Deghost amount accordingly.
Step 4: Create the HDR DNG
When you’re satisfied with the preview, click Merge. Lightroom will process the full-resolution HDR merge and create a new DNG file in your catalog. This can take a minute or two for high-resolution images.
The merged DNG will appear in the Grid view alongside your original bracketed photos. By default, Lightroom creates a stack with the HDR file on top. You can uncheck “Create Stack” in the HDR Merge dialog if you prefer all files to remain visible separately.
HDR Merge Dialog Options Explained
Understanding the options in Lightroom’s HDR Merge dialog is key to getting the best results. Let me break down each setting and when to use it.
Auto Align
Auto Align corrects for slight camera movement between exposures. Even on a tripod, minor shifts can occur from mirror slap or wind. I recommend keeping Auto Align enabled unless you’re absolutely certain there was zero movement between shots.
For handheld HDR photography, Auto Align is essential. Lightroom’s alignment algorithm handles surprisingly well for minor movement, though results vary depending on shutter speed and how steady you can hold the camera. If you’re merging shots with significant misalignment, consider whether the scene is worth the effort.
Auto Tone
Auto Tone applies initial tonal adjustments to the merged HDR DNG. Lightroom analyzes the combined dynamic range and sets initial values for exposure, highlights, shadows, whites, and blacks. This gives you a reasonable starting point for further editing.
I usually keep Auto Tone enabled for a neutral starting point. However, some photographers prefer to disable it and start from a flat, unadjusted file. If you’re comfortable with manual tone mapping or have a specific look in mind, try unchecking Auto Tone and building the tones yourself in the Develop module.
Deghost Amount
Deghosting addresses the problem of moving subjects between exposures. If tree branches, water, clouds, or people shift position during your bracketing sequence, the merged HDR can show ghosting artifacts—duplicate semi-transparent versions of moving objects.
Lightroom offers four deghosting levels:
- None: No deghosting applied. Use for static scenes on a tripod.
- Low: Minimal deghosting. Best for scenes with slight movement like gentle water or slow-moving clouds.
- Medium: Moderate deghosting. Good for scenes with moderate movement like windblown foliage.
- High: Aggressive deghosting. Use for scenes with significant movement, though this can cause artifacts in complex areas.
I typically start with Low or Medium deghosting and preview the results. The “Show Deghost Overlay” option highlights affected areas in red, making it easier to evaluate the effect. Enable this toggle to see precisely where deghosting is being applied.
Be aware that high deghosting settings can sometimes create unnatural results or smooth out areas you want to keep detailed, like water texture. When in doubt, try multiple settings and compare. There’s no one-size-fits-all answer.
Create Stack
This option groups your original bracketed photos with the new HDR DNG in a stack, keeping your catalog organized. The HDR file appears on top, with the source images hidden underneath. Click the stack number to expand and view all files.
I always enable Create Stack to keep my HDR sequences organized. It makes it easy to return to the original brackets if needed without cluttering the grid. If you prefer seeing all files at once, uncheck this option.
Processing the Resulting DNG File in Lightroom
Why does Lightroom create a DNG file for HDR merges? The merged HDR is saved as a 32-bit floating point DNG, which preserves the extended dynamic range data from all your exposures. This format can store tonal information that would be lost in a standard 16-bit RAW file, giving you unprecedented editing headroom.
After merging, you’ll find the new DNG file in your catalog alongside your original brackets. It’s treated like any other RAW file—you can edit it in the Develop module, apply presets, and export it in various formats. The difference is the amount of data available for manipulation.
Finding Your HDR DNG
If you can’t locate your merged HDR file, check the stack. The HDR DNG is typically placed on top of the stacked images. Click the stack count number in the corner of the thumbnail to expand and view all files. If you disabled Create Stack, scroll through your import session to find the file named with “-HDR” appended to the original filename.
Basic Panel Adjustments
Start your HDR processing in the Basic panel. If you enabled Auto Tone during merge, you’ll have a reasonable starting point. If not, begin by setting the white point—drag the Whites slider until the brightest highlights just begin to clip, then back off slightly.
Next, adjust the Highlights slider to recover detail in bright areas. One of the advantages of HDR is that you can push the Highlights slider more aggressively than with a single exposure since you’ve captured more highlight data. Similarly, lift Shadows to reveal detail in dark areas.
The Exposure slider controls overall brightness. With HDR, you often have more flexibility here since you’re not fighting clipped highlights or blocked shadows. I find I can push exposure further in both directions with HDR files compared to single exposures.
Tone Curve and Presence Sliders
The Tone Curve lets you fine-tune contrast. For a natural HDR look, I use a gentle S-curve to add contrast without crushing shadows or blowing highlights. Avoid aggressive curves that create an unnatural, overprocessed appearance.
The Presence sliders—Clarity, Dehaze, Vibrance, and Saturation—are powerful but require restraint. Clarity adds local contrast and can enhance detail, but too much creates a harsh, gritty look. I typically use Clarity values between +10 and +25 for HDR images.
Dehaze can add contrast and color saturation, but it’s easy to overdo. Use it sparingly, if at all. Vibrance is safer than Saturation for HDR images because it boosts muted colors more than already-saturated ones, preventing oversaturation.
Local Adjustments with Masking
Lightroom’s masking tools work exceptionally well with HDR files. The extended dynamic range gives you more data to work with when applying local adjustments. I frequently use linear gradients to darken bright skies or brighten dark foregrounds, taking advantage of the HDR file’s headroom.
The Range Masking feature is particularly useful for HDR. You can target specific brightness ranges—for example, applying clarity only to highlights while leaving shadows untouched. This selective approach prevents the “crunchy” HDR look that plagues poorly processed high dynamic range images.
Settings Retained After HDR Merge
When you merge photos to HDR, Lightroom creates a completely new DNG file. Some settings from your source images are preserved, while others reset to defaults. Presence sliders (Clarity, Dehaze, Vibrance, Saturation), Color Mixer, Color Grading, Detail adjustments, and Lens Corrections are typically retained. Basic tonal adjustments (Exposure, Contrast, Highlights, Shadows, Whites, Blacks) reset because the merged file has different tonal characteristics than any single source image.
Understanding which settings survive the merge helps you develop an efficient workflow. If you’ve applied lens corrections or camera calibration to your source images, those will carry over to the HDR DNG, saving you time.
Exporting Your Final HDR Image
Once you’ve processed your HDR DNG to your liking, it’s time to export. Go to File > Export or use the shortcut Ctrl+Shift+E (Windows) or Cmd+Shift+E (Mac). The export settings for HDR images are similar to those for any other photo, with a few considerations.
For maximum quality, export as TIFF with 16-bit depth and Adobe RGB or ProPhoto RGB color space. This preserves as much of the HDR file’s extended data as possible, which is useful if you plan further editing in Photoshop or other software. TIFF files are larger but maintain the full quality of your processed HDR.
For web sharing, JPEG is more practical. Use sRGB color space for maximum compatibility, and set quality to 80-100 depending on your needs for file size versus quality. Lightroom’s Super Resolution option can help if you need to enlarge the image significantly.
If you’re delivering files to clients or printing, consider the output medium’s dynamic range. Print has more limited dynamic range than screen, so you may need to apply slightly more aggressive contrast during export preparation to ensure the image doesn’t appear flat in print.
Tips, Tricks, and Troubleshooting
Batch HDR Merge Workflow
If you have multiple HDR sequences to process, Lightroom offers a faster workflow. Select all the bracket sets you want to merge, then press Shift+Ctrl+H (Windows) or Shift+Cmd+H (Mac). This performs a “headless” merge without showing the preview dialog, using default settings (Auto Align and Auto Tone enabled, Low deghosting).
This batch approach is significantly faster when processing dozens of HDR sequences. However, you lose the opportunity to customize settings for each merge. Use this for consistent scenes where the default settings work well, and preview a few results to ensure quality.
Fixing HDR Merge That Looks Like Single Exposure
A common frustration is when the merged HDR looks nearly identical to your middle exposure. This usually happens when there wasn’t enough dynamic range in the scene to justify HDR, or when your exposures didn’t span enough EV difference.
If your brackets are only 1 EV apart, try increasing the separation to 2 EV. Alternatively, the scene may simply not have enough contrast to benefit from HDR. In these cases, a single exposure with careful processing may produce equally good results.
Another possibility is that Auto Tone is neutralizing the HDR effect. Try merging again with Auto Tone disabled, then apply tone mapping manually in the Develop module. This gives you more control over the final look.
Color Saturation Loss
Some photographers report that HDR DNG files appear less saturated than expected. This is a known issue that has improved in recent Lightroom versions but can still occur. The solution is usually to manually boost saturation or vibrance in the Basic panel, or use the Color Mixer to target specific hue ranges.
Avoid oversaturating to compensate—this creates the unnatural HDR look that gives the technique a bad reputation. Subtle saturation increases that enhance natural colors work better than aggressive boosts.
Dealing with Ghosting Artifacts
If you see ghosting in your merged HDR—semi-transparent duplicates of moving objects—you have a few options. First, try merging again with a higher deghosting setting. If High deghosting still shows artifacts, consider whether those moving elements are essential to the image.
Sometimes the best solution is to accept some ghosting in non-critical areas like leaves or water texture. Perfect deghosting isn’t always possible, especially with significant subject movement between frames. In extreme cases, you may need to use Photoshop’s more advanced deghosting or manually blend layers.
Lightroom Classic vs Lightroom CC
Lightroom Classic (the desktop version with full catalog features) and Lightroom CC (the cloud-based version) have different HDR capabilities. Classic offers more control with the detailed HDR Merge dialog, while CC provides a simplified HDR merge with fewer options.
The steps in this guide apply specifically to Lightroom Classic, which is the version most serious photographers use for HDR work. If you’re using Lightroom CC, the merge process is streamlined but less customizable. Consider upgrading to Classic for advanced HDR workflows.
When HDR Merge Doesn’t Work
Occasionally, Lightroom fails to merge photos to HDR. Common causes include: non-RAW source files (HDR merge requires RAW), images with different dimensions or aspect ratios, or corrupted files. Ensure all selected photos are RAW files captured with the same camera and lens settings.
If Lightroom crashes during merge, the issue may be insufficient memory. HDR merging is resource-intensive, especially with high-resolution files. Close other applications and try again. If problems persist, reduce the number of images in the merge or ensure you’re running the latest Lightroom version.
Frequently Asked Questions About HDR Merge in Lightroom
Can you merge HDR photos in Lightroom?
How many photos do I need for HDR merge?
What is deghosting in HDR photography?
Why does Lightroom convert photos to DNG?
How do I merge HDR without preview in Lightroom?
Should I use Auto Align for HDR merge?
What settings are retained after HDR merge?
Final Thoughts on HDR Merge in Lightroom
Learning how to merge HDR photos in Lightroom is a valuable skill that opens up creative possibilities for high-contrast scenes. The key is capturing quality bracketed exposures in the first place—use a tripod when possible, shoot RAW, and ensure enough exposure separation to cover the scene’s dynamic range.
Lightroom’s HDR merge excels at creating natural-looking results that enhance what you saw rather than creating artificial, overprocessed images. The 32-bit floating point DNG gives you tremendous editing flexibility while maintaining the clean, non-destructive workflow that makes Lightroom so efficient.
Like any technique, HDR photography takes practice. Experiment with different numbers of exposures, deghosting settings, and processing approaches to develop your own style. Not every high-contrast scene needs HDR, and not every HDR merge will succeed—and that’s okay. Part of mastering the technique is learning when to use it and when a single exposure will serve you better.
The most important advice I can offer is to start with subtle adjustments. HDR gives you the data to recover highlight and shadow detail, but that doesn’t mean you have to push every slider to its maximum. Natural, realistic HDR images often look more impressive than exaggerated ones because they demonstrate skillful capture and processing rather than heavy-handed effects.
Now that you understand the complete workflow from capture through processing, grab your camera and find some high-contrast scenes to practice. The best way to learn HDR photography in Lightroom is by doing—merge photos, process the DNG files, export the results, and refine your approach based on what you see. Before long, you’ll develop an intuitive sense of which scenes benefit from HDR and exactly how to process them for stunning, natural-looking results.