You know that feeling when you hike to an incredible viewpoint, snap what should be a stunning landscape photo, and then see a flat, washed-out image on your screen? That frustrating haze that dulls distant mountains and mutes sky colors has ruined more landscape shots than I can count. The good news is that learning how to use Dehaze in Lightroom can transform those disappointing captures into the dramatic scenes you actually witnessed.
The Dehaze tool in Adobe Lightroom has become one of my go-to adjustments for landscape photography editing. Whether I am dealing with morning fog rolling through valleys, atmospheric haze obscuring distant peaks, or even heat shimmer distorting horizons, this single slider often does what would take multiple contrast and clarity adjustments to achieve. In this guide, I will show you exactly how to use Dehaze effectively, when to reach for it, and how to avoid the common mistakes that make photos look overprocessed.
What is Dehaze in Lightroom and How Does It Work?
The Dehaze slider is a specialized adjustment tool in Lightroom designed specifically to combat atmospheric haze in photographs. Unlike generic contrast adjustments, Dehaze analyzes how light scatters through your image and targets those low-frequency areas where haze typically lives. Think of it as a smart contrast boost that knows exactly where to work.
Technically, Dehaze increases contrast in the low-frequency areas of your photo while simultaneously boosting color saturation in affected regions. Low-frequency areas are the broad, gradual tonal transitions like skies, distant landscapes, and fog banks where fine details are minimal. When atmospheric particles scatter light, they flatten these transitions and wash out colors. Dehaze reverses this effect by restoring the natural contrast and color relationships that your eyes perceived but your camera struggled to capture.
Where to Find the Dehaze Slider in Lightroom
In Lightroom Classic, you will find the Dehaze slider in the Develop module within the Basic panel, positioned between Texture and Clarity. In Lightroom CC (the cloud-based version), open the Edit panel and look under Light or Effects depending on your version. The slider ranges from -100 to +100, with 0 as the neutral starting point.
How to Use Dehaze in Lightroom: Step-by-Step Guide
Using the Dehaze tool effectively requires understanding both the mechanics and the art of this adjustment. Here is my step-by-step workflow for cutting through fog and haze in landscape photos:
Step 1: Open your image in the Develop module
Import your hazy landscape photo and switch to the Develop module by pressing D on your keyboard or clicking Develop at the top right. I recommend making basic exposure and white balance corrections before applying Dehaze, as these foundational adjustments affect how Dehaze interacts with your image.
Step 2: Locate the Dehaze slider
In the Basic panel on the right side, scroll to find the Dehaze slider positioned between Texture and Clarity. If you are using an older version of Lightroom, check the Effects panel instead, as Adobe moved Dehaze to the Basic panel in recent updates.
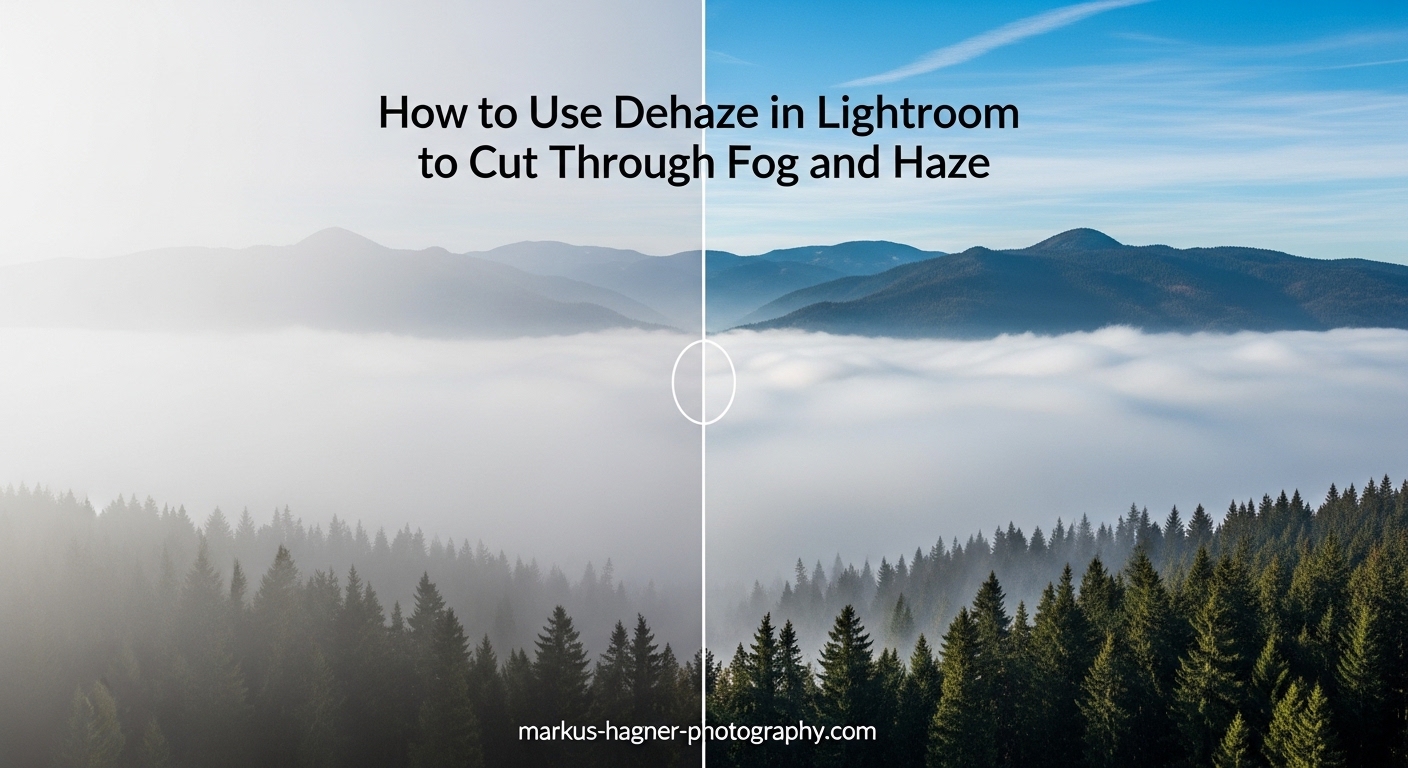
Step 3: Drag right to remove haze
To cut through fog and atmospheric haze, drag the Dehaze slider to the right into positive values. I typically start between +15 and +30 for most landscape photos. Going beyond +40 often introduces unwanted side effects like noise and color shifts, so proceed with caution as you approach higher values.
Step 4: Drag left to add haze for creative effects
Negative Dehaze values add atmospheric haze to your image, which can create beautiful, moody effects. Try settings between -15 and -35 for a subtle misty atmosphere, or push further for a dreamy, ethereal look. This technique works beautifully for sunrise shots, forest scenes, and any image where you want to enhance the feeling of depth and atmosphere.
Step 5: Fine-tune with exposure and contrast
After applying Dehaze, your image may appear darker or show increased contrast in unwanted areas. Use the Exposure, Highlights, Shadows, and Contrast sliders to balance the overall tonality. I find that a slight exposure boost of +0.1 to +0.3 often compensates for the darkening effect of positive Dehaze values.
5 Creative Ways to Use Dehaze Beyond Basic Haze Removal
While removing atmospheric haze is the primary purpose of this tool, I have discovered several creative applications that can elevate your landscape photography editing workflow. Here are five techniques that go beyond the basics.
1. Recover Lost Sky Details
One of my favorite uses for Dehaze is bringing back detail in washed-out skies. Even on relatively clear days, distant skies often photograph as flat, pale expanses lacking the blue saturation and cloud definition you saw with your eyes. Applying a moderate Dehaze adjustment of +20 to +35 can dramatically improve sky definition without the artificial look of heavy saturation boosts.
The key here is subtlety. I create a virtual copy of my image, apply Dehaze aggressively to recover maximum sky detail, then dial it back until the effect looks natural. This approach lets me see the full potential of what Dehaze can recover before settling on a balanced final value.
2. Add Atmospheric Mood with Negative Dehaze
Dragging the Dehaze slider into negative territory adds haze rather than removing it, which opens up creative possibilities for mood enhancement. I use this technique for forest scenes, morning landscapes, and any situation where I want to convey a sense of mystery or tranquility.
For a subtle misty effect, try -10 to -25. For more dramatic atmospheric perspective, push to -40 or beyond. The beauty of negative Dehaze is that it creates natural-looking haze that respects the existing luminosity of your image, unlike simply reducing contrast which can flatten the entire photo.
3. Enhance Northern Lights and Astrophotography
Astrophotographers have discovered that Dehaze is remarkably effective for enhancing northern lights and Milky Way shots. Atmospheric haze and light pollution often wash out the subtle colors and details in night sky images. A Dehaze adjustment of +20 to +40 can cut through this interference and reveal hidden stars, aurora structures, and nebula details.
I have used this technique on aurora photos from Iceland and Norway with impressive results. The key is to apply Dehaze early in your workflow, then adjust white balance and saturation afterward, as Dehaze will shift colors in night sky images.
4. Improve Black and White Conversions
Dehaze can dramatically improve black and white landscape conversions by increasing tonal separation in atmospheric conditions. When converting a hazy landscape to black and white, the lack of color information often makes the haze even more apparent as flat, muddy grays.
Apply Dehaze before or during your black and white conversion to restore contrast and detail. I find that Dehaze values of +25 to +50 work well for monochrome landscapes, as the absence of color makes higher values less likely to produce unnatural looks.
5. Use Dehaze with Local Adjustments
Applying Dehaze through the Graduated Filter, Radial Filter, or Adjustment Brush gives you precise control over where the effect appears. This technique is essential when you want to cut through haze in a distant mountain range while preserving atmospheric perspective in the foreground.
To use Dehaze locally, select your preferred adjustment tool from the toolbar, check the Dehaze box in the adjustment panel, and paint or draw your selection. I often use a graduated filter across the sky with positive Dehaze values while keeping the foreground untouched, creating a natural progression from clear distant elements to the original atmospheric conditions in closer areas.
Dehaze vs Clarity vs Texture: When to Use Each Tool
Understanding the differences between Dehaze, Clarity, and Texture helps you choose the right tool for each editing situation. While all three affect contrast, they target different frequency ranges and produce distinct results.
Texture works on high-frequency details like skin pores, fabric textures, and fine landscape elements. It increases local contrast in small areas without significantly affecting the overall image. Use Texture when you want to enhance or soften fine details without changing the broader tonal relationships.
Clarity targets mid-frequency contrast, affecting the medium-sized details and edges throughout your image. It adds punch and presence but can create an HDR-like look when overused. Clarity is excellent for adding overall impact to landscapes, but it affects the entire image uniformly.
Dehaze focuses on low-frequency areas where atmospheric haze lives. It specifically targets the broad, gradual transitions in skies, distant landscapes, and fog. Unlike Clarity, Dehaze can both add and remove atmospheric effects, making it more versatile for landscape work.
Quick comparison:
- Texture – Fine details, skin retouching, subtle sharpening
- Clarity – Midtone punch, overall impact, presence enhancement
- Dehaze – Atmospheric haze, sky recovery, creative mood effects
For most landscape photos, I apply these tools in order: Dehaze first to address atmospheric conditions, then Texture for fine detail enhancement, and finally a touch of Clarity if the image needs additional presence. This order ensures each tool works on the appropriate frequency range without fighting the others.
Common Dehaze Problems and How to Fix Them
Through years of using Dehaze and following community discussions on Reddit and Adobe forums, I have identified the most common issues photographers encounter with this tool. Here are the problems and their solutions.
Problem: Dehaze Makes the Image Too Dark
This is probably the most common complaint. Positive Dehaze values increase contrast by deepening shadows, which can make your overall image appear darker than intended. The solution is simple: compensate with the Exposure slider. After applying Dehaze, boost exposure by +0.1 to +0.3 to restore overall brightness. You may also need to lift shadows slightly using the Shadows slider.
Problem: Color Shifts and Unwanted Casts
Dehaze can introduce color casts, often appearing as blue or magenta tints in affected areas. This happens because Dehaze saturates colors while increasing contrast. To fix this, use the HSL panel to desaturate the affected color range slightly, or adjust the Tint slider in the Basic panel. For more precise corrections, create a local adjustment targeting the color-shifted area and adjust temperature and tint specifically for that region.
Problem: Noise and Artifacts
High Dehaze values, especially above +40, can introduce visible noise and even banding in smooth areas like skies. The best approach is prevention: keep Dehaze values moderate and combine them with other adjustments rather than relying on Dehaze alone. If noise appears, apply luminance noise reduction selectively to affected areas. Working with RAW files rather than JPEGs gives you more latitude before noise becomes problematic.
Problem: Unnatural, Overprocessed Look
The temptation to crank Dehaze to extreme values is real, but the results often look obviously edited. The key to natural-looking Dehaze is restraint. I rarely exceed +35 for haze removal. If you need more effect, consider blending multiple versions of your image in Photoshop: one with heavy Dehaze for distant elements and another with minimal adjustments for foreground subjects.
Frequently Asked Questions About Using Dehaze
How to reduce haze in landscape photography?
To reduce haze in landscape photography, use the Dehaze slider in Lightroom’s Develop module (Basic panel). Drag the slider to the right between +15 and +35 for most images. For best results, apply Dehaze after basic exposure corrections and before fine-tuning contrast. Combine Dehaze with local adjustments to target specific hazy areas while preserving foreground atmosphere.
What is the difference between clarity and dehaze in Lightroom?
Clarity increases mid-frequency contrast, adding overall punch and presence to an image. It affects medium-sized details throughout the photo. Dehaze targets low-frequency areas specifically where atmospheric haze exists, such as distant landscapes and skies. Dehaze can both remove haze (positive values) and add haze (negative values), while Clarity only increases midtone contrast. Use Dehaze for atmospheric issues and Clarity for general impact enhancement.
How to get rid of heat haze in photos?
Heat haze, caused by hot air rising from surfaces, is challenging to remove because it distorts details rather than simply reducing contrast. Lightroom’s Dehaze can help reduce the appearance of mild heat haze, typically with values between +20 and +40. However, severe heat haze that has warped details cannot be fully corrected in post-processing. The best solution is prevention: shoot during cooler times of day or use a longer lens to reduce the amount of heated air between you and your subject.
How to edit foggy pictures in Lightroom?
Editing foggy pictures in Lightroom requires a balanced approach. For fog removal, apply positive Dehaze values (+10 to +30) to cut through the mist. Adjust Contrast and Clarity to restore definition. If you want to preserve or enhance the foggy atmosphere, use negative Dehaze values (-10 to -30) or leave Dehaze at zero and only adjust Contrast and Highlights. Many photographers create two versions and blend them: one with fog removed for key subjects and one with fog preserved for atmospheric depth.
Conclusion
Learning how to use Dehaze in Lightroom has saved countless landscape photos from the reject pile for me. This powerful tool does what would otherwise require complex manual contrast adjustments, and when used with restraint, it produces natural-looking results that honor the scene you witnessed. The key is understanding that Dehaze is not a magic fix for every atmospheric condition, but rather a precise instrument for addressing specific issues related to haze, fog, and light scatter.
Start with moderate values between +15 and +30 for haze removal, always compensate for the darkening effect with exposure adjustments, and watch for color shifts in affected areas. Remember that negative Dehaze values offer creative possibilities for adding mood and atmosphere. Combine Dehaze with local adjustments for targeted effects, and use it alongside Texture and Clarity as part of a comprehensive editing workflow. With practice, you will develop an intuitive sense for when and how much Dehaze your landscape photos need.