I’ll never forget the day I discovered fungus growing inside my favorite vintage lens. There it was, spreading like tiny spider webs across the glass elements – my heart sank. I thought my beloved lens was ruined forever. But after hours of research and some careful work, I managed to bring it back to life. Today, I’m going to share everything I’ve learned about cleaning lens fungus so you can save your lenses too.
Lens fungus is every photographer’s nightmare, but it’s not necessarily a death sentence for your gear. Whether you’ve discovered fungus in an expensive modern lens or a cherished vintage find, this comprehensive guide will walk you through everything you need to know to tackle the problem safely and effectively.
What Exactly is Lens Fungus?
Before we dive into the cleaning process, let me explain what we’re dealing with. Lens fungus isn’t just dirt – it’s actually living organisms that have taken up residence inside your lens. I discovered this the hard way when I found those web-like patterns spreading across my lens elements.
Lens fungus consists of microscopic spores that are literally everywhere in our environment. They’re floating in the air, sitting on surfaces, and just waiting for the right conditions to grow. When these spores find their way inside your lens and encounter the perfect environment – darkness, humidity, and some organic material to feed on – they start to grow and spread.
The fungus appears as fine, web-like structures that can range from barely visible to extensive networks covering your lens elements. I’ve seen everything from tiny spots in the corner of a lens to complete coverage that makes the glass look cloudy. The scary part is that if left untreated, fungus can actually etch the glass coating, causing permanent damage that can’t be repaired.
What Causes Lens Fungus to Grow?
Through my experience dealing with multiple fungus-infected lenses, I’ve identified the main culprits that create the perfect storm for fungal growth:
Humidity is the #1 Enemy I live in a humid climate, and I’ve learned that moisture is the biggest factor in lens fungus development. When humidity levels rise above 60%, especially in warm conditions, fungus spores can thrive. I’ve had lenses develop fungus after just a few weeks in a damp environment.
Darkness Creates the Perfect Breeding Ground Fungus hates light – it grows best in dark conditions. This is why lenses stored in camera bags, closets, or cabinets are more susceptible. I once stored a lens in my camera bag for six months and found it covered in fungus when I finally took it out.
Organic Material Provides Food Fungus needs something to eat, and lenses provide plenty of organic material. I’ve learned that finger oils, dust particles, and even the lubricants used inside lenses can serve as food sources for fungus. This is why it’s so important to keep your lenses clean.
Poor Air Circulation Stagnant air traps moisture and creates the perfect environment for fungus. I’ve found that lenses stored in sealed containers without proper ventilation are much more likely to develop fungus.
How to Identify Lens Fungus
Before you start cleaning, you need to be sure you’re actually dealing with fungus. I’ve seen plenty of photographers mistake dust, haze, or oil for fungus. Here’s how to tell the difference:
Visual Signs of Lens Fungus
- Web-like patterns: Fungus typically appears as fine, branching structures that look like tiny spider webs or tree roots
- Cloudy patches: Advanced fungus growth can create cloudy areas on the glass
- Color variations: Fungus often appears white, gray, or sometimes slightly greenish
- Irregular shapes: Unlike dust spots, fungus forms irregular, organic patterns
How to Inspect Your Lens I’ve developed a systematic approach to checking for fungus:
- Remove the lens caps and examine both front and rear elements
- Use a bright flashlight and shine it through the lens at different angles
- Look through the lens from both ends, checking for any obstructions
- Zoom in and out (if it’s a zoom lens) to check internal elements
- Take test shots to see if the fungus affects image quality
What’s NOT Fungus I’ve learned to distinguish fungus from other common lens issues:
- Dust: Appears as small, discrete spots that don’t branch or spread
- Haze: Creates a general cloudiness without the web-like structures
- Oil: Looks like smudges or streaks, not organic patterns
- Scratches: Have sharp, defined edges unlike fungus
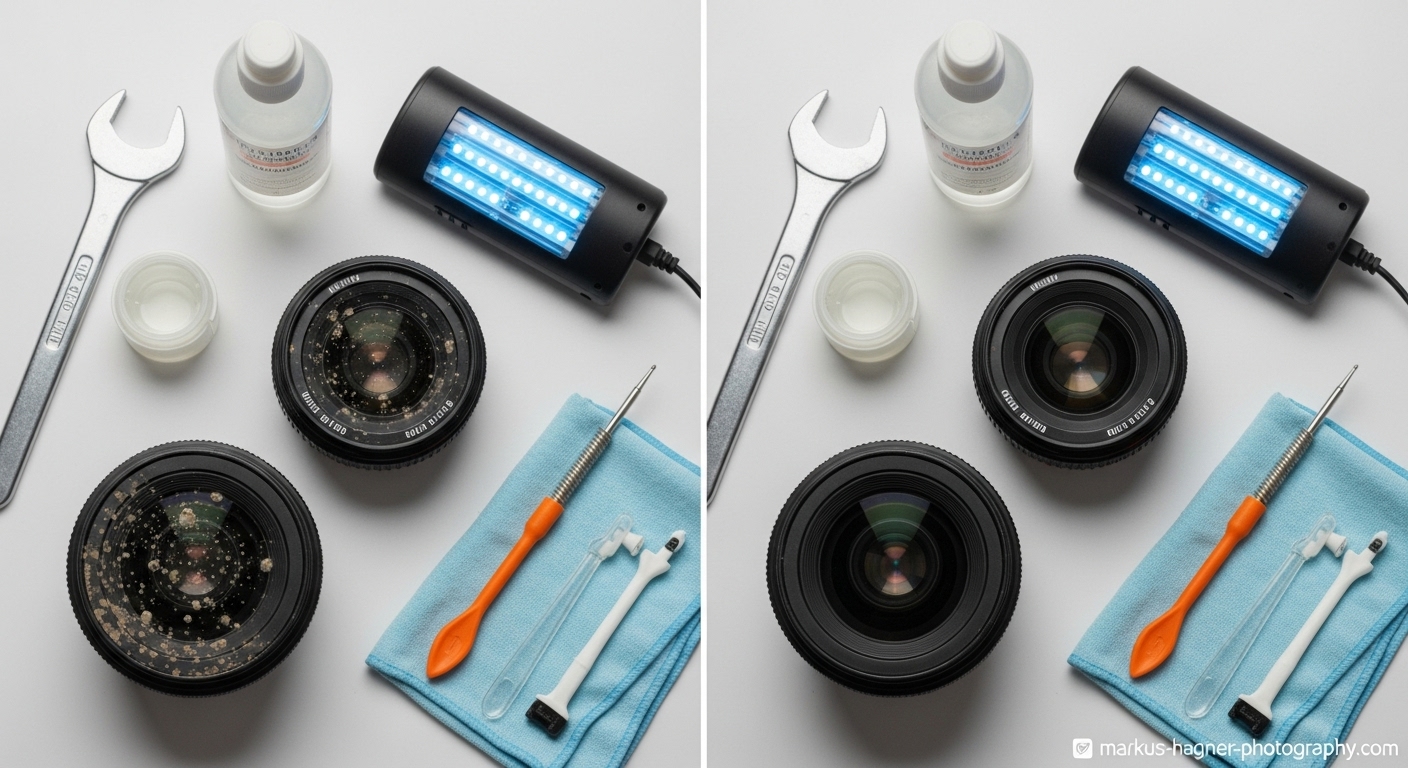
Tools and Materials You’ll Need
Based on my experience cleaning dozens of lenses, here’s what you’ll need to tackle lens fungus effectively. I’ll break this down into essential items and optional tools that can make the job easier.
Essential Tools and Materials
For Disassembly:
- Lens spanner wrench: This is non-negotiable. I learned this the hard way when I tried to use makeshift tools and damaged my lens. A good lens spanner costs about $15-20 and is worth every penny.
- JIS screwdrivers: These are different from regular Phillips screwdrivers. I ruined several screw heads before I discovered JIS (Japanese Industrial Standard) screwdrivers. They’re designed specifically for Japanese-made lenses.
- Tweezers: Fine-tipped tweezers are essential for handling small screws and components.
- Small containers: I use pill organizers or ice cube trays to keep screws and parts organized and in order.
For Cleaning:
- Hydrogen peroxide (3% solution): This is my go-to solution for most fungus cleaning jobs. The regular 3% solution you can buy at any pharmacy works perfectly.
- Household ammonia: Clear, unscented ammonia works best. I’ve found that the sudsy or scented varieties can leave residues.
- Distilled water: Tap water can leave mineral deposits, so I always use distilled water for rinsing.
- Microfiber cloths: I keep a stash of clean, lint-free microfiber cloths specifically for lens cleaning.
- Cotton swabs: Regular Q-tips work, but I prefer the professional-grade ones that don’t shed fibers.
- Lens cleaning solution: For final cleaning after fungus removal.
Safety Equipment:
- Rubber gloves: The cleaning solutions can be harsh on your skin.
- Safety glasses: Protect your eyes from splashes and debris.
- Well-ventilated area: I always work in a well-ventilated space or even outdoors when using ammonia.
Optional but Helpful Tools
For Better Results:
- UV lamp: For killing remaining spores after cleaning
- Magnifying glass or loupe: For inspecting small elements
- Compressed air: For removing dust before and after cleaning
- Anti-static brush: For gentle dust removal
- Lens cleaning pen: For final touch-ups
For Organization:
- White paper or mat: For laying out parts in order
- Labels or sticky notes: For marking the order and orientation of parts
- Camera or smartphone: For taking reference photos during disassembly
Also Read: Canon R50 vs Sony A6100
Safety First: Important Precautions
I can’t stress this enough – cleaning lens fungus involves working with chemicals and delicate equipment. I’ve learned these safety lessons through experience, and I want you to avoid the mistakes I made.
Chemical Safety The hydrogen peroxide and ammonia solution we’ll be using is effective but can be dangerous if handled improperly. Here’s what I’ve learned:
- Never mix chemicals in advance: Always mix the solution fresh when you’re ready to use it. I once mixed a batch ahead of time and found it had lost its effectiveness when I needed it.
- Work in a well-ventilated area: Ammonia fumes can be overwhelming. I prefer working outdoors or in a garage with the door open.
- Wear protective gear: Gloves and safety glasses are mandatory. I learned this after getting ammonia on my skin – it burns!
- Have neutralizing solution ready: Keep a bowl of water and baking soda nearby to neutralize any spills.
Lens Safety Your lens is a precision instrument, and one wrong move can render it useless. Here are the precautions I always take:
- Assume the lens is ruined: This mindset helps me work carefully without the pressure of potentially damaging a valuable lens.
- Take reference photos: Before disassembly, I take photos from every angle. This has saved me countless times when reassembling.
- Work on a clean, static-free surface: I use a white paper towel on my work surface to catch any small parts that might fall.
- Keep parts organized: I lay out parts in the order I remove them, with screws in small labeled containers.
- Don’t force anything: If something doesn’t want to move, there’s probably a reason. I’ve learned to stop and reassess rather than force components.
Personal Safety Beyond the chemical and lens safety, I’ve learned to protect myself in other ways:
- Take breaks: This is detailed work that requires concentration. I work in 30-minute sessions to avoid mistakes.
- Stay calm: If you get frustrated, walk away. I’ve made my worst mistakes when rushing or working while upset.
- Have good lighting: I use a bright LED lamp to see what I’m doing clearly.
- Keep pets and children away: The small parts and chemicals are dangerous for curious hands and paws.
Method 1: Hydrogen Peroxide and Ammonia Solution (Recommended for Beginners)
This is the method I use most often, and it’s the one I recommend for beginners. It’s effective, relatively safe, and has worked for me on dozens of lenses with varying degrees of fungus growth.
Step 1: Preparation
Before you start mixing solutions or taking anything apart, proper preparation is key. I’ve learned that rushing this step leads to mistakes later.
Set Up Your Workspace: I clear a large, clean table and cover it with white paper towels. This helps me see small parts and provides a clean working surface. I gather all my tools and materials within reach so I won’t have to leave the workspace once I start.
Prepare the Cleaning Solution: I mix a 50/50 solution of 3% hydrogen peroxide and household ammonia in a small glass container. I only mix what I need for the current cleaning session – usually about 2 tablespoons total. The solution should be used immediately after mixing, as it loses effectiveness over time.
Document Everything: Before I touch a single screw, I take photos of the lens from every angle. I also take notes as I disassemble, numbering parts and screws as I go. This has saved me countless headaches during reassembly.
Step 2: Lens Disassembly
This is where most people get nervous, and I understand why. Taking apart a lens feels intimidating, but with patience and care, it’s completely doable.
Remove External Components: I start by removing any external components – lens caps, hoods, filters, and any removable rings. I place these aside in the order I remove them.
Locate and Remove Screws: Most lenses have screws holding the various elements together. I use my JIS screwdrivers to remove these carefully, placing each screw in a labeled container. I take photos as I go so I know exactly where each screw came from.
Separate Lens Elements: Once the screws are removed, I can usually separate the lens elements. I work slowly and gently, noting the orientation and order of each element. Some elements may be held in place with retaining rings that require the lens spanner to remove.
Label Everything: As I remove each element, I place it on my white paper towel in the order it was removed. I use sticky notes to label elements and mark their orientation. This attention to detail has saved me from putting elements back backward or in the wrong order.
Step 3: Cleaning the Fungus
Now comes the actual cleaning process. This is where patience and gentle technique really pay off.
Apply the Solution: I dip a cotton swab into the hydrogen peroxide/ammonia solution and gently apply it to the fungus-affected areas. I let it sit for about 2-3 minutes – I’ve found this is the perfect amount of time for the solution to break down the fungus without damaging the lens coatings.
Gentle Cleaning: After letting the solution work, I use a fresh cotton swab to gently wipe away the fungus. I use a circular motion, starting from the center and working outward. I’ve learned that applying too much pressure can scratch the coatings, so I use a very light touch.
Repeat if Necessary: For stubborn fungus, I may need to repeat the process. I’ve had lenses that required two or three applications to completely remove all traces of fungus. I never scrub harder – I just apply more solution and wait longer.
Rinse Thoroughly: Once the fungus is removed, I rinse the element thoroughly with distilled water. I use a clean cotton swab dipped in distilled water to remove any remaining cleaning solution. This step is crucial – any residue left behind can affect image quality.
Step 4: Drying and Reassembly
With the cleaning complete, it’s time to dry everything and put the lens back together.
Air Dry Completely: I let all cleaned elements air dry completely on a clean, lint-free cloth. I never use compressed air or heat to speed up the drying process, as this can cause water spots or damage to coatings.
Final Cleaning: Once dry, I give each element a final cleaning with a proper lens cleaning solution and microfiber cloth. This removes any remaining streaks or fingerprints.
Reassembly in Reverse Order: I reassemble the lens in the exact reverse order of disassembly, referring to my photos and notes frequently. I take my time with this step, ensuring each element is properly seated before moving to the next.
Test the Lens: Before declaring victory, I mount the lens on my camera and take some test shots. I check for sharpness, clarity, and any signs of remaining fungus or cleaning residue.
Method 2: Muriatic Acid Treatment (For Severe Cases)
I only recommend this method for severe fungus growth that doesn’t respond to the hydrogen peroxide method. It’s more aggressive and carries higher risks, but I’ve used it successfully on lenses that seemed beyond hope.
When to Use This Method
I reserve the muriatic acid method for:
- Lenses with extensive, deeply etched fungus
- Vintage lenses where the coatings are already compromised
- Situations where the lens would otherwise be unusable
Safety Precautions (Extra Important)
Muriatic acid is serious stuff, and I treat it with extreme respect:
- Work outdoors or in a very well-ventilated area
- Wear full protective gear: gloves, safety glasses, and even a respirator
- Have baking soda and water ready to neutralize any spills
- Keep children and pets far away
- Never work alone – have someone nearby in case of emergency
The Acid Treatment Process
Prepare the Acid Solution: I mix a small amount of muriatic acid with water (about 1 part acid to 10 parts water) in a glass container. I always add acid to water, never water to acid, to prevent dangerous splashing.
Apply Carefully: Using a cotton swab, I apply the acid solution directly to the fungus-affected areas. I work quickly and precisely, avoiding any contact with lens edges or metal parts.
Neutralize Immediately: After about 30 seconds, I neutralize the acid with a baking soda solution. I apply this with a fresh cotton swab, working quickly to prevent the acid from damaging the glass.
Rinse Thoroughly: I rinse the element multiple times with distilled water to ensure all traces of acid and baking soda are removed.
Complete the Process: From here, I follow the same drying and reassembly process as the hydrogen peroxide method.
Method 3: UV Light Treatment (Prevention and Mild Cases)
UV light won’t remove existing fungus, but it’s excellent for killing spores and preventing future growth. I use this method as a preventive measure and for very mild cases.
How UV Light Works
UV light damages the DNA of fungus spores, preventing them from reproducing. It won’t remove the physical traces of fungus, but it will stop it from spreading and prevent new growth.
The UV Treatment Process
Direct Sunlight Method: For a simple approach, I place the lens in direct sunlight for several hours. I rotate it periodically to ensure all areas receive exposure. I’m careful to avoid overheating, which can damage lens lubricants.
UV Lamp Method: For more controlled treatment, I use a UV-C lamp designed for sterilization. I place the lens about 6-12 inches from the lamp and expose it for 30-60 minutes per side.
Combination Approach: I often combine UV treatment with the hydrogen peroxide method. I clean the fungus first, then use UV light to kill any remaining spores and prevent regrowth.
Also Read: Tamron 50-400 vs Sony 70-300
Prevention: How to Keep Your Lenses Fungus-Free
After dealing with lens fungus several times, I’ve become obsessive about prevention. Here are the methods I use to keep my lens collection fungus-free:
Proper Storage Conditions
Control Humidity: I store my lenses in a climate-controlled environment with humidity below 50%. I use silica gel packs in my lens cases and replace them regularly. For my valuable lenses, I invested in a dry cabinet that maintains perfect humidity levels.
Ensure Good Air Circulation: I never store lenses in sealed containers for long periods. I make sure there’s some air circulation, even if it’s just opening the camera bag occasionally to let fresh air in.
Avoid Darkness: Fungus thrives in darkness, so I store my lenses where they get some ambient light. I don’t expose them to direct sunlight, but I make sure they’re not in complete darkness.
Regular Maintenance
Use Your Lenses: The best prevention is regular use. I make a point to use all my lenses regularly, even if it’s just taking a few test shots around the house. The light and air movement help prevent fungus growth.
Clean Regularly: I clean my lenses regularly, removing dust and fingerprints that can provide food for fungus. I use proper lens cleaning solution and microfiber cloths.
Inspect Frequently: I inspect my lenses every few months for any signs of fungus. Early detection makes treatment much easier and more effective.
Environmental Controls
Use Dehumidifiers: In my photography area, I run a dehumidifier to keep the overall humidity low. This creates an environment where fungus can’t thrive.
Avoid Temperature Extremes: I avoid storing lenses in areas with extreme temperature changes, as this can cause condensation inside the lens. I maintain a relatively stable temperature in my storage area.
Consider Anti-Fungal Treatments: For long-term storage, I place anti-fungal strips or pellets in my lens cases. These release chemicals that inhibit fungal growth without damaging the lenses.
Troubleshooting Common Problems
Even with careful preparation, things can go wrong. Here are some common issues I’ve encountered and how I dealt with them:
Fungus Returns After Cleaning
If fungus comes back after cleaning, it usually means:
- Not all spores were killed: I do another UV treatment to kill remaining spores
- Storage conditions are still poor: I improve humidity control and air circulation
- There’s residual organic material: I do a more thorough cleaning of the lens interior
Lens Elements Won’t Come Apart
Sometimes lens elements seem stuck together. I’ve learned:
- Apply gentle, even pressure: Never force it
- Use a hair dryer on low heat to warm the barrel slightly (never heat the glass)
- Try a rubber band for better grip on stubborn rings
- Walk away and come back later if you’re getting frustrated
Scratches or Coating Damage
If you accidentally scratch the lens or damage coatings:
- Minor scratches often don’t affect image quality
- Coating damage can sometimes be polished out with special compounds
- Consider professional repair for valuable lenses with significant damage
Lens Doesn’t Work After Reassembly
If the lens doesn’t function properly after cleaning:
- Check for misaligned elements: Refer to your disassembly photos
- Ensure all screws are properly tightened but not overtightened
- Look for pinched wires in autofocus lenses
- Consider professional help if you can’t identify the problem
When to Seek Professional Help
As much as I encourage DIY lens cleaning, there are times when it’s better to seek professional help. I’ve learned to recognize these situations:
Expensive Modern Lenses
For expensive autofocus lenses, especially those with electronics and image stabilization, I recommend professional cleaning. The risk of damaging complex electronics is too high for most DIY attempts.
Lenses Under Warranty
If your lens is still under warranty, attempting DIY cleaning will void it. I always check warranty status before attempting any cleaning.
Complex Internal Mechanisms
Some lenses have incredibly complex internal mechanisms. If you’re not comfortable with the level of disassembly required, it’s better to leave it to the professionals.
Lack of Confidence
If you’re not confident in your ability to disassemble and reassemble the lens correctly, it’s better to seek professional help. The cost of professional cleaning is often less than the cost of replacing a damaged lens.
Cost-Benefit Analysis
Before attempting lens fungus cleaning, I always consider whether it’s worth the effort and risk:
When DIY Makes Sense
- Vintage lenses with sentimental value but low monetary value
- Inexpensive lenses where professional cleaning costs more than replacement
- Learning experience if you’re interested in lens repair
- Emergency situations where professional help isn’t available
When Professional Cleaning is Better
- High-value lenses where mistakes would be costly
- Complex lenses with electronics or special coatings
- Lenses under warranty
- When you lack the proper tools or confidence
My Personal Success Stories
I’ve successfully cleaned dozens of lenses with fungus, and each one taught me something new. Here are a few memorable examples:
The Vintage 50mm That Saved My Portfolio
I found a beautiful vintage 50mm lens at a flea market for $20. It had severe fungus covering most of the elements. Using the hydrogen peroxide method, I spent an entire afternoon carefully cleaning it. The result? A stunning lens that produces some of my favorite portfolio images. That $20 investment plus my time has paid for itself many times over.
The Zoom Lens I Almost Gave Up On
A telephoto zoom lens developed fungus after being stored in a damp basement. The fungus was so bad I could barely see through it. I tried the hydrogen peroxide method twice with limited success. Finally, I used the muriatic acid method (with extreme caution), and while it didn’t remove 100% of the fungus, it made the lens usable again. The images have a slight softness that actually adds character to my photos.
The Prevention Success Story
After dealing with several fungus-infected lenses, I invested in a dry cabinet and changed my storage habits. That was three years ago, and I haven’t had a single case of fungus since. The prevention methods really do work!
Frequently Asked Questions
Can I clean lens fungus without disassembling the lens?
Unfortunately, no. Fungus grows on internal lens elements, and you need to access those surfaces to clean them properly. I’ve seen people try various external methods, but they simply don’t work. The fungus will continue to grow and potentially cause permanent damage.
Will cleaning fungus damage my lens coatings?
If done properly, no. The hydrogen peroxide and ammonia method is generally safe for modern lens coatings. However, the muriatic acid method can damage coatings, which is why I reserve it for severe cases or vintage lenses where the coatings are already compromised.
How long does the cleaning process take?
For a simple prime lens, I usually budget 2-3 hours for the complete process. Complex zoom lenses can take 4-6 hours or more. I always allow plenty of time and never rush the process.
Can I use regular household cleaners instead of the recommended solutions?
I strongly advise against this. Regular household cleaners can damage lens coatings and leave residues that affect image quality. The hydrogen peroxide and ammonia solution I recommend is specifically formulated to break down fungus without harming lens coatings.
Is it worth cleaning fungus from inexpensive lenses?
It depends on the lens’s value to you. I’ve cleaned $20 vintage lenses that became my favorite shooting lenses. If the lens has sentimental value or unique characteristics, it’s probably worth the effort. If it’s a generic kit lens, replacement might be more cost-effective.
How can I tell if the fungus has permanently damaged my lens?
If the fungus has etched the glass, you’ll see permanent marks that remain even after cleaning. These often look like faint spider webs or cloudiness that doesn’t wipe away. Minor etching might not affect image quality noticeably, but severe etching can cause softness or haze in your photos.
Can I prevent fungus from coming back after cleaning?
Absolutely! The prevention methods I’ve outlined are very effective when followed consistently. I’ve had lenses stay fungus-free for years after proper cleaning and implementing good storage practices.
What should I do if I’m not comfortable cleaning the lens myself?
There’s no shame in seeking professional help. Look for a reputable camera repair shop with experience in lens cleaning. While it will cost more than DIY, you’ll have peace of mind knowing your lens is in expert hands.
Save This Guide for Future Reference!
I hope this comprehensive guide helps you tackle lens fungus with confidence. I’ve poured all my experience and knowledge into these steps to help you save your lenses and prevent future problems.
Before you start cleaning, make sure to:
- Assess the severity of the fungus growth
- Gather all necessary tools and materials
- Set up a clean, well-ventilated workspace
- Take reference photos before disassembly
- Have all safety equipment ready
Remember, lens fungus is a common problem that photographers have been dealing with for decades. With patience, care, and the right techniques, you can save most fungus-infected lenses and prevent future problems. The key is to act quickly when you discover fungus and to implement good prevention habits.
Have questions about lens fungus cleaning or want to share your success stories? Drop them in the comments below or contact me directly. I’d love to hear about your lens cleaning adventures and see the results you’ve achieved!
Last updated: May 2026