Getting smooth, cinematic-looking video footage can feel like a mystery when you’re just starting out. You’ve probably heard experienced videographers talk about the 180-degree shutter rule, but what does that actually mean for your camera settings? In simple terms, the 180-degree shutter rule states that your shutter speed should be set to double your frame rate for natural-looking motion blur. So if you’re shooting at 24 frames per second, your shutter speed should be 1/48th of a second (or the closest equivalent your camera offers, like 1/50th). Following this guideline gives your video that professional, film-like quality viewers expect, rather than the stuttery, choppy look that comes from incorrect settings.
Throughout this guide, I’ll walk you through everything you need to know about this essential videography concept. We’ll cover where the rule comes from, the simple formula you need to remember, practical examples for different frame rates, and even when you should deliberately break the rule for creative effect. By the end, you’ll have the confidence to set your camera correctly every time you shoot.
What Is Shutter Angle (and Why Does It Matter)
To understand the 180-degree shutter rule, we first need to talk about shutter angle, a concept that comes from the physical design of old film cameras. Traditional motion picture cameras used a rotating disc called a rotary shutter, which was literally a spinning circle with a pie-slice-shaped opening cut into it. As film moved through the camera, this disc would spin, alternately exposing the film to light and blocking it.
The size of that opening was measured in degrees, just like angles in geometry. A full circle is 360 degrees, so if the opening took up half the disc (180 degrees), the film was being exposed for exactly half the time between frames. This 180-degree opening became the standard in Hollywood because it produced motion blur that looked natural to human eyes.
Digital cameras don’t have spinning discs inside them anymore, but they still control exposure time the same way conceptually. Instead of measuring in degrees, we use shutter speed, which tells us how long the sensor is collecting light for each frame. The relationship is simple: a 180-degree shutter angle means your exposure time is half the duration between frames. That’s where the rule comes from, and why we still use this old film terminology today.
Here’s the key insight: your camera’s shutter speed setting is the digital equivalent of that physical shutter angle. When you set your shutter speed to double your frame rate, you’re essentially recreating the 180-degree shutter angle that filmmakers have used for decades. This creates the right amount of motion blur to make movement look smooth and natural rather than choppy or stuttery.
The 180-Degree Shutter Rule Explained
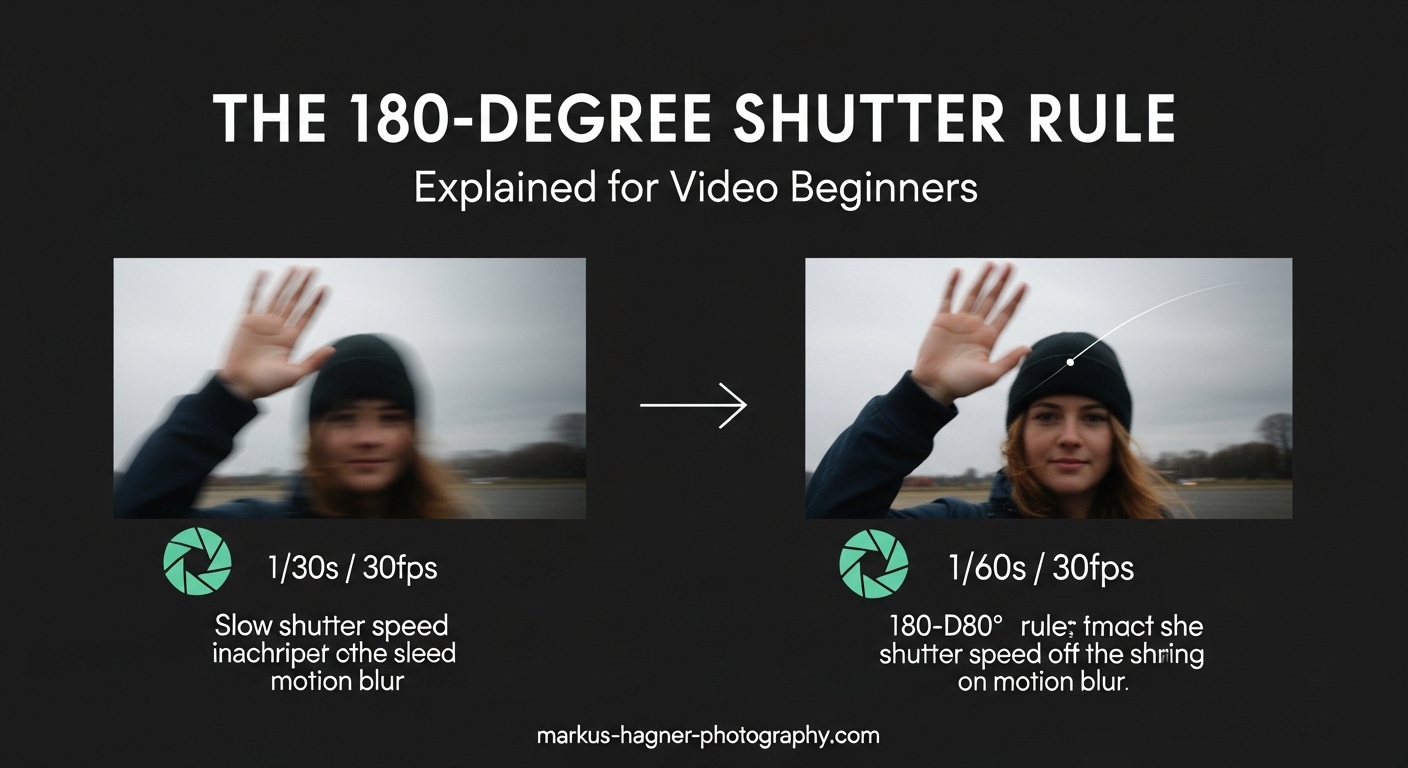
Now let’s get into the practical application. The 180-degree shutter rule gives you a simple formula to remember: Shutter Speed = 2 x Frame Rate. That’s it. Multiply your frame rate by two, and put a “1 over” in front of it to get your shutter speed. Shooting at 24fps? Your shutter speed should be 1/48th of a second. At 30fps? Use 1/60th. Recording at 60fps? Set your shutter to 1/120th.
The reason this works so well comes down to how our eyes and brains perceive motion. When an object moves across your frame, there’s a small amount of blur that happens naturally. If your shutter speed is too fast, each frame captures a razor-sharp image with almost no blur between them. When you play this back at normal speed, your brain notices the lack of blur and interprets it as stuttering or choppiness. It feels wrong, almost like watching a flipbook.
On the other hand, if your shutter speed is too slow, you get excessive motion blur that makes everything look smeary and undefined. The 180-degree rule hits the sweet spot: enough blur to smooth out the motion between frames, but not so much that you lose detail. Filmmakers call this quality “cadence,” referring to the rhythm and feel of motion in your footage.
This is why Hollywood films look so different from soap operas or cheap video productions. The cinematic look we associate with movies comes largely from this specific relationship between frame rate and shutter speed. When you follow the 180-degree rule, you’re giving your footage that same professional foundation.
One thing I should clarify: the “180” in the rule name has nothing to do with the 180-degree line rule in cinematography, which is about camera placement during dialogue scenes. They’re completely different concepts that just happen to share a number. I’ve seen plenty of beginners confuse these two, so don’t feel bad if you’ve mixed them up too.
Practical Examples for Common Frame Rates
Let’s look at the specific settings you’ll use for different shooting scenarios. These are the most common frame rates and their corresponding 180-degree shutter speeds.
24fps (Cinematic Standard): Set your shutter speed to 1/48th of a second. Since most cameras don’t offer exactly 1/48, you’ll typically use 1/50th instead. This is the frame rate used for feature films and gives your footage that classic movie look. Use this for narrative work, documentaries, or any project where you want that cinematic feel.
30fps (Standard Video): Use 1/60th shutter speed. This frame rate is common for television, YouTube videos, and general-purpose video content. The motion will look slightly different from 24fps (some people describe it as more “video-like”), but it’s still smooth and professional when you follow the rule.
60fps (Slow Motion Potential): Set your shutter to 1/120th. You can either use this frame rate for smoother motion in standard-speed playback, or slow it down to 24fps or 30fps in editing for a 40% slow-motion effect. Either way, the 1/120th shutter speed maintains proper motion blur.
120fps (Extreme Slow Motion): Use 1/240th shutter speed. This gives you significant slow-motion capability when played back at normal speed. Great for action sports, nature footage, or dramatic moments where you want to stretch time.
Here’s a practical tip for setting up your camera: switch to manual mode or shutter priority mode so you have control over this setting. Many cameras will show your current frame rate and shutter speed in the display, so you can quickly verify you’re following the rule. Some cameras even have helpful overlays that warn you when your settings don’t match.
One challenge you’ll run into is that following the 180-degree rule might give you too much exposure in bright conditions. At 1/50th shutter speed with your aperture wide open in sunlight, your image will be completely blown out. This is where neutral density (ND) filters come in. Think of ND filters as sunglasses for your camera, they reduce the amount of light hitting your sensor without affecting color or quality, allowing you to maintain proper shutter speed even in bright environments.
When to Break the 180-Degree Shutter Rule
While the 180-degree rule is an excellent starting point, it’s not an unbreakable law. Experienced filmmakers deliberately deviate from it for specific creative or practical reasons. Understanding when and why to break the rule will expand your creative toolkit.
Fast Shutter Speeds for Action: Using a shutter speed faster than the 180-degree rule creates a staccato, jittery look with minimal motion blur. This technique was famously used in the D-Day landing sequence of “Saving Private Ryan” to make the combat feel chaotic and intense. Sports videographers sometimes use faster shutter speeds to capture crisp, freeze-frame moments where you can see every detail of an athlete’s movement. If you want your footage to feel tense, aggressive, or hyper-real, try pushing your shutter speed higher.
Slow Shutter Speeds for Dreamy Effects: Going the opposite direction with a slower shutter speed introduces more motion blur, creating a dreamy, ethereal quality. Music videos often use this technique for artistic sequences. Horror films sometimes employ it to make movement feel unsettling or otherworldly. Just be aware that too much blur can make your footage look amateurish if not done intentionally.
Low Light Situations: Sometimes practical constraints force your hand. In extremely dim conditions, you might need to slow your shutter speed below the 180-degree recommendation just to get a usable exposure. It’s a trade-off: you’ll have more motion blur than ideal, but at least you’ll have footage. Modern cameras with excellent low-light performance have reduced this problem, but it’s still something to be aware of.
Stylized Projects: Some projects simply don’t call for the traditional cinematic look. Music videos, experimental films, and certain commercial work might benefit from unconventional shutter speeds. The key is making these choices deliberately rather than accidentally. Know what “normal” looks like first, then decide to deviate for creative reasons.
Common Mistakes Beginners Make
After working with many new videographers, I’ve noticed several recurring mistakes related to shutter speed. Recognizing these will help you avoid them.
Mistake 1: Using Too Fast a Shutter Speed: This is probably the most common error. Beginners often leave their shutter speed at 1/1000 or faster because that’s what they’re used to from photography. The result is choppy, strobing footage that looks more like a slideshow than smooth video. If your footage looks jittery and unnatural, check your shutter speed first.
Mistake 2: Forgetting to Adjust When Changing Frame Rates: If you switch from shooting 24fps to 60fps but leave your shutter speed at 1/50th, you’re now effectively using a much wider shutter angle than intended. Your footage will have too much motion blur. Always recalculate your shutter speed when you change frame rates.
Mistake 3: Confusing the Two “180 Rules”: As mentioned earlier, the 180-degree shutter rule is completely different from the 180-degree line rule (which is about camera placement during scenes). I’ve seen beginners spend hours researching the wrong concept because they mixed up the terminology.
Mistake 4: Ignoring ND Filters: Shooting outdoors without ND filters forces you into impossible choices: either break the 180-degree rule with too-fast shutter speeds, or stop down your aperture so much that you lose the shallow depth of field you wanted. Investing in a good set of ND filters solves this problem entirely.
Quick Reference Chart for Common Frame Rates
Here’s a simple chart you can bookmark or screenshot for quick reference in the field:
- 24fps: 1/48 or 1/50 second
- 25fps: 1/50 second
- 30fps: 1/60 second
- 48fps: 1/96 or 1/100 second
- 50fps: 1/100 second
- 60fps: 1/120 or 1/125 second
- 120fps: 1/240 or 1/250 second
- 240fps: 1/480 or 1/500 second
Note: Your camera may not offer exact values like 1/48 or 1/96. Use the closest available setting. The slight difference won’t noticeably affect your footage.
Frequently Asked Questions
What is the 180-degree rule in videography?
The 180-degree shutter rule is a guideline stating your shutter speed should be set to double your frame rate to achieve natural-looking motion blur. For 24fps, use 1/48th shutter; for 30fps, use 1/60th; for 60fps, use 1/120th. This creates the cinematic look viewers expect from professional video.
What is the 180 rule for 24fps?
For 24fps video, the 180-degree rule recommends a shutter speed of 1/48th of a second (or 1/50th if your camera doesn’t offer 1/48). This creates the classic cinematic motion blur associated with feature films and gives your footage that professional movie look.
What should my shutter speed be for videography?
As a general rule, set your shutter speed to double your frame rate: 24fps = 1/48 or 1/50, 30fps = 1/60, 60fps = 1/120. This follows the 180-degree shutter rule and produces natural motion blur. You can deviate for creative effects or specific situations like low light or action sequences.
What are common mistakes with the 180 rule?
Common mistakes include using too fast a shutter speed (creating choppy footage), forgetting to adjust shutter when changing frame rates, confusing the 180 shutter rule with the 180-degree line rule in cinematography, and not using ND filters in bright conditions which forces you into incorrect settings.
Putting It All Together
The 180-degree shutter rule gives you a reliable foundation for shooting professional-looking video. Remember the simple formula: Shutter Speed = 2 x Frame Rate. Whether you’re shooting cinematic content at 24fps or slow-motion action at 120fps, this relationship creates the natural motion blur that makes footage feel smooth and polished.
My advice is to practice with these settings until they become second nature. Start by following the rule strictly, then experiment with breaking it once you understand the effect. The goal isn’t to memorize a rule, but to develop an intuitive sense of how shutter speed affects the look and feel of your video. Grab your camera, head outside, and shoot some test footage at different shutter speeds. Seeing the difference firsthand will teach you more than any article ever could.