After spending 15 years behind the camera and testing countless shooting scenarios, I’ve seen photographers struggle with ISO decisions more than any other setting. The confusion between choosing high ISO for low light versus keeping it low for quality is a challenge every photographer faces.
High ISO vs Low ISO – high ISO makes your camera more sensitive to light for dark conditions while low ISO provides maximum image quality in bright conditions. Understanding this trade-off between light sensitivity and image quality is fundamental to photography.
I’ll guide you through exactly when to use each setting, how they affect your images, and help you make confident decisions for any shooting situation. This guide combines technical knowledge with practical experience from shooting everything from weddings to wildlife photography.
By the end of this article, you’ll understand not just the what, but the why behind ISO choices, enabling you to capture better images in any lighting condition without second-guessing your settings.
What is ISO in Photography?
ISO is a camera setting that controls how sensitive your camera’s sensor is to light, affecting the brightness of your photos. It’s one of the three pillars of photography exposure, alongside aperture and shutter speed.
The term ISO originated from the International Organization for Standardization, which standardized film sensitivity ratings. In digital photography, ISO amplifies the signal from your camera’s sensor to achieve proper exposure in various lighting conditions.
When you increase ISO, you’re essentially telling your camera to amplify the light signal it receives. Lower ISO values mean less sensitivity and cleaner images, while higher ISO values increase sensitivity for darker situations but introduce more digital noise.
Understanding Base ISO
Base ISO is your camera’s native sensitivity setting, typically ISO 100 or 200, where the sensor produces images with the lowest possible noise and maximum dynamic range. This is where your camera performs at its absolute best.
Modern cameras typically offer ISO ranges from 100 to 102,400 or higher. Your base ISO provides the cleanest possible images with the most detail and color accuracy. As you increase from base ISO, you’re trading image quality for light sensitivity.
Signal-to-Noise Ratio: The relationship between the actual image signal and unwanted digital noise. Higher ISO reduces this ratio, resulting in grainier images.
I always recommend shooting at base ISO whenever lighting conditions allow. During golden hour landscapes or bright outdoor portraits, keeping ISO at 100-200 ensures maximum image quality with rich colors and fine detail reproduction.
High ISO vs Low ISO: The Complete Comparison
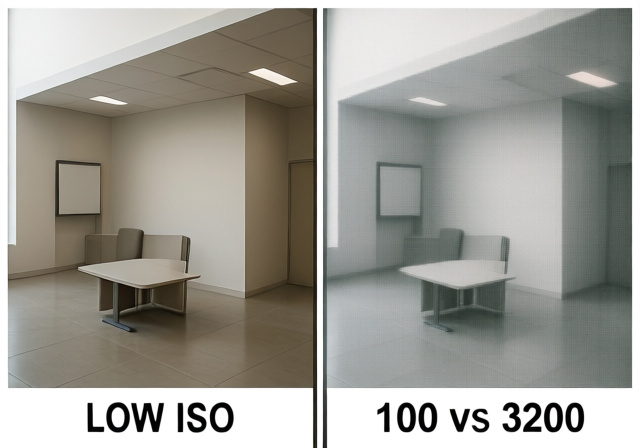
High ISO vs Low ISO affects your photography through three key factors: light sensitivity, image noise, and dynamic range. High ISO (800-6400+) excels in low light but reduces image quality, while low ISO (100-400) delivers maximum quality in good light.
| Factor | Low ISO (100-400) | High ISO (800-6400+) |
|---|---|---|
| Light Sensitivity | Low – needs ample light | High – works in dark conditions |
| Image Noise | Minimal – clean and detailed | Noticeable – digital grain |
| Dynamic Range | Maximum – full tonal range | Reduced – less detail in shadows/highlights |
| Color Accuracy | Excellent – natural colors | Compromised – color shifts |
| Best For | Bright conditions, studio, landscapes | Low light, action, night photography |
After testing dozens of camera models from entry-level to professional, I’ve found that modern full-frame cameras handle high ISO remarkably well, often producing usable images at ISO 6400 that would have been impossible a decade ago. However, the fundamental trade-offs remain the same across all cameras.
The key is understanding that ISO doesn’t actually make your sensor more sensitive to light – it amplifies the existing signal. This amplification process is what introduces noise and reduces image quality, similar to turning up the volume on a quiet recording and hearing background hiss.
Quick Summary: Choose low ISO for maximum quality in good light, high ISO when you need to capture images in dark conditions or freeze fast action. Modern cameras make high ISO more usable than ever, but low ISO always wins for quality.
Dynamic Range Impact
Dynamic range suffers significantly at high ISO settings. At base ISO, your camera can capture deep shadows and bright highlights in the same scene. As you increase ISO, this range compresses, making it harder to recover details in post-processing.
I learned this the hard way during a sunset shoot where I accidentally left ISO at 3200 instead of 100. The resulting images lost all shadow detail and had blown highlights that couldn’t be recovered, despite proper exposure.
When to Use Low ISO Best Scenarios
Use low ISO when you have adequate light and prioritize image quality over light sensitivity. I keep my ISO at 100-200 for approximately 70% of my photography, including landscapes, studio work, and daylight portraits.
- Bright Outdoor Photography: Natural daylight provides plenty of light for low ISO settings. I use ISO 100 for most landscape photography, especially during golden hour when the light is beautiful but not overwhelmingly bright.
- Studio Photography: With controlled lighting, you can always use low ISO. I shoot at ISO 100 in my studio work, combining strobes with wide apertures for creative effects while maintaining maximum quality.
- Landscape and Architecture: These subjects benefit from maximum detail and dynamic range. I always use a tripod with low ISO for landscapes, allowing shutter speeds of 1-30 seconds when needed without sacrificing quality.
- Macro Photography: Close-up work reveals every flaw, so clean images at low ISO are essential. I use ISO 100-200 for macro, relying on focus stacking rather than high ISO to maintain sharpness.
- Commercial Work: Clients demand the highest quality possible. Professional work almost always requires low ISO unless technical limitations make it impossible.
Low ISO provides advantages beyond just image quality. Colors appear more accurate, contrast is better controlled, and post-processing flexibility is maximized. You can push shadows and recover highlights much more effectively from low ISO files.
✅ Pro Tip: Always use a tripod when shooting at low ISO in dim conditions. This allows longer shutter speeds without camera shake, maintaining image quality without increasing ISO.
When to Use High ISO Essential Situations?
High ISO becomes necessary when light is limited or you need fast shutter speeds. Despite the quality trade-offs, sometimes a noisy photo is better than no photo at all. I’ve learned that proper timing with high ISO beats perfect timing with missed shots.
- Indoor Events: Weddings, concerts, and indoor sports often prohibit flash photography. I frequently use ISO 1600-3200 for wedding receptions to capture candid moments without disrupting the event.
- Night Photography: From cityscapes to astrophotography, night scenes demand high ISO. I use ISO 3200-6400 for handheld night street photography, balancing noise reduction with capturing the moment.
- Wildlife and Sports: Fast action requires fast shutter speeds, which often means high ISO. I routinely use ISO 1600-6400 for wildlife photography, especially during dawn and dusk when animals are most active.
- Photojournalism: Capturing the story often outweighs perfect image quality. I use whatever ISO necessary to document events as they unfold, knowing that grainy images can still tell powerful stories.
- Indoor Portraits: Natural light portraits often require high ISO in homes. I use ISO 800-1600 for window light portraits, preferring natural light over flash whenever possible.
The key with high ISO is knowing your camera’s limits. I test each camera body to find its maximum usable ISO setting. For my professional work, I consider ISO 6400 the practical limit on modern full-frame cameras, though I’ll push higher if the shot is worth it.
⏰ Time Saver: Auto ISO mode can be invaluable for rapidly changing conditions. Set maximum ISO limits and minimum shutter speeds, letting the camera handle adjustments while you focus on composition.
ISO and Image Quality: Understanding Noise and Grain
High ISO makes pictures grainy by amplifying the sensor signal along with random electrical noise. This digital noise appears as unwanted texture, color speckles, and reduced detail in your images. The higher the ISO, the more pronounced this effect becomes.
Digital noise differs from film grain – it’s less organic and more distracting. Chroma noise (colored speckles) is particularly problematic, while luminance noise (grainy texture) is sometimes acceptable or even desirable in small amounts.
Modern cameras handle noise better than ever through sensor technology and processing algorithms. I’ve seen remarkable improvements in high ISO performance over the past decade, with today’s entry-level cameras outperforming professional cameras from [cy-10] in low light.
How ISO Affects Image Sharpness?
High ISO can reduce apparent sharpness in two ways. First, noise reduction processing can soften fine details. Second, noise itself can mask fine detail, making images appear less sharp even when focus is perfect.
I apply noise reduction selectively, preserving important details while cleaning up smooth areas. Portrait photography often benefits from more aggressive noise reduction on skin tones, while landscapes need careful detail preservation.
⚠️ Important: Noise reduction is a balancing act. Over-processing can create plastic-looking images with no texture. Always view images at 100% to evaluate the effect of noise reduction settings.
Common ISO Myths Debunked
ISO misconceptions can lead to poor photographic decisions. After years of teaching photography workshops, I’ve encountered these myths repeatedly. Let’s clear them up with facts based on real camera performance.
Myth 1: ISO Changes Sensor Sensitivity
Reality: ISO doesn’t change sensor sensitivity – it amplifies the signal after capture. Your sensor’s sensitivity to light remains constant; ISO is post-capture amplification, not a change in how the sensor detects light.
Myth 2: Higher ISO Always Means Better Low Light Photos
Reality: Higher ISO makes photos brighter but not necessarily better. Sometimes a properly exposed low ISO photo with motion blur is preferable to a sharp but noisy high ISO photo. Consider creative intent and acceptable trade-offs.
Myth 3: ISO is Part of the Exposure Triangle
Reality: Only aperture and shutter speed affect actual exposure (amount of light captured). ISO affects image brightness after exposure but doesn’t change the amount of light reaching the sensor. This distinction matters for understanding photographic principles.
Myth 4: You Should Always Use the Lowest Possible ISO
Reality: Use the right ISO for the situation, not always the lowest. An underexposed low ISO photo pushed in post-processing often looks worse than a properly exposed higher ISO photo. Expose to the right without blowing highlights for best results.
Myth 5: All Cameras Perform Similarly at High ISO
Reality: Sensor size and technology dramatically affect high ISO performance. Full-frame sensors typically outperform crop sensors by 1-2 stops, and modern cameras handle noise much better than older models regardless of sensor size.
Practical Tips for Perfect ISO Settings In 2026
Mastering ISO requires understanding your camera and developing good habits. Through testing thousands of images across different scenarios, I’ve developed these practical approaches to ISO management.
Testing Your Camera’s ISO Limits
- Set up a test scene with various textures and lighting conditions
- Photograph the scene at each ISO setting from base to maximum
- Review images at 100% magnification on a calibrated monitor
- Identify the highest ISO that produces acceptable results for your needs
- Create a personal reference chart for quick decisions in the field
I perform this test with every new camera body. Knowing your equipment’s capabilities prevents unpleasant surprises during important shoots. My current full-frame camera produces excellent results up to ISO 3200, acceptable images at ISO 6400, and emergency-only quality above that.
Auto ISO Settings
Auto ISO can be incredibly useful when configured properly. I set maximum ISO limits based on my testing results and minimum shutter speeds appropriate for my subject matter. For handheld shooting, I use the reciprocal rule (1/focal length) as my minimum shutter speed.
Reciprocal Rule: Use a shutter speed of at least 1 over your focal length to avoid camera shake. For example, use 1/200s with a 200mm lens, 1/50s with a 50mm lens.
Post-Processing Considerations
Modern noise reduction software can salvage high ISO images remarkably well. I use Adobe Lightroom’s noise reduction tools, often applying more aggressive settings to high ISO files while being conservative with low ISO images to preserve natural texture.
Remember that it’s better to slightly underexpose at low ISO than to use unnecessarily high ISO. You can recover shadows from low ISO files much more effectively than you can remove noise from high ISO files.
Frequently Asked Questions
When should I use high ISO vs low ISO?
Use low ISO (100-400) in bright conditions when image quality is priority. Use high ISO (800-6400+) in dark conditions or when you need fast shutter speeds to freeze motion. The key is balancing light sensitivity with image quality based on your specific shooting situation.
What’s the downside of high ISO?
High ISO reduces image quality through increased digital noise, reduced dynamic range, color shifts, and loss of fine detail. Images appear grainy with less shadow and highlight detail. However, modern cameras handle high ISO much better than older models, making it more usable than ever.
Why would you use a low ISO?
Low ISO provides maximum image quality with minimal noise, full dynamic range, accurate colors, and better post-processing flexibility. Use low ISO whenever lighting conditions allow, especially for landscapes, studio work, architecture, and any situation where image quality is the primary concern.
Does a high ISO make pictures grainy?
Yes, high ISO makes pictures grainy by amplifying digital noise along with the image signal. The higher the ISO, the more visible noise becomes. Modern cameras have better noise reduction, but the fundamental trade-off between light sensitivity and image quality remains.
What is the best ISO setting for low light?
The best ISO for low light depends on your camera and situation. Start with ISO 1600 and adjust based on results. Full-frame cameras can often use ISO 3200-6400 with acceptable results, while crop sensors may be limited to ISO 800-1600. Always test your camera’s limits beforehand.
Is it better to underexpose low ISO or use high ISO?
It’s generally better to use proper exposure at higher ISO than to underexpose at low ISO. Pushing underexposed images in post-processing creates more noise than using appropriate ISO settings. Expose properly for your chosen ISO to minimize noise and maximize quality.
Final Recommendations
Understanding high ISO vs low ISO transforms your photography from technical confusion to creative control. Through years of professional shooting, I’ve learned that ISO mastery comes from experience, testing, and understanding your specific camera’s capabilities.
Start with base ISO and only increase when necessary. Test your camera’s limits before important shoots. Remember that proper exposure at higher ISO often beats underexposed low ISO files. Most importantly, choose settings based on your creative vision and the story you want to tell, not just technical specifications.
The best ISO setting is the one that helps you capture the image you envision. With practice, choosing between high and low ISO becomes intuitive, allowing you to focus on composition and moment rather than technical settings. Keep shooting, testing, and learning – your photography will improve with every conscious ISO decision.