The holiday season brings magical displays of lights and the warm glow of candles that we all want to capture perfectly. Yet, so many of us end up with disappointing photos – blown-out lights, blurry images, or pictures that completely miss the festive atmosphere we witnessed with our own eyes.
Capturing stunning holiday lights and candle photography requires turning off your flash, using a tripod or stable surface, shooting at dusk for ambient light, using wide apertures (f/1.8-f/4) with slower shutter speeds, and mastering manual focus in low light conditions.
After spending countless holiday seasons experimenting with different techniques – starting with completely overexposed Christmas tree photos that looked like white blobs of light, I’ve learned what actually works. My journey began when I tried to capture my family’s holiday traditions, only to find that automatic mode was destroying the very ambiance I wanted to preserve.
Through years of trial and error, photographing everything from intimate candlelit dinners to massive outdoor light displays with over 500,000 bulbs, I’ve developed these 10 expert tips that will transform your holiday photography from frustrating failures to frame-worthy masterpieces.
In this comprehensive guide, you’ll discover the exact camera settings professionals use, how to solve the dreaded LED flicker problem, smartphone techniques that actually work, and creative methods to make your holiday photos stand out on social media and in family albums for years to come.
10 Expert Tips for Perfect Holiday Light Photography In 2025
1. Turn Off Your Flash – This is Non-Negotiable
Your camera’s flash is the enemy of holiday light photography. When you use flash, it overpowers the delicate ambient light from your holiday decorations and candles, creating harsh shadows and completely washing out the warm glow that makes these scenes special.
I learned this lesson the hard way during my first holiday photography attempt. My Christmas tree photos looked like someone had pointed a spotlight directly at the ornaments, with all the beautiful lights disappearing into white blobs. The flash was essentially telling my camera, “Don’t worry about those pretty lights – I’ve got this,” which was exactly wrong.
For DSLR users, simply turn your flash setting to “off” or “disabled”. On smartphones, look for the lightning bolt icon and tap it until it shows a circle with a slash through it. This forces your camera to rely on existing light, which is exactly what you want when photographing holiday lights and candles.
⚠️ Important: Never use flash when photographing holiday lights or candles. It will destroy the ambient lighting and create harsh, unnatural shadows that ruin the festive atmosphere.
2. Stabilize Your Camera – The Foundation of Sharp Holiday Photos
Camera shake is the primary reason holiday light photos turn out blurry. In low light conditions, your camera needs longer shutter speeds to capture enough light, and any movement during these longer exposures results in blurry images.
A tripod is your best friend for holiday light photography. I use a basic aluminum tripod that cost me $45, and it made more difference to my holiday photos than any lens or camera upgrade. When shooting indoors, I’ve also used stacks of books, chair backs, and even balanced my camera on a stable picture frame in a pinch.
For smartphone users, stability is equally crucial. Prop your phone against a stable surface, use a small tabletop tripod, or invest in a smartphone tripod mount. I’ve seen photographers achieve remarkable results simply by bracing their phone against a window frame or using a bean bag to stabilize it on a railing.
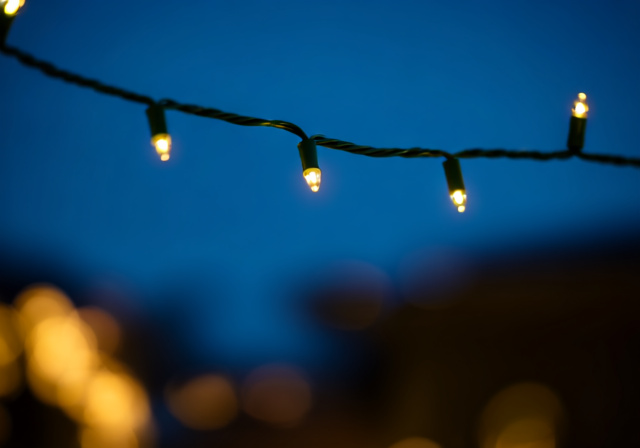
3. Master the Magic Hour – Shoot at Dusk, Not Dark
The secret to professional-looking holiday light photos isn’t shooting in complete darkness – it’s shooting during the blue hour, that magical time just after sunset when there’s still some ambient light in the sky.
My breakthrough moment came when I started photographing outdoor Christmas lights 20-30 minutes after sunset. Instead of having lights floating in a black void, I had a beautiful deep blue sky that provided context and made the lights pop. This timing creates a perfect balance between the artificial lights and natural twilight.
For indoor photography, don’t wait until complete darkness. Photograph your Christmas tree or holiday displays while there’s still some natural light coming through windows. This ambient light helps fill in the scene and prevents your photos from looking like they were taken in a cave.
The sweet spot typically lasts about 45 minutes – plan your shoot accordingly and arrive early to set up your equipment. I’ve missed countless opportunities by arriving just as darkness fell, leaving me with flat, lifeless images that lacked the depth and dimension achievable during dusk.
4. Dial In Your ISO – Start Low and Adjust as Needed
ISO determines your camera’s sensitivity to light. For holiday light photography, you want to start with the lowest possible ISO setting (usually 100 or 200) and only increase if absolutely necessary.
High ISO settings introduce digital noise – those ugly grainy spots that can ruin the magical quality of holiday lights. When I first started, I cranked my ISO to 1600 thinking it would solve my low light problems, but ended up with photos that looked like they were taken through a dirty window.
For outdoor holiday lights with a tripod: Start at ISO 100-200. Your long shutter speed will capture plenty of light.
For indoor holiday scenes without a tripod: Try ISO 400-800 first. Only go higher if your photos are consistently too dark.
For smartphone users: Many phones have automatic ISO control, but you can often manually adjust it in “pro” or “manual” mode. Start with the lowest available setting and increase gradually.
5. Open Up Your Aperture – Let the Light In
Aperture (the f-stop) controls how much light enters your camera. For holiday light photography, you generally want a wide aperture (small f-number like f/1.8, f/2.8, or f/4) to capture as much light as possible.
Wide apertures create that beautiful bokeh effect where background lights transform into soft, glowing orbs – perfect for holiday photography. When I switched from shooting at f/8 to f/2.8, my Christmas light photos went from flat to magical.
Prime lenses (those with a fixed focal length) often have wider maximum apertures than zoom lenses. A 50mm f/1.8 lens, typically costing around $125, is one of the best investments for holiday photography and general low-light shooting.
If you’re using a smartphone camera, you don’t have direct aperture control, but you can use “portrait mode” or “night mode” to simulate the effect. These modes create that beautiful background blur that makes holiday lights look dreamy and professional.
6. Perfect Your Shutter Speed – The Key to Capturing Light
Shutter speed determines how long your camera’s sensor is exposed to light. For holiday photography, you’ll need slower shutter speeds than usual – typically anywhere from 1/15 second to several seconds, depending on your situation.
With a tripod, I often use shutter speeds of 1-4 seconds for outdoor holiday light displays. This long exposure captures all the light and creates smooth, glowing images. Without stabilization, you’ll need faster shutter speeds (1/60 second or faster) to avoid camera shake.
Here’s where LED lights create a unique challenge: many LED lights flicker rapidly (usually at 60Hz), and certain shutter speeds can capture them at their dimmest moment or create strange color shifts. The solution? Use shutter speeds that are multiples of 1/60 second (1/60, 1/30, 1/15) or use very slow exposures of 1 second or longer.
LED Flicker: The rapid cycling of LED lights that can cause exposure problems and color shifts in photographs. Unlike traditional incandescent bulbs, LEDs turn on and off many times per second, creating issues with certain camera shutter speeds.
7. Master Candle Photography – A Special Challenge
Candles present unique challenges that even many experienced photographers struggle with. The light source is tiny, moves with air currents, and creates a very specific warm color temperature that cameras often misinterpret.
For candle photography, I’ve found that slightly wider apertures (f/2.0-f/3.5) work best to capture enough light from the flame. Position yourself close enough to the candles that they’re a primary light source, but not so close that you blow out the highlights in the flame itself.
The biggest mistake I see with candle photography is using automatic white balance, which tries to “correct” the warm orange glow of candles. Instead, set your white balance manually to “tungsten” or “incandescent” (around 3000K) to preserve that romantic candlelit atmosphere.
Safety first: never leave candles unattended during photography sessions. I once got so focused on getting the perfect shot that I didn’t notice a candle had burned down too close to a decorative element. Create a safe setup before you start shooting, and always have something nearby to extinguish flames if needed.
8. Switch to Manual Focus – Your Camera Can’t See in the Dark
Your camera’s autofocus system struggles in low light conditions, often hunting back and forth or focusing on the wrong thing. For holiday light photography, manual focus is your secret weapon for consistently sharp images.
Switch your camera or lens to manual focus (often marked MF on the lens barrel). Then, use your camera’s LCD screen to zoom in on your subject and adjust the focus ring until the lights are sharp. This technique gives you precise control over what’s in focus.
For smartphone users, tap on the screen where you want to focus, then lock that focus by pressing and holding until you see “AE/AF LOCK” or a similar message. This prevents your phone from constantly refocusing as you compose your shot.
When photographing Christmas trees or multiple light sources, I often focus about one-third of the way into the scene. This creates a pleasing depth of field where both foreground and background lights have a nice, soft quality while keeping key elements sharp.
9. Get Creative with Composition – Tell a Holiday Story
Technical perfection is only half the battle. Creative composition transforms technically correct holiday photos into emotionally resonant images that people will actually want to look at.
Include foreground elements to create depth. I often use holiday ornaments, wrapped gifts, or even tree branches in the foreground to frame my shots. This creates a sense of being there, rather than just documenting decorations from a distance.
Try different perspectives. Get low and shoot upward at Christmas trees to make them seem more majestic. Shoot through other decorations to create natural frames. For outdoor displays, I’ve found that shooting from a distance with a wider lens often captures more of the overall ambiance than getting too close to individual displays.
Reflections are your friend during the holidays. Wet pavement after rain or snow creates beautiful reflections of holiday lights. Windows, glass ornaments, and even puddles can double the impact of your light displays. I always carry a small spray bottle of water to create artificial reflections on surfaces when needed.
10. Shoot in RAW Format – Your Editing Safety Net
RAW format captures all the data from your camera’s sensor, giving you incredible flexibility when editing your holiday photos. While JPEG files process the image in-camera, RAW files preserve all the information, allowing you to recover details from both shadows and highlights.
The difference became obvious to me when I photographed a particularly challenging scene with both bright Christmas lights and dark interior elements. My JPEG shots either had blown-out lights or crushed shadows, but the RAW files allowed me to balance the exposure perfectly in post-processing.
For smartphone users, many newer phones offer RAW shooting capabilities in their “pro” or “professional” modes. While RAW files take up more storage space and require editing software, the ability to fine-tune your holiday photos after the fact is often worth it.
If you’re shooting in RAW, pay extra attention to your initial exposure. It’s better to slightly underexpose your holiday photos than to overexpose them. Recovering shadow details in post-processing is much easier than recovering blown-out highlights from holiday lights.
Essential Equipment for Holiday Light Photography
You don’t need thousands of dollars of equipment to capture stunning holiday photos, but having the right gear makes a significant difference. Based on my experience photographing everything from intimate candlelit dinners to massive light displays, here’s what actually matters.
Must-Have Equipment
A sturdy tripod is non-negotiable for serious holiday light photography. Even inexpensive tripods in the $30-50 range make more difference than any lens upgrade. I’ve used the same basic aluminum tripod for years, and it’s been to countless holiday displays, family gatherings, and professional shoots.
For DSLR users, a fast prime lens (50mm f/1.8 or 35mm f/1.8) is your best investment. These lenses are lightweight, affordable ($125-200), and excel in low light conditions. They create that beautiful bokeh effect that makes holiday lights look magical and dreamy.
Budget-Friendly Alternatives
If you don’t have a tripod, get creative. I’ve used stacks of books, bean bags, and even wedged my camera into stable tree branches. The key is eliminating any movement during the longer exposures required for holiday light photography.
For smartphone photographers, consider a small tripod adapter ($10-20) that lets you mount your phone on any standard tripod. This simple accessory transformed my smartphone holiday photography from shaky snapshots to sharp, professional-looking images.
Helpful Accessories
A remote shutter release or timer function eliminates camera shake when pressing the shutter button. If you don’t have a remote, use your camera’s 2-second or 10-second timer. This gives the camera time to stabilize after you press the button.
Extra batteries are crucial in cold weather. I learned this during a outdoor holiday light shoot when my battery died after just 30 minutes in 20°F weather. Keep spare batteries in an inside pocket close to your body heat, and consider battery grips for extended shooting sessions.
Camera Settings Quick Reference
Different holiday photography scenarios require different camera settings. This quick reference table will help you dial in the right configuration for your specific situation. Remember, these are starting points – adjust based on your specific conditions and creative vision.
| Scenario | Best Time | ISO | Aperture | Shutter Speed | Special Tips |
|---|---|---|---|---|---|
| Outdoor Christmas Lights | 20-30 min after sunset | 100-400 | f/2.8 – f/8 | 1-4 seconds | Use tripod, avoid LED flicker |
| Indoor Christmas Tree | Dim room light | 400-800 | f/1.8 – f/4 | 1/30 – 1 sec | Turn off room lights |
| Candle Photography | Dark room | 400-1600 | f/2 – f/3.5 | 1/60 – 1/15 | Manual focus, tungsten WB |
| Holiday Portraits | Dusk/blue hour | 200-800 | f/2.8 – f/5.6 | 1/60 – 1/125 | Use fill light or reflector |
| Smartphone – Night Mode | Any low light | Auto | Auto | Auto (1-10 seconds) | Stabilize against surface |
DSLR vs Smartphone Settings
DSLR and mirrorless cameras give you full control over all settings, which is ideal for holiday light photography. The key is understanding how ISO, aperture, and shutter speed work together to create the perfect exposure for festive lighting.
Smartphones have become surprisingly capable for holiday photography. Most modern phones have “night mode” that automatically handles longer exposures and combines multiple images for better low-light performance. For best results, use pro/manual mode if available, and always stabilize your phone somehow.
✅ Pro Tip: When photographing people with holiday lights, use a slightly slower shutter speed (1/30-1/60) and ask your subjects to hold very still. This captures both the person and the ambient lights without creating motion blur.
Troubleshooting Common Holiday Light Photography Problems (2025)
Even experienced photographers encounter challenges when shooting holiday lights. Based on forum insights and my own experience, here are solutions to the most common problems you’ll face.
LED Flicker Issues
LED lights can create strange patterns, color shifts, or partial illumination in photos due to their rapid on-off cycling. The solution is using shutter speeds that are multiples of 1/60 second or very long exposures (1 second or more). I’ve found that shutter speeds of 1/60, 1/30, 1/15, or 2+ seconds work best with most LED holiday lights.
Blurry Photos
If your holiday light photos are consistently blurry, check your shutter speed. For handheld shots, you need at least 1/60 second. With a tripod, you can use much slower speeds, but make sure everything is stable and use a remote shutter or timer to avoid camera shake when pressing the button.
Overexposed Lights
When your holiday lights appear as white blobs without detail, you’re overexposing them. Try using a smaller aperture (higher f-number), faster shutter speed, or lower ISO. I often slightly underexpose my holiday photos intentionally – it’s easier to brighten shadows in post-processing than recover blown-out highlights.
Autofocus Problems
If your camera keeps hunting for focus in low light, switch to manual focus. Use your LCD screen to zoom in on a light source and adjust the focus ring until it’s sharp. For smartphones, tap to focus and then lock that focus to prevent the phone from constantly readjusting.
Frequently Asked Questions
What camera settings should I use for Christmas lights?
Start with ISO 100-400, aperture f/2.8-f/8, and shutter speed 1-4 seconds for outdoor Christmas lights. Use a tripod and turn off your flash. Adjust based on how bright your lights are and the ambient light available.
How do you photograph candles without them being blurry?
Use a faster shutter speed (1/60 second or faster) and wider aperture (f/2-f/3.5). Increase ISO if needed, but try to stay under 1600 to avoid noise. Manual focus works best since autofocus struggles with candle flames.
What’s the best time to photograph outdoor holiday lights?
The ideal time is 20-30 minutes after sunset, during the blue hour when there’s still some ambient light in the sky. This creates depth and context instead of having lights floating in complete darkness.
How do you fix LED flicker in holiday photos?
Use shutter speeds that are multiples of 1/60 second (1/60, 1/30, 1/15) or very slow exposures of 1 second or longer. This ensures you capture LED lights at their full brightness rather than during their dim cycle.
Can you take good Christmas light photos with a smartphone?
Absolutely! Use night mode if available, stabilize your phone against a surface or small tripod, turn off flash, and tap to focus on the lights. Newer smartphones with night mode can produce excellent holiday light photos.
Why do my Christmas lights look white instead of colored?
This usually happens from overexposure. Try using a smaller aperture (higher f-number), faster shutter speed, or lower ISO. Slight underexposure preserves the color and detail in holiday lights.
Final Thoughts and Next Steps
Holiday light photography is about preserving the magic and warmth of the season in images that will bring joy for years to come. The techniques I’ve shared through countless trial and error – from blown-out Christmas tree disasters to candlelit portraits that captured exactly what I saw – will help you create photos that do justice to the beauty of holiday displays.
Remember, perfect is the enemy of good. Your first attempts might not be flawless, but each photo teaches you something about light, composition, and technique. I still review every holiday photo session to see what worked and what didn’t, and that’s how I continue improving year after year.
This holiday season, challenge yourself to try one new technique from this guide. Whether it’s shooting during the blue hour, mastering manual focus, or finally conquering that LED flicker problem, each skill you develop adds to your photography toolkit. Share your results with fellow photographers, learn from their experiences, and most importantly, enjoy the process of capturing the special glow that only happens during this magical time of year.
Happy shooting, and may your holidays be as bright and beautiful as the photos you’ll create!